Yolov8详解与实战

标签: Yolov8详解与实战
2023-03-18 03:00:12 1901浏览
文章目录
摘要
YOLOv8 是 ultralytics 公司在 2023 年 1月 10 号开源的 YOLOv5 的下一个重大更新版本,目前支持图像分类、物体检测和实例分割任务,鉴于Yolov5的良好表现,Yolov8在还没有开源时就收到了用户的广泛关注。yolov8的整体架构如下:
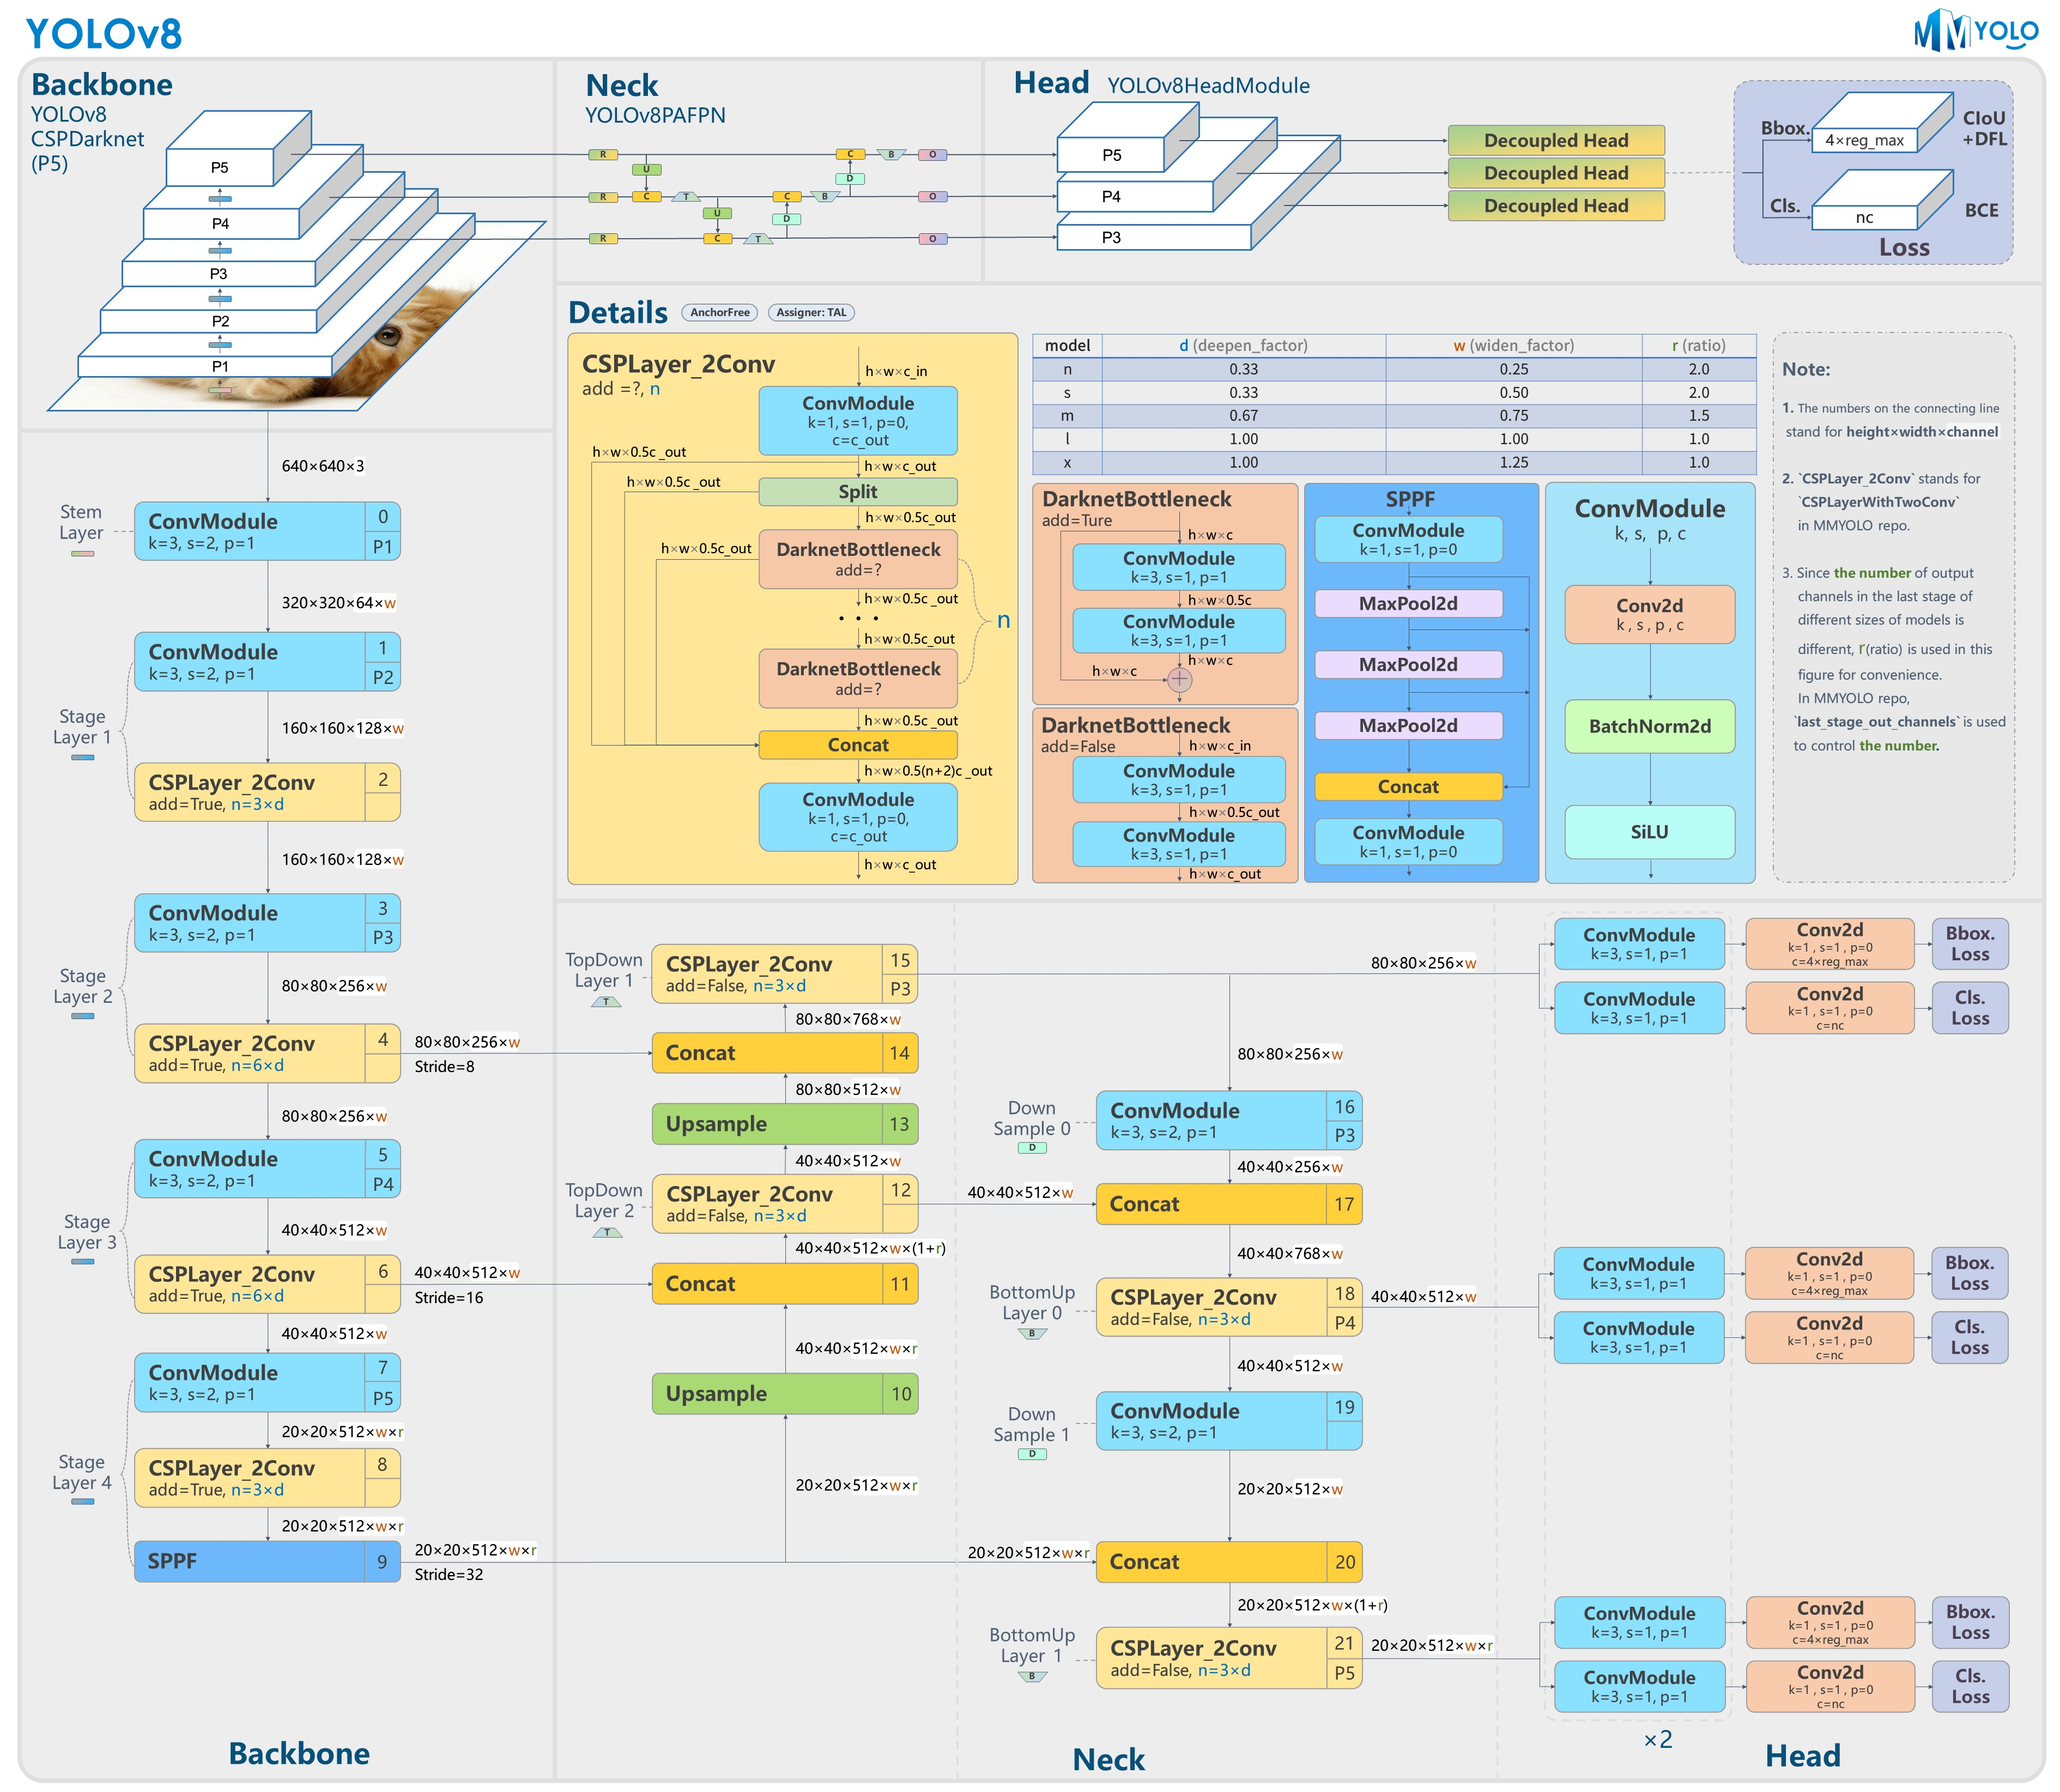
Yolov8的改进之处有以下几个地方:
- Backbone:使用的依旧是CSP的思想,将YOLOv5中的C3模块被替换成了C2f模块,实现了进一步的轻量化,同时YOLOv8依旧使用了YOLOv5等架构中使用的SPPF模块;
- PAN-FPN:YOLOv8依旧使用了PAN的思想,不同的是YOLOv8将YOLOv5中PAN-FPN上采样阶段中的卷积结构删除了,同时也将C3模块替换为了C2f模块;
- Decoupled-Head:这一点源自YOLOX;分类和回归两个任务的head不再共享参数,YoloV8也借鉴了这样的head设计。
- Anchor-Free:YOLOv8抛弃了以往的Anchor-Base,使用了Anchor-Free的思想;
- 损失函数:YOLOv8使用VFL Loss作为分类损失,使用DFL Loss+CIOU Loss作为分类损失;
- 样本匹配:YOLOv8抛弃了以往的IOU匹配或者单边比例的分配方式,而是使用了Task-Aligned Assigner匹配方式。
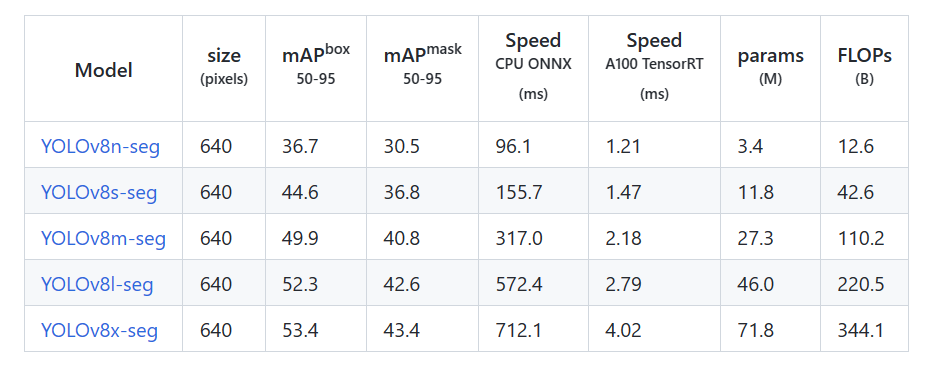
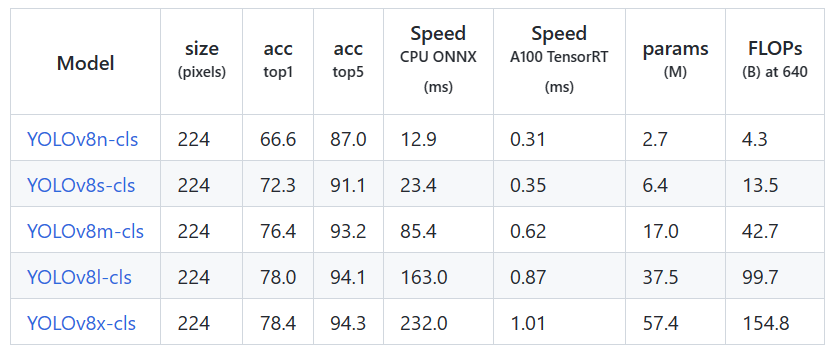
yolov8是个模型簇,从小到大包括:yolov8n、yolov8s、yolov8m、yolov8l、yolov8x等。模型参数、运行速度、参数量等详见下表:

对比yolov5,如下表:
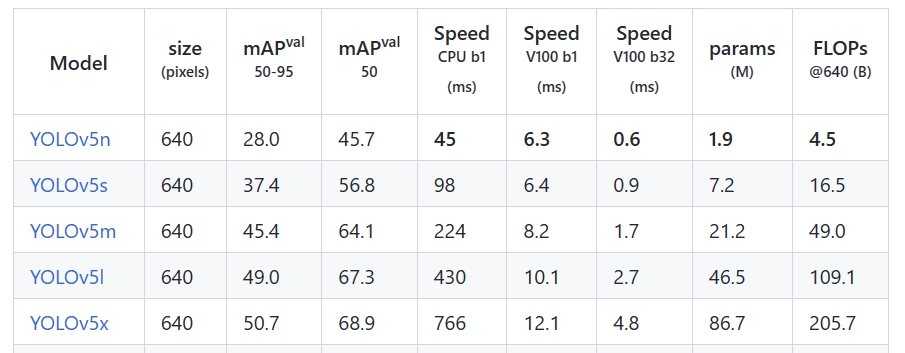
mAP和参数量都上升了不少,具体的感受还是要亲自实践一番。
这篇文章首先对YoloV8做详细的讲解,然后实现对COCO数据集的训练和测试,最后,实现自定义数据集的训练和测试。
希望能帮助到朋友们!
分割的结果
分类的结果
模型详解
C2F模块
yolov8将yolov5中的C3模块换成了C2F模型,我们先了解一下C3模块,如图:
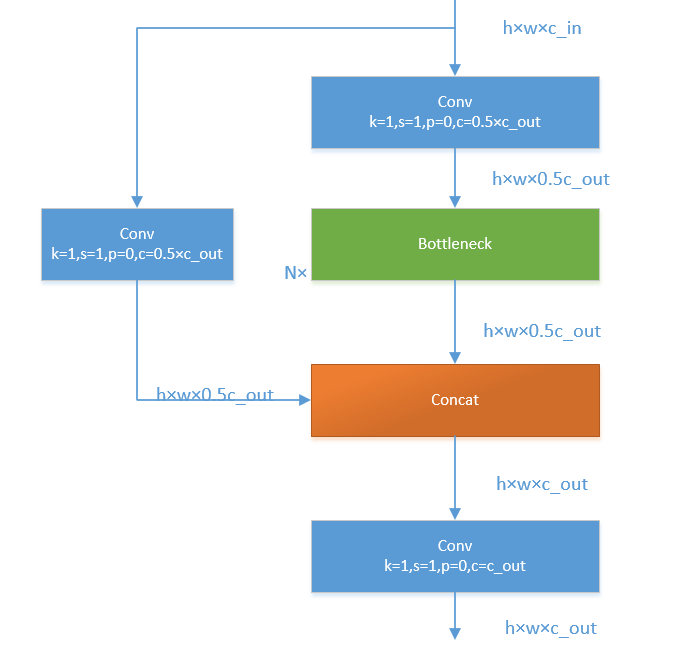
C3模块,其主要是借助CSPNet提取分流的思想,同时结合残差结构的思想,设计了所谓的C3 Block,这里的CSP主分支梯度模块为BottleNeck模块,堆叠的个数由参数n来进行控制,不同的模型,n的个数也不相同。C3的pytorch代码如下:
class C3(nn.Module):
    # CSP Bottleneck with 3 convolutions
    def __init__(self, c1, c2, n=1, shortcut=True, g=1, e=0.5):  # ch_in, ch_out, number, shortcut, groups, expansion
        super().__init__()
        c_ = int(c2 * e)  # hidden channels
        self.cv1 = Conv(c1, c_, 1, 1)
        self.cv2 = Conv(c1, c_, 1, 1)
        self.cv3 = Conv(2 * c_, c2, 1)  # optional act=FReLU(c2)
        self.m = nn.Sequential(*(Bottleneck(c_, c_, shortcut, g, k=((1, 1), (3, 3)), e=1.0) for _ in range(n)))

    def forward(self, x):
        return self.cv3(torch.cat((self.m(self.cv1(x)), self.cv2(x)), 1))
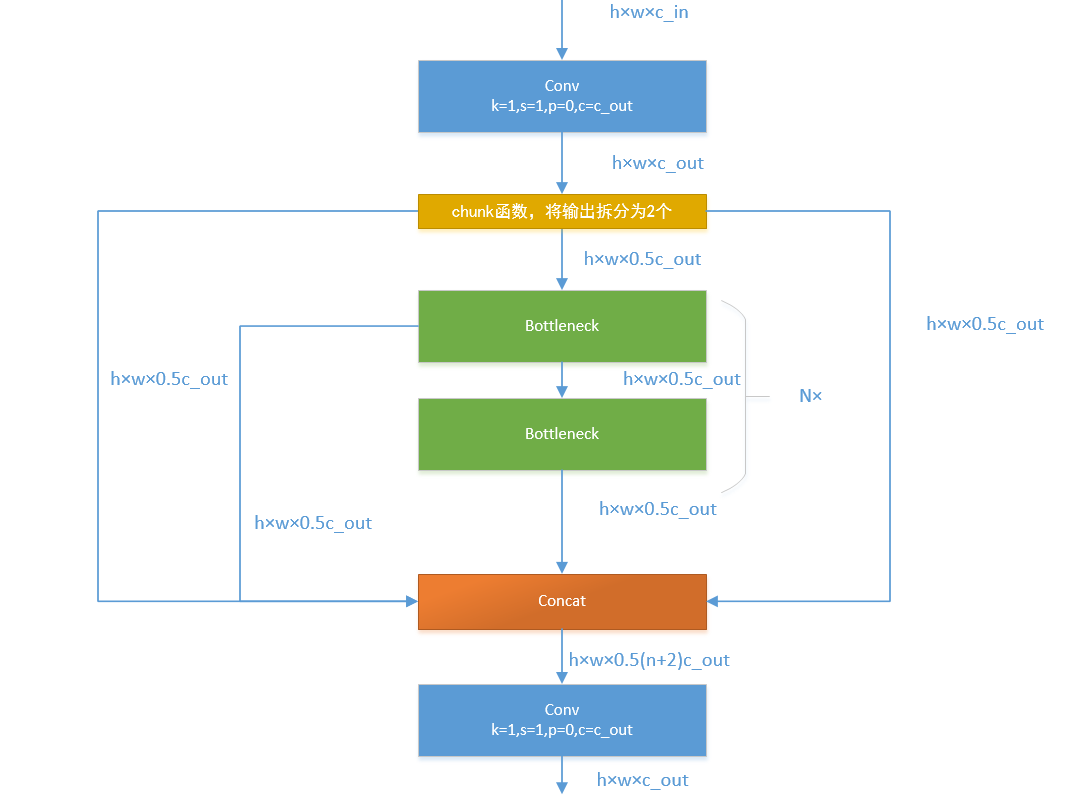
接下来,我们一起学习C2F模块,先经过一个Conv,然后使用chunk函数将out平均拆分成两个向量,然后保存到list中,将后半部分输入到Bottleneck Block里面,Bottleneck Block里面有n个Bottleneck,将每个Bottleneck的输出都追加list中,有n个,所以拼接之后的out等于0.5✖(n+2)。然后经过一个Conv输出,所以输出为h×w×c_out。如下图:
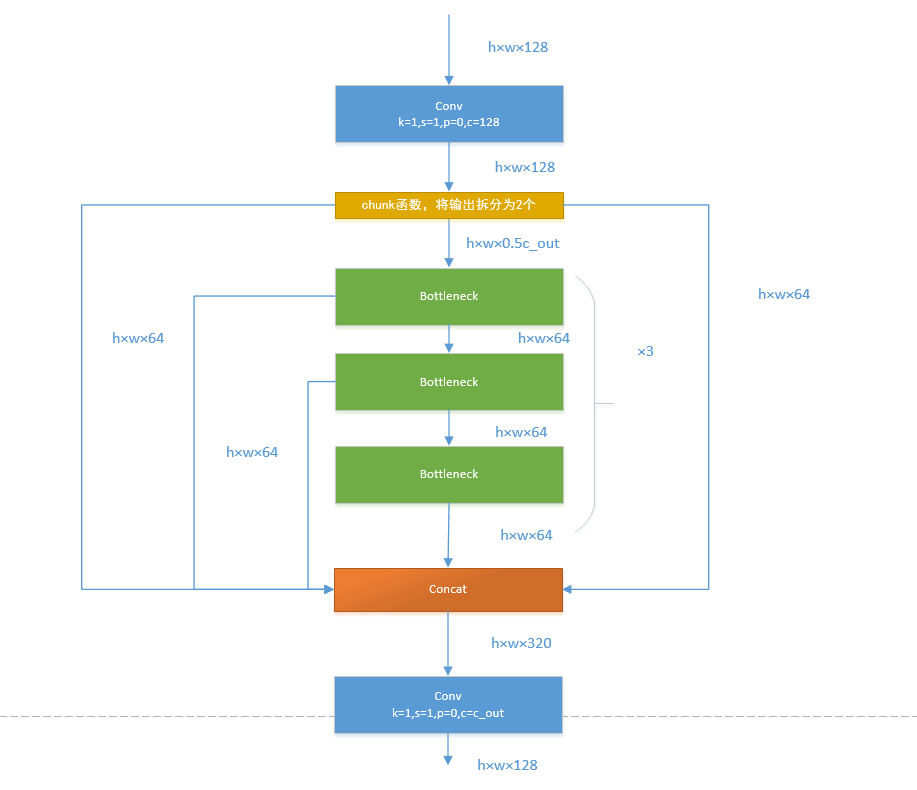
如果还是比较难懂,我将具体的数据代入图中,得出下图:
Loss
对于YOLOv8,其分类损失为VFL Loss,其回归损失为CIOU Loss+DFL的形式,这里Reg_max默认为16。
VFL主要改进是提出了非对称的加权操作,FL和QFL都是对称的。而非对称加权的思想来源于论文PISA,该论文指出首先正负样本有不平衡问题,即使在正样本中也存在不等权问题,因为mAP的计算是主正样本。

q是label,正样本时候q为bbox和gt的IoU,负样本时候q=0,当为正样本时候其实没有采用FL,而是普通的BCE,只不过多了一个自适应IoU加权,用于突出主样本。而为负样本时候就是标准的FL了。可以明显发现VFL比QFL更加简单,主要特点是正负样本非对称加权、突出正样本为主样本。
针对这里的DFL(Distribution Focal Loss),其主要是将框的位置建模成一个 general distribution,让网络快速的聚焦于和目标位置距离近的位置的分布。
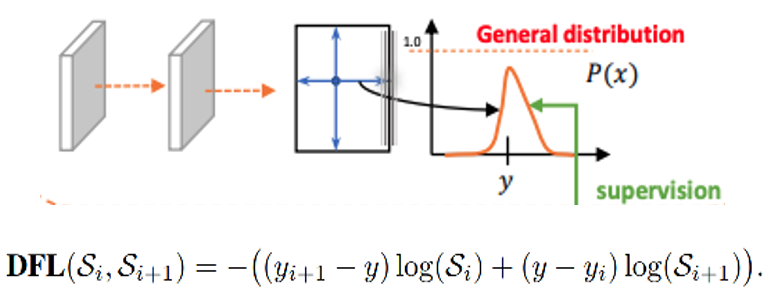
DFL 能够让网络更快地聚焦于目标 y 附近的值,增大它们的概率;
DFL的含义是以交叉熵的形式去优化与标签y最接近的一左一右2个位置的概率,从而让网络更快的聚焦到目标位置的邻近区域的分布;也就是说学出来的分布理论上是在真实浮点坐标的附近,并且以线性插值的模式得到距离左右整数坐标的权重。
head部分
相对于YOLOv5,YOLOv8将Head里面C3模块替换为了C2f,将上采样之前的1×1卷积去除了,将Backbone不同阶段输出的特征直接送入了上采样操作。通过下图对比可以看出差别:


YOLOv8则是使用了Decoupled-Head,同时由于使用了DFL 的思想,因此回归头的通道数也变成了4*reg_max的形式:

模型实战
训练COCO数据集
本次使用2017版本的COCO数据集作为例子,演示如何使用YoloV8训练和预测。
下载数据集
Images:
- 2017 Train images [118K/18GB] :http://images.cocodataset.org/zips/train2017.zip
- 2017 Val images [5K/1GB]:http://images.cocodataset.org/zips/val2017.zip
- 2017 Test images [41K/6GB]:http://images.cocodataset.org/zips/unlabeled2017.zip
Annotations:
- 2017 annotations_trainval2017 [241MB]:http://images.cocodataset.org/annotations/annotations_trainval2017.zip
COCO转yolo格式数据集(适用V4,V5,V6,V7,V8)
最初的研究论文中,COCO中有91个对象类别。然而,在2014年的第一次发布中,仅发布了80个标记和分割图像的对象类别。2014年发布之后,2017年发布了后续版本。详细的类别如下:
| ID | OBJECT (PAPER) | OBJECT (2014 REL.) | OBJECT (2017 REL.) | SUPER CATEGORY |
|---|---|---|---|---|
| 1 | person | person | person | person |
| 2 | bicycle | bicycle | bicycle | vehicle |
| 3 | car | car | car | vehicle |
| 4 | motorcycle | motorcycle | motorcycle | vehicle |
| 5 | airplane | airplane | airplane | vehicle |
| 6 | bus | bus | bus | vehicle |
| 7 | train | train | train | vehicle |
| 8 | truck | truck | truck | vehicle |
| 9 | boat | boat | boat | vehicle |
| 10 | trafficlight | traffic light | traffic light | outdoor |
| 11 | fire hydrant | fire hydrant | fire hydrant | outdoor |
| 12 | street | sign | - | - |
| 13 | stop sign | stop sign | stop sign | outdoor |
| 14 | parking meter | parking meter | parking meter | outdoor |
| 15 | bench | bench | bench | outdoor |
| 16 | bird | bird | bird | animal |
| 17 | cat | cat | cat | animal |
| 18 | dog | dog | dog | animal |
| 19 | horse | horse | horse | animal |
| 20 | sheep | sheep | sheep | animal |
| 21 | cow | cow | cow | animal |
| 22 | elephant | elephant | elephant | animal |
| 23 | bear | bear | bear | animal |
| 24 | zebra | zebra | zebra | animal |
| 25 | giraffe | giraffe | giraffe | animal |
| 26 | hat | - | - | accessory |
| 27 | backpack | backpack | backpack | accessory |
| 28 | umbrella | umbrella | umbrella | accessory |
| 29 | shoe | - | - | accessory |
| 30 | eye glasses | - | - | accessory |
| 31 | handbag | handbag | handbag | accessory |
| 32 | tie | tie | tie | accessory |
| 33 | suitcase | suitcase | suitcase | accessory |
| 34 | frisbee | frisbee | frisbee | sports |
| 35 | skis | skis | skis | sports |
| 36 | snowboard | snowboard | snowboard | sports |
| 37 | sports ball | sports ball | sports ball | sports |
| 38 | kite | kite | kite | sports |
| 39 | baseball bat | baseball bat | baseball bat | sports |
| 40 | baseball glove | baseball glove | baseball glove | sports |
| 41 | skateboard | skateboard | skateboard | sports |
| 42 | surfboard | surfboard | surfboard | sports |
| 43 | tennis racket | tennis racket | tennis racket | sports |
| 44 | bottle | bottle | bottle | kitchen |
| 45 | plate | - | - | kitchen |
| 46 | wine glass | wine glass | wine glass | kitchen |
| 47 | cup | cup | cup | kitchen |
| 48 | fork | fork | fork | kitchen |
| 49 | knife | knife | knife | kitchen |
| 50 | spoon | spoon | spoon | kitchen |
| 51 | bowl | bowl | bowl | kitchen |
| 52 | banana | banana | banana | food |
| 53 | apple | apple | apple | food |
| 54 | sandwich | sandwich | sandwich | food |
| 55 | orange | orange | orange | food |
| 56 | broccoli | broccoli | broccoli | food |
| 57 | carrot | carrot | carrot | food |
| 58 | hot dog | hot dog | hot dog | food |
| 59 | pizza | pizza | pizza | food |
| 60 | donut | donut | donut | food |
| 61 | cake | cake | cake | food |
| 62 | chair | chair | chair | furniture |
| 63 | couch | couch | couch | furniture |
| 64 | potted plant | potted plant | potted plant | furniture |
| 65 | bed | bed | bed | furniture |
| 66 | mirror | - | - | furniture |
| 67 | dining table | dining table | dining table | furniture |
| 68 | window | - | - | furniture |
| 69 | desk | - | - | furniture |
| 70 | toilet | toilet | toilet | furniture |
| 71 | door | - | - | furniture |
| 72 | tv | tv | tv | electronic |
| 73 | laptop | laptop | laptop | electronic |
| 74 | mouse | mouse | mouse | electronic |
| 75 | remote | remote | remote | electronic |
| 76 | keyboard | keyboard | keyboard | electronic |
| 77 | cell phone | cell phone | cell phone | electronic |
| 78 | microwave | microwave | microwave | appliance |
| 79 | oven | oven | oven | appliance |
| 80 | toaster | toaster | toaster | appliance |
| 81 | sink | sink | sink | appliance |
| 82 | refrigerator | refrigerator | refrigerator | appliance |
| 83 | blender | - | - | appliance |
| 84 | book | book | book | indoor |
| 85 | clock | clock | clock | indoor |
| 86 | vase | vase | vase | indoor |
| 87 | scissors | scissors | scissors | indoor |
| 88 | teddy bear | teddy bear | teddy bear | indoor |
| 89 | hair drier | hair drier | hair drier | indoor |
| 90 | toothbrush | toothbrush | toothbrush | indoor |
| 91 | hair brush | - | - | indoor |
可以看到,2014年和2017年发布的对象列表是相同的,它们是论文中最初91个对象类别中的80个对象。所以在转换的时候,要重新对类别做映射,映射函数如下:
def coco91_to_coco80_class():  # converts 80-index (val2014) to 91-index (paper)
    # https://tech.amikelive.com/node-718/what-object-categories-labels-are-in-coco-dataset/
    # a = np.loadtxt('data/coco.names', dtype='str', delimiter='\n')
    # b = np.loadtxt('data/coco_paper.names', dtype='str', delimiter='\n')
    # x1 = [list(a[i] == b).index(True) + 1 for i in range(80)]  # darknet to coco
    # x2 = [list(b[i] == a).index(True) if any(b[i] == a) else None for i in range(91)]  # coco to darknet
    x = [0, 1, 2, 3, 4, 5, 6, 7, 8, 9, 10, None, 11, 12, 13, 14, 15, 16, 17, 18, 19, 20, 21, 22, 23, None, 24, 25, None,
         None, 26, 27, 28, 29, 30, 31, 32, 33, 34, 35, 36, 37, 38, 39, None, 40, 41, 42, 43, 44, 45, 46, 47, 48, 49, 50,
         51, 52, 53, 54, 55, 56, 57, 58, 59, None, 60, None, None, 61, None, 62, 63, 64, 65, 66, 67, 68, 69, 70, 71, 72,
         None, 73, 74, 75, 76, 77, 78, 79, None]
    return x
接下来,开始格式转换,工程的目录如下:

- coco:存放解压后的数据集。
-out:保存输出结果。
-coco2yolo.py:转换脚本。
转换代码如下:
import json
import glob
import os
import shutil
from pathlib import Path
import numpy as np
from tqdm import tqdm


def make_folders(path='../out/'):
    # Create folders

    if os.path.exists(path):
        shutil.rmtree(path)  # delete output folder
    os.makedirs(path)  # make new output folder
    os.makedirs(path + os.sep + 'labels')  # make new labels folder
    os.makedirs(path + os.sep + 'images')  # make new labels folder
    return path


def convert_coco_json(json_dir='./coco/annotations_trainval2017/annotations/'):
    jsons = glob.glob(json_dir + '*.json')
    coco80 = coco91_to_coco80_class()

    # Import json
    for json_file in sorted(jsons):
        fn = 'out/labels/%s/' % Path(json_file).stem.replace('instances_', '')  # folder name
        fn_images = 'out/images/%s/' % Path(json_file).stem.replace('instances_', '')  # folder name
        os.makedirs(fn,exist_ok=True)
        os.makedirs(fn_images,exist_ok=True)
        with open(json_file) as f:
            data = json.load(f)
        print(fn)
        # Create image dict
        images = {'%g' % x['id']: x for x in data['images']}

        # Write labels file
        for x in tqdm(data['annotations'], desc='Annotations %s' % json_file):
            if x['iscrowd']:
                continue

            img = images['%g' % x['image_id']]
            h, w, f = img['height'], img['width'], img['file_name']
            file_path='coco/'+fn.split('/')[-2]+"/"+f
            # The Labelbox bounding box format is [top left x, top left y, width, height]
            box = np.array(x['bbox'], dtype=np.float64)
            box[:2] += box[2:] / 2  # xy top-left corner to center
            box[[0, 2]] /= w  # normalize x
            box[[1, 3]] /= h  # normalize y

            if (box[2] > 0.) and (box[3] > 0.):  # if w > 0 and h > 0
                with open(fn + Path(f).stem + '.txt', 'a') as file:
                    file.write('%g %.6f %.6f %.6f %.6f\n' % (coco80[x['category_id'] - 1], *box))
            file_path_t=fn_images+f
            print(file_path,file_path_t)
            shutil.copy(file_path,file_path_t)


def coco91_to_coco80_class():  # converts 80-index (val2014) to 91-index (paper)
    # https://tech.amikelive.com/node-718/what-object-categories-labels-are-in-coco-dataset/
    # a = np.loadtxt('data/coco.names', dtype='str', delimiter='\n')
    # b = np.loadtxt('data/coco_paper.names', dtype='str', delimiter='\n')
    # x1 = [list(a[i] == b).index(True) + 1 for i in range(80)]  # darknet to coco
    # x2 = [list(b[i] == a).index(True) if any(b[i] == a) else None for i in range(91)]  # coco to darknet
    x = [0, 1, 2, 3, 4, 5, 6, 7, 8, 9, 10, None, 11, 12, 13, 14, 15, 16, 17, 18, 19, 20, 21, 22, 23, None, 24, 25, None,
         None, 26, 27, 28, 29, 30, 31, 32, 33, 34, 35, 36, 37, 38, 39, None, 40, 41, 42, 43, 44, 45, 46, 47, 48, 49, 50,
         51, 52, 53, 54, 55, 56, 57, 58, 59, None, 60, None, None, 61, None, 62, 63, 64, 65, 66, 67, 68, 69, 70, 71, 72,
         None, 73, 74, 75, 76, 77, 78, 79, None]
    return x

convert_coco_json()
开始运行:

转换完成后,验证转换的结果:
import cv2
import os

def draw_box_in_single_image(image_path, txt_path):
    # 读取图像
    image = cv2.imread(image_path)

    # 读取txt文件信息
    def read_list(txt_path):
        pos = []
        with open(txt_path, 'r') as file_to_read:
            while True:
                lines = file_to_read.readline()  # 整行读取数据
                if not lines:
                    break
                # 将整行数据分割处理,如果分割符是空格,括号里就不用传入参数,如果是逗号, 则传入‘,'字符。
                p_tmp = [float(i) for i in lines.split(' ')]
                pos.append(p_tmp)  # 添加新读取的数据
                # Efield.append(E_tmp)
                pass
        return pos


    # txt转换为box
    def convert(size, box):
        xmin = (box[1]-box[3]/2.)*size[1]
        xmax = (box[1]+box[3]/2.)*size[1]
        ymin = (box[2]-box[4]/2.)*size[0]
        ymax = (box[2]+box[4]/2.)*size[0]
        box = (int(xmin), int(ymin), int(xmax), int(ymax))
        return box

    pos = read_list(txt_path)
    print(pos)
    tl = int((image.shape[0]+image.shape[1])/2)
    lf = max(tl-1,1)
    for i in range(len(pos)):
        label = str(int(pos[i][0]))
        print('label is '+label)
        box = convert(image.shape, pos[i])
        image = cv2.rectangle(image,(box[0], box[1]),(box[2],box[3]),(0,0,255),2)
        cv2.putText(image,label,(box[0],box[1]-2), 0, 1, [0,0,255], thickness=2, lineType=cv2.LINE_AA)
        pass

    if pos:
        cv2.imwrite('./Data/see_images/{}.png'.format(image_path.split('\\')[-1][:-4]), image)
    else:
        print('None')


img_folder = "./out/images/val2017"
img_list = os.listdir(img_folder)
img_list.sort()

label_folder = "./out/labels/val2017"
label_list = os.listdir(label_folder)
label_list.sort()
if not os.path.exists('./Data/see_images'):
    os.makedirs('./Data/see_images')
for i in range(len(img_list)):
    image_path = img_folder + "\\" + img_list[i]
    txt_path = label_folder + "\\" + label_list[i]
    draw_box_in_single_image(image_path, txt_path)
结果展示:

配置yolov8环境
可以直接安装requirements.txt里面所有的库文件,执行安装命令:
pip install -r requirements.txt
如果不想安装这么多库文件,在运行的时候,查看缺少哪个库,就安装哪个库,比如我的环境:
pip install thop
我的本地只缺少了这个库文件。
训练
下载代码:https://github.com/ultralytics/ultralytics,通过下载的方式可以下载到源码,这样方便修改。
也可以使用命令:
pip install ultralytics
如果仅仅是为了使用yolov8,可以使用这种方式安装。
yolov8还支持使用命令的方式,例如:
yolo predict model=yolov8n.pt source="https://ultralytics.com/images/bus.jpg"
接下来,创建训练脚本,可以使用yaml文件创建,例如:
from ultralytics import YOLO

# Load a model
model = YOLO("yolov8n.yaml")  # build a new model from scratch
模型文件在ultralytics/models/v8下面,如图:
也可以使用预训练模型创建。例如:
model = YOLO("yolov8n.pt") # load a pretrained model (recommended for training)
然后开启训练。
# Use the model
model.train(data="coco128.yaml", epochs=3)  # train the model
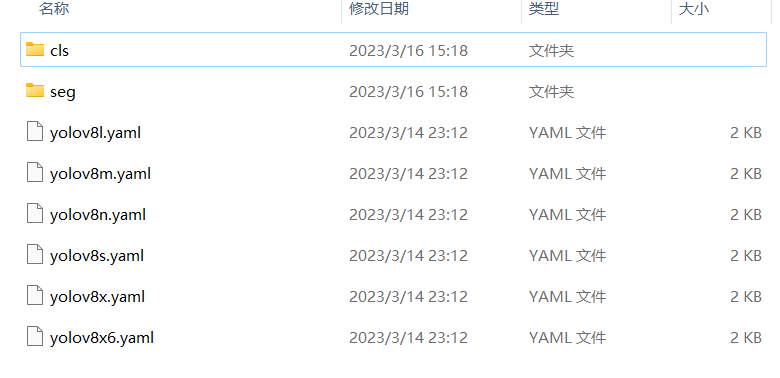
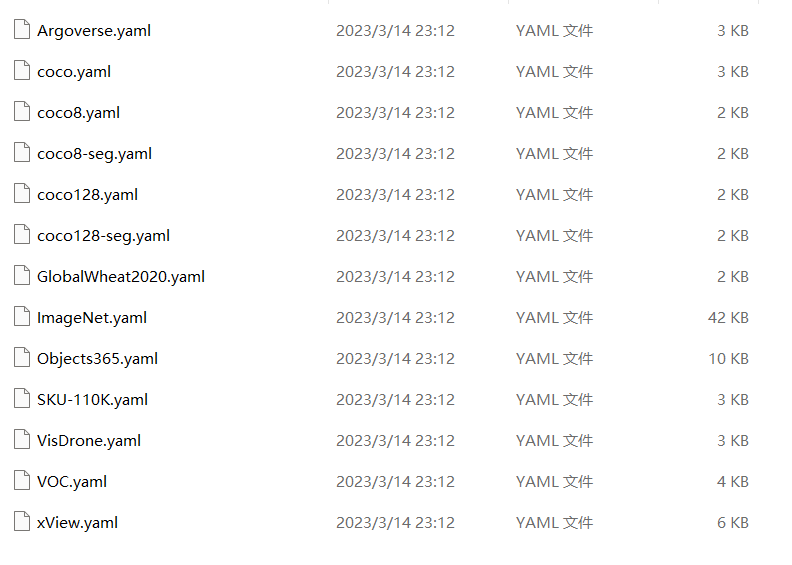
数据集的配置文件在:ultralytics/datasets/下面,如图:
是不是很简单!!!!
接下来,我们配置自己的环境。
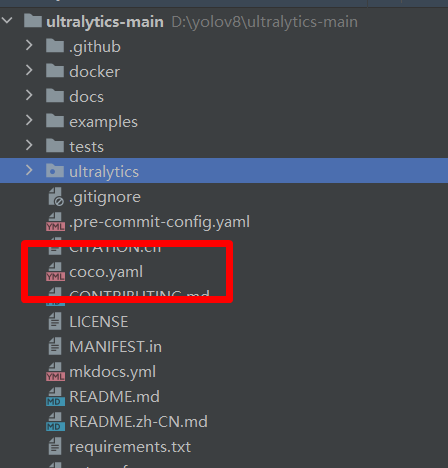
第一步 找到ultralytics/datasets/coco.yaml文件。
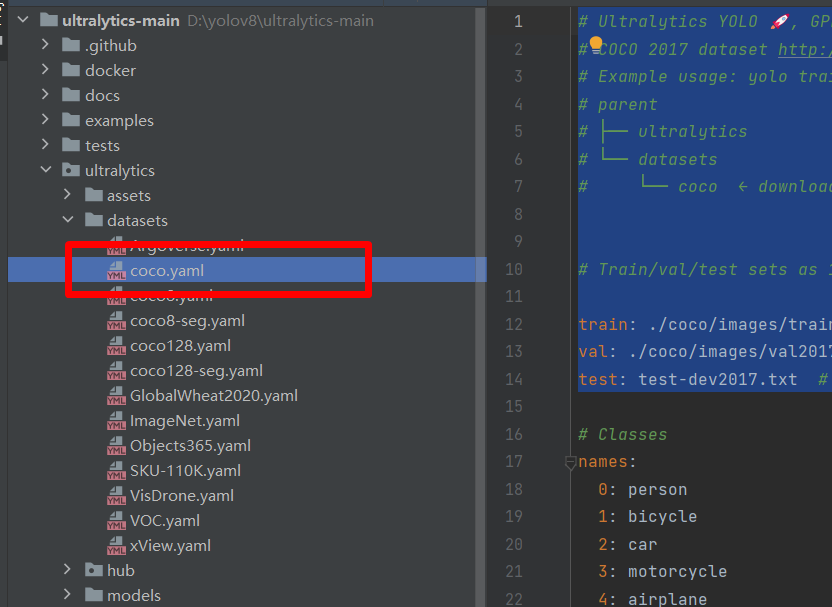
然后将其复制到根目录
将里面的路径修改为:
# Ultralytics YOLO ?, GPL-3.0 license
# COCO 2017 dataset http://cocodataset.org by Microsoft
# Example usage: yolo train data=coco.yaml
# parent
# ├── ultralytics
# └── datasets
#     └── coco  ← downloads here (20.1 GB)


# Train/val/test sets as 1) dir: path/to/imgs, 2) file: path/to/imgs.txt, or 3) list: [path/to/imgs1, path/to/imgs2, ..]

train: ./coco/images/train2017  # train images (relative to 'path') 118287 images
val: ./coco/images/val2017  # val images (relative to 'path') 5000 images
test: test-dev2017.txt  # 20288 of 40670 images, submit to https://competitions.codalab.org/competitions/20794
关于数据集的路径,大家可以自行尝试,我经过多次尝试发现,YoloV8会自行添加datasets这个文件,所以设置./coco/images/train2017,则实际路径是datasets/coco/images/train2017。
第二步 新建train.py脚本。
from ultralytics import YOLO

# 加载模型
model = YOLO("ultralytics/models/v8/yolov8n.yaml")  # 从头开始构建新模型

# Use the model
results = model.train(data="coco.yaml", epochs=3,device='3')  # 训练模型
然后,点击train.py可以运行了。
如果设置多卡,可以在device中设置,例如我使用四张卡,可以设置为:
results = model.train(data="coco.yaml", epochs=3,device='0,1,2,3') # 训练模型
第三步 修改参数,在ultralytics/yolo/cfg/default.yaml文件中查看。例如:
# Train settings -------------------------------------------------------------------------------------------------------
model:  # path to model file, i.e. yolov8n.pt, yolov8n.yaml
data:  # path to data file, i.e. coco128.yaml
epochs: 100  # number of epochs to train for
patience: 50  # epochs to wait for no observable improvement for early stopping of training
batch: 16  # number of images per batch (-1 for AutoBatch)
imgsz: 640  # size of input images as integer or w,h
save: True  # save train checkpoints and predict results
save_period: -1 # Save checkpoint every x epochs (disabled if < 1)
cache: False  # True/ram, disk or False. Use cache for data loading
device:  # device to run on, i.e. cuda device=0 or device=0,1,2,3 or device=cpu
workers: 8  # number of worker threads for data loading (per RANK if DDP)
project:  # project name
name:  # experiment name, results saved to 'project/name' directory
exist_ok: False  # whether to overwrite existing experiment
pretrained: False  # whether to use a pretrained model
optimizer: SGD  # optimizer to use, choices=['SGD', 'Adam', 'AdamW', 'RMSProp']
verbose: True  # whether to print verbose output
seed: 0  # random seed for reproducibility
deterministic: True  # whether to enable deterministic mode
single_cls: False  # train multi-class data as single-class
image_weights: False  # use weighted image selection for training
rect: False  # support rectangular training if mode='train', support rectangular evaluation if mode='val'
cos_lr: False  # use cosine learning rate scheduler
close_mosaic: 10  # disable mosaic augmentation for final 10 epochs
resume: False  # resume training from last checkpoint
上面是训练过程中常用的参数,我们调用yolo函数可以自行修改。
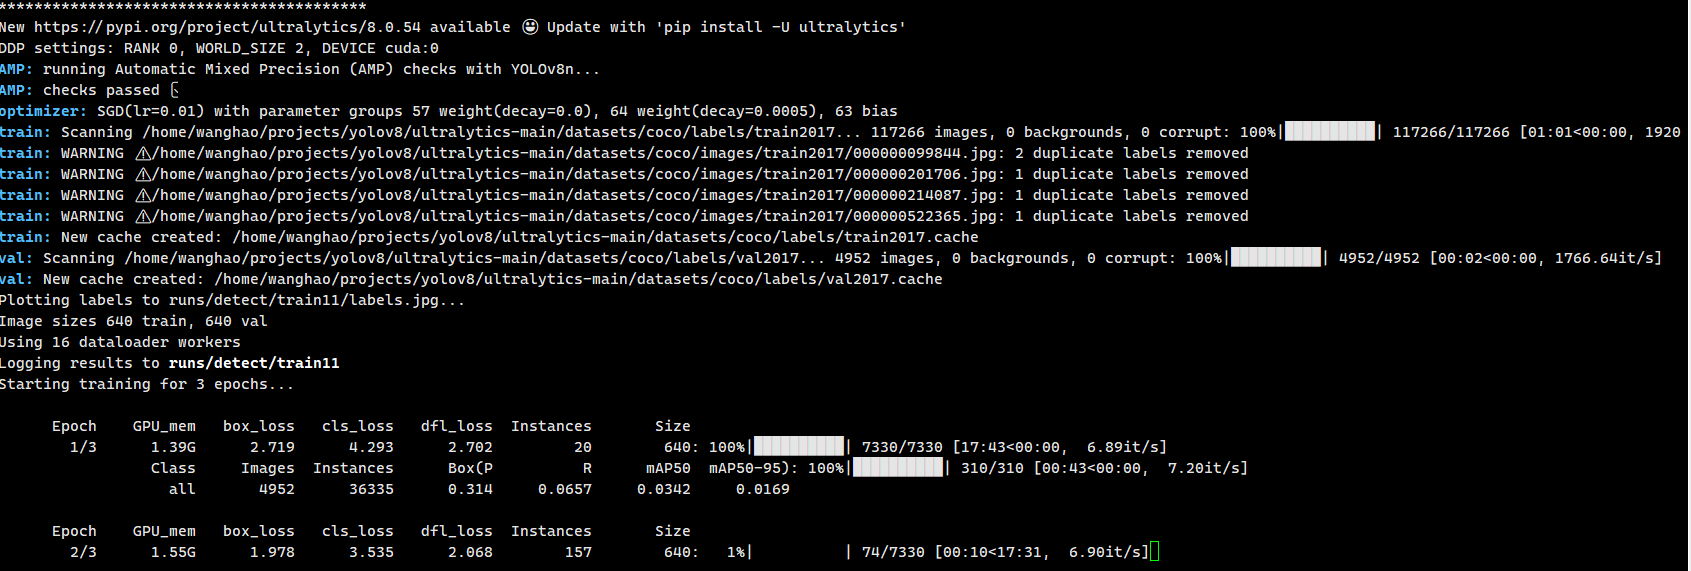
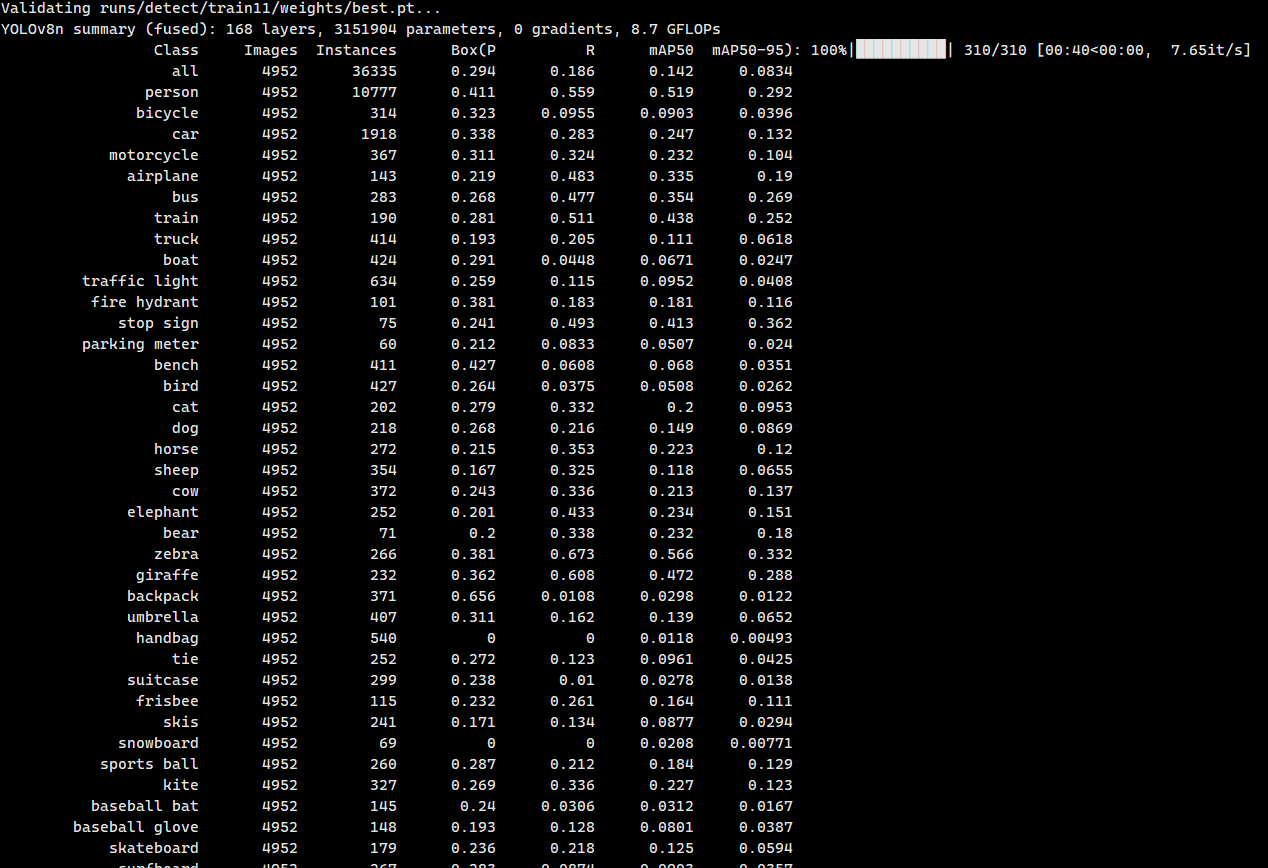
等待测试完成后,就可以看到结果,如下图:
测试
新建测试脚本test.py.
from ultralytics import YOLO
# Load a model
model = YOLO("runs/detect/train11/weights/best.pt") # load a pretrained model (recommended for training)
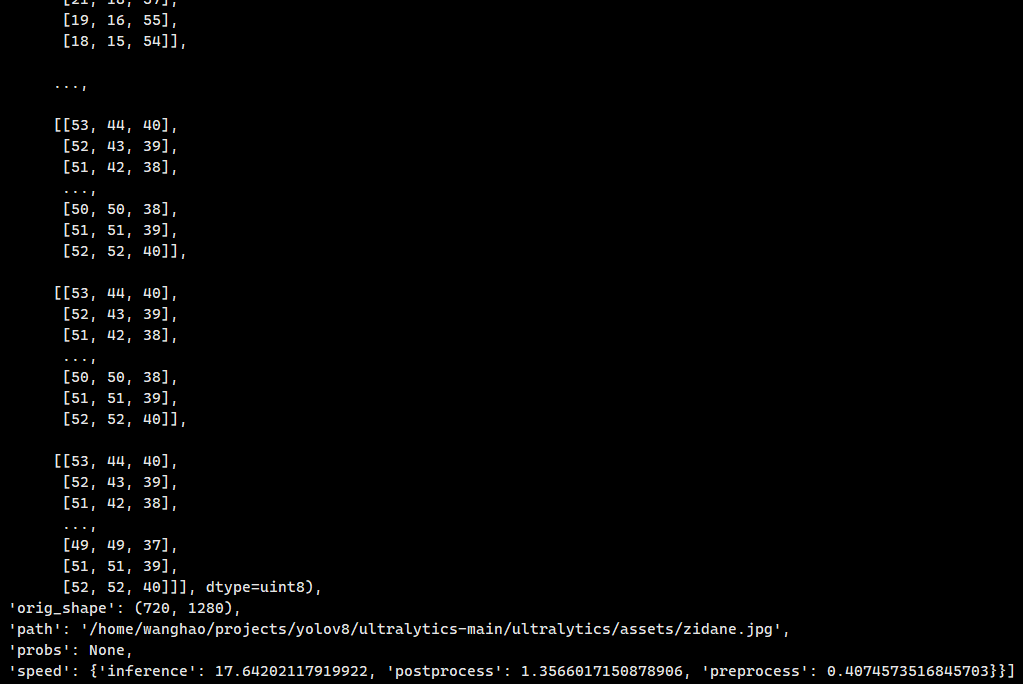
results = model.predict(source="ultralytics/assets",device='3') # predict on an image
print(results)
这个results保存了所有的结果。如下图:
predict的参数也可以在ultralytics/yolo/cfg/default.yaml文件中查看。例如:
# Prediction settings --------------------------------------------------------------------------------------------------
source:  # source directory for images or videos
show: False  # show results if possible
save_txt: False  # save results as .txt file
save_conf: False  # save results with confidence scores
save_crop: False  # save cropped images with results
hide_labels: False  # hide labels
hide_conf: False  # hide confidence scores
vid_stride: 1  # video frame-rate stride
line_thickness: 3  # bounding box thickness (pixels)
visualize: False  # visualize model features
augment: False  # apply image augmentation to prediction sources
agnostic_nms: False  # class-agnostic NMS
classes:  # filter results by class, i.e. class=0, or class=[0,2,3]
retina_masks: False  # use high-resolution segmentation masks
boxes: True  # Show boxes in segmentation predictions
训练自定义数据集
Labelme数据集
好博客就要一起分享哦!分享海报
此处可发布评论
评论(0)展开评论
展开评论
