第2章 Spring Boot Web开发技术

分类: springboot 专栏: springboot3.0新教材 标签: springboot3
2023-12-25 16:40:58 2737浏览
前期回顾
- springboot项目常见的配置文件类型有哪些?哪种类型的优先级最高
yml properties yaml
- 读取配置文件里的数据用什么注解?
@Value()
@ConfigurationProperties(prefix = )
restful风格
RESTful 风格与传统的 HTTP 请求方式相比,更加简洁,安全,能隐藏资源的访问行为,无法从访问地址得知对资源是何种操作
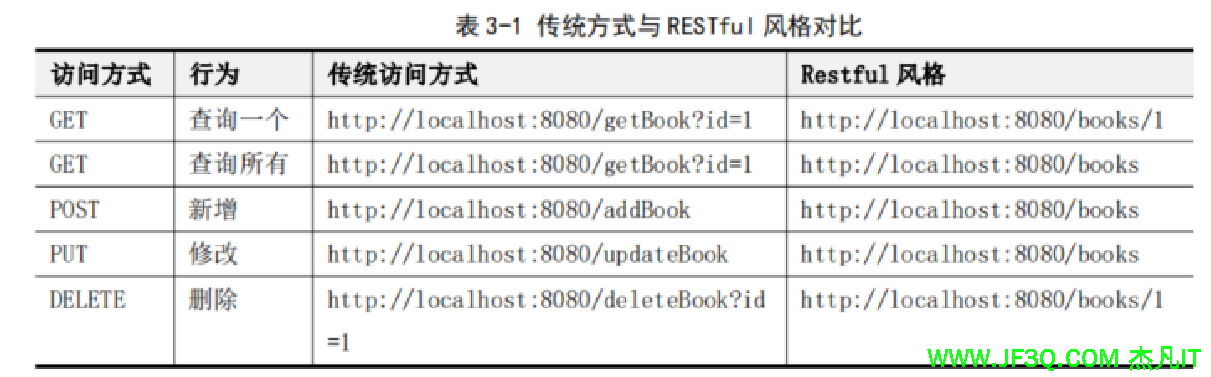
可见很多 RESTful 风格的访问地址都是一样的,只用行为动作区分了不同的访问,对外隐藏了真实的操作。此外,资源描述部分一般用复数,如 books,当然这种操作是只是一种约定,不是规范,但大多数人都这样做。
@RestController
@RequestMapping("/users")
public class UserController {

    @PostMapping
    public String addUser(@RequestBody UserInfo userInfo){
        System.out.println("新增用户信息:"+userInfo);
        return "新增用户成功";
    }
    @DeleteMapping("/{id}")
    public String del(@PathVariable Integer id){
        System.out.println("删除用户ID:"+id);
        return "删除用户成功";
    }
    @PutMapping
    public String update(@RequestBody UserInfo userInfo){
        System.out.println("修改后");
        return "修改用户成功";
    }
    @GetMapping("/{id}")
    public String getUser(@PathVariable Integer id){
        System.out.println("用户ID:"+id);
        return "查询用户ID成功!";
    }
    @GetMapping
    public String getUsers(){
        System.out.println("查询所有的用户");
        return "查询所有的用户";
    }

}
利用postman测试
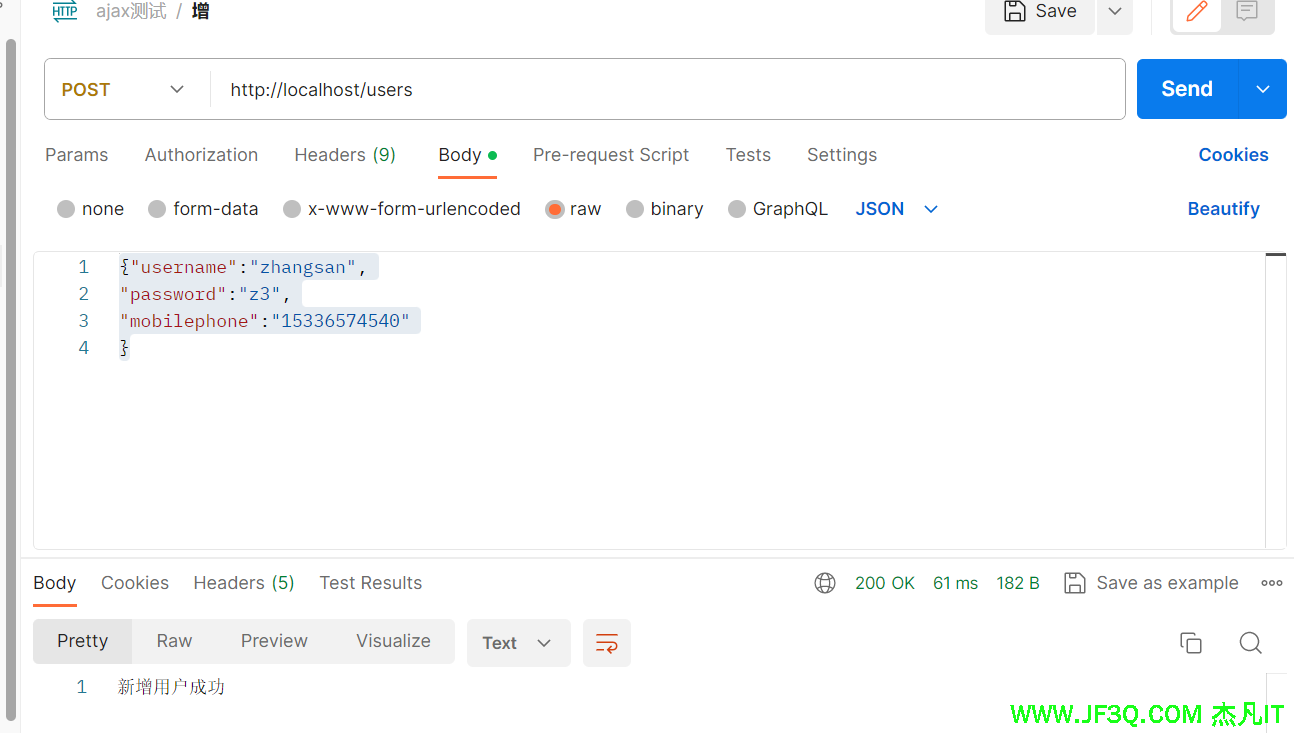
{
  "username":"zhangsan",
	"password":"z3",
	"mobilephone":"15336574540"
}
静态资源访问
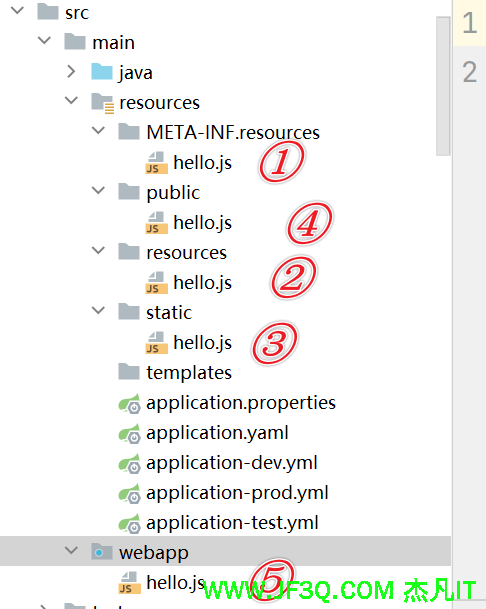
默认静态资源访问
Spring Boot 规定了静态资源可以放在以下 5 个目录中的任意一个下面:
classpath:/META-INF/resources/
classpath:/resources/
classpath:/static/
classpath:/public/
/
Spring Boot 项目创建完成后默认情况下提供了classpath:/static/目录,一般情况下在此放置静态资源即可
自定义静态资源
1.在application.yml配置
web:
  upload-path: D:/upimgs/
spring:
  mvc:
    static-path-pattern: /**
  web:
    resources:
      static-locations:
        file:${web.upload-path},
        classpath:/META-INF/resources/,
        classpath:/resources/,
        classpath:/static/,
        classpath:/public/
2.配置类的方式
@Configuration
public class WebConfig extends WebMvcConfigurationSupport {

    @Override
    protected void addResourceHandlers(ResourceHandlerRegistry registry) {
        registry.addResourceHandler("/**")
                .addResourceLocations(
                        "classpath:/META-INF/resources/",
                        "classpath:/resources/",
                        "classpath:/static/",
                        "classpath:/public/",
                        "file:D:/upimgs/"
                );
    }
}
路径映射
在 Spring Boot 的 Web 项目中,所有页面都需要通过控制器才能访问到,包括没有数据的页面。对于这种只是完成简单的跳转的没有数据的页面,可以直接配置路径映射,不再经过控制器。
1.导入依赖
<dependency>
    <groupId>org.springframework.boot</groupId>
    <artifactId>spring-boot-starter-thymeleaf</artifactId>
</dependency>
2.在application.yml中添加thymeleaf的配置
spring:
  thymeleaf:
    prefix: classpath:/templates/
    suffix: .html
默认就是这样,所以可以省略不写
3.在项目的 resource/ templates 目录下创建 add.html 文件和 register.html 文件
4.在项目的 MyWebMvcConfig 配置类中重写 addViewControlles 方法
@Override
protected void addViewControllers(ViewControllerRegistry registry) {
    registry.addViewController("/add").setViewName("add");
    registry.addViewController("/register").setViewName("register");
}
5.运行测试,浏览器访问 http://localhost:8080/add,结果访问到了 add.html 页面, 访问 http://localhost:8080/register,结果访问到了 register.html 页面
CORS 跨域资源访问
回顾一下浏览器的同源策略
假设后端的主页 URL 是 http://sike.com/index.html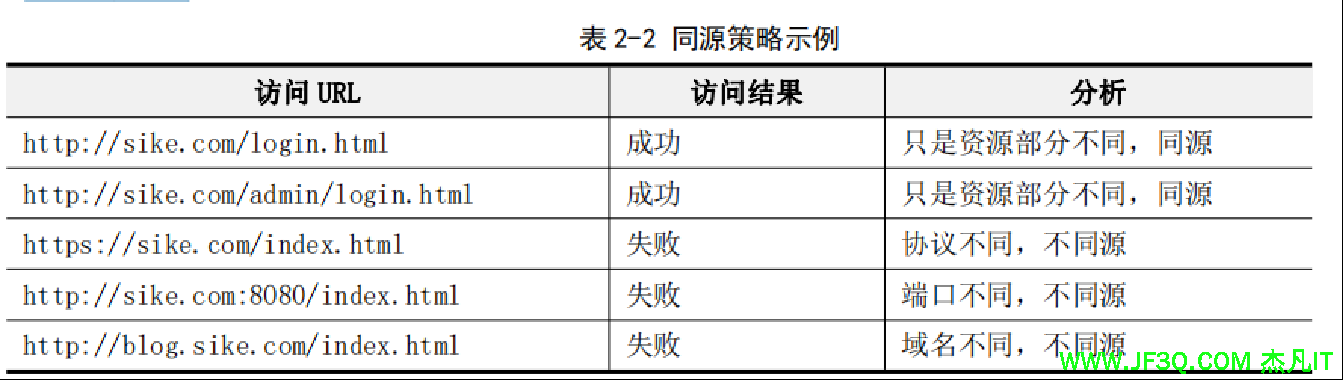
CORS 基础
CORS 是一个 W3C 的一种跨域资源共享技术标准,目的是为了解决前端的跨域请求问题,是英文 Cross-origin resource sharing 的缩写,全称是“跨域资源共享”,它允许浏览器向跨源(协议 + 域名 + 端口)服务器,发出 XMLHttpRequest 请求,从而克服了 AJAX 只能同源使用的限制。
解决方案
1.@CrossOrigin 注解实现方案
直接在控制器需要跨域访问的方法上面添加@CrossOrigin 注解,并配置跨域属性,主要属性有:
- value:表示支持的域,即哪些来源的域允许访问。
- maxAge:表示预检信息的有效缓存时间,单位是秒
- allowedHeaders:表示允许的请求头。
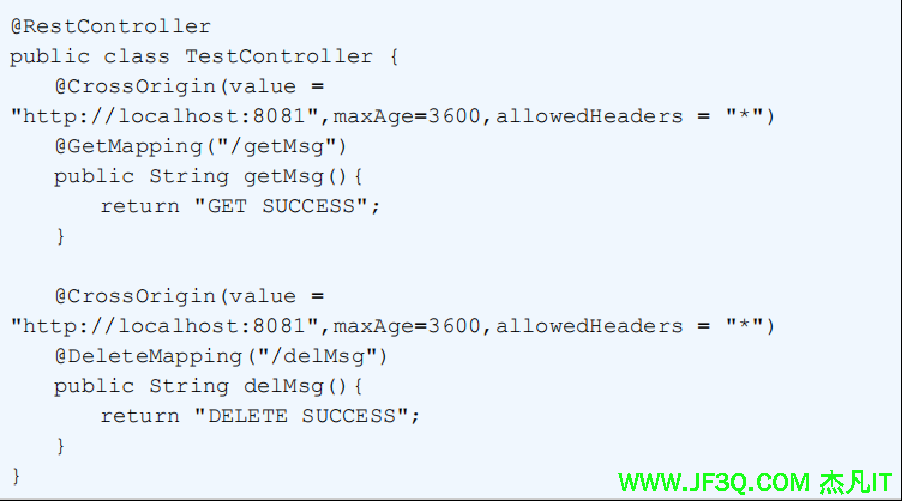
    @GetMapping("/getMsg")
    @CrossOrigin(value = "http://localhost:8081")
    public String getMsg(){
        return "GET success";
    }
    @DeleteMapping("/delMsg")
    @CrossOrigin(value = "http://localhost:8081")
    public String delMsg(){
        return "delete success";
    }
新建一个新的web项目(换个端口启动)发起ajax跨域请求。

<script src="/jquery-1.8.3.min.js"></script>

<body>
<button onclick="sendAjax()">点击发送ajax请求</button>
</body>

<script>
    function sendAjax() {
        $.ajax({
            url:"http://localhost/getMsg",
            type:"get",
            success:function (result) {
                alert(result)
            }
        })
    }
</script>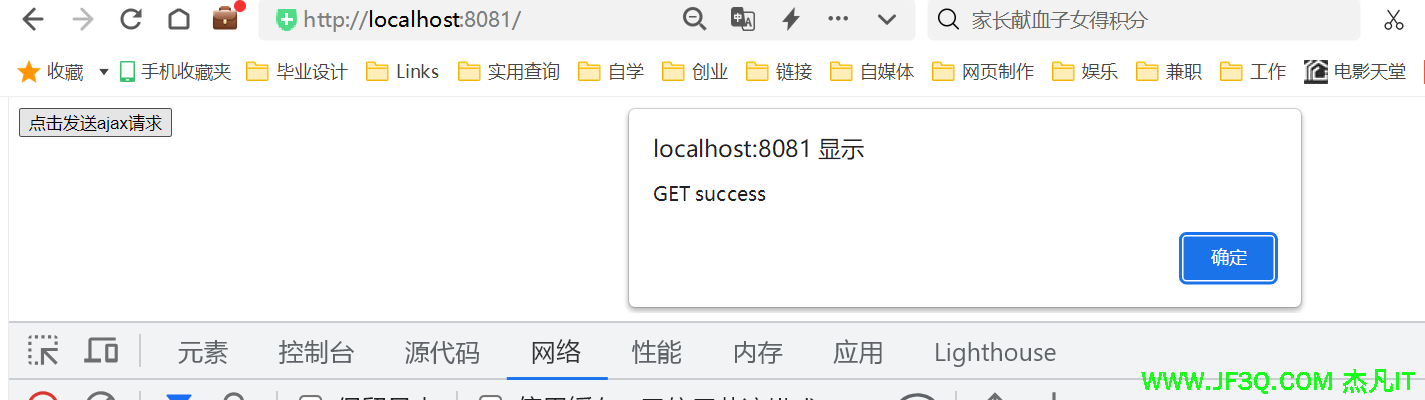
2.基于过滤器的实现方案
@Configuration
public class CorsFilterConfig {
    @Bean
    public FilterRegistrationBean<CorsFilter> corsFilter(){
        FilterRegistrationBean<CorsFilter> corsFilterFilterRegistrationBean=new FilterRegistrationBean<>();
        UrlBasedCorsConfigurationSource source=new UrlBasedCorsConfigurationSource();
        CorsConfiguration corsConfiguration=new CorsConfiguration();
        corsConfiguration.addAllowedHeader("*");//允许的请求头
//        corsConfiguration.addAllowedOrigin("*");
        corsConfiguration.addAllowedOriginPattern("*");//允许的origin域名
        corsConfiguration.setAllowCredentials(true); //是否允许发cookie
        corsConfiguration.setMaxAge(3600L);//从预检请求得到相应的最大时间,默认30分钟
        corsConfiguration.setAllowedMethods(Arrays.asList("GET","POST","DELETE","PUT")); //允许的请求方法
        source.registerCorsConfiguration("/**",corsConfiguration);//指定可以跨域的路径
        corsFilterFilterRegistrationBean.setFilter(new CorsFilter(source));
        corsFilterFilterRegistrationBean.setOrder(-1);
        return corsFilterFilterRegistrationBean;
    }
}
统一响应数据格式
@Data
@AllArgsConstructor
public class ResultVo<T> {
    private Integer code;
    private String mess;
    private T data;


    //success
    public static<T> ResultVo success(String mess,T data){
        return new ResultVo(200,mess,data);
    }


    //error
    public static<T> ResultVo error(String mess){
        return new ResultVo(500,mess,null);
    }
}
Spring Boot 异常处理
自定义错误页
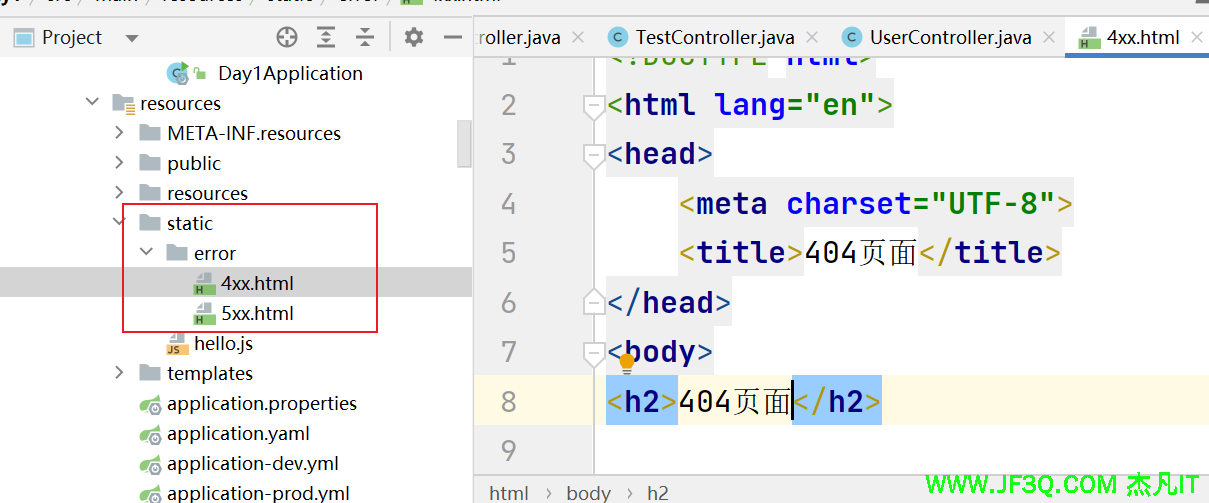
如果不需要向用户展示错误的详细信息,可以把错误信息定义成静态页面,简单地输出自定义的出错啦或找不到之类的网页。 在静态文件路径下创建 error 目录并创建 4xx.html 或 5xx.html 页面,则发生 4 开头的错误状态码代表的异常时将返回 4xx.html,当发生 5 开头的错误状态码代表的异常时将返回5xx.html。还可以用更具体的错误状态码命名的文件,如 404.html,则发生 404 错误时则会直接返回,当发生 403 等错误时返回 4xx。如果最后都找到不到的话还会返回springboot 自带的默认白页。
@ControllerAdvice 全局统一异常处理
如果客户端需要比较具体的异常信息,则不能用上述简单方法,一般要用注解@ControllerAdvice 进行统一异常处理,如果返回 json 格式的数据也可以使用@RestControllerAdvice,只需要创建一个类加上这个注解就可以捕捉到异常,然后类中各个方法再用@ExceptionHandler 注解来对具体的各个异常分别进行处理
@RestControllerAdvice
public class GlobalExceptionHandler {


    @ExceptionHandler(NullPointerException.class)
    public ResponseData exception(NullPointerException exception) {
        return new ResponseData("500", "空指针异常",false, null);
    }

    @ExceptionHandler(IndexOutOfBoundsException.class)
    public ResponseData exception(IndexOutOfBoundsException exception) {
        return new ResponseData("500", "数组越界异常", false,null);
    }

    @ExceptionHandler(Exception.class)
    public ResponseData exception(Exception exception) {
        return new ResponseData("500", exception.getMessage(),false, null);
    }

}
测试类
@RequestMapping("/exception")
@RestController
public class ExceptionController {

    @GetMapping("/test1")
    public ResponseData test1() {
        UserInfo userInfo = null;
        userInfo.setUsername("zhangsan");
        return new ResponseData("200",null,true,userInfo);
    }

    @GetMapping("/test2")
    public ResponseData test2() {
        int[] arr= {1,2,3};
        System.out.println(arr[3]);//发生越界针异常
        //以下是正常业务代码 省略


        return new ResponseData("200",null,true,arr);
    }

    @GetMapping("/test3")
    public ResponseData test3() {
        int i=10/0; //发生算术异常
        //以下是正常业务代码
        return new ResponseData("200",null,true,i);
    }


}
文件上传
单文件上传
Spring Boot 提供了自动配置类 MultipartAutoConfigure 可以实现文件上传,只需导入 spring-boot-starter-web 以及配置 spring.servlet.multipart.enabled=true 即可生效。
#表示是否开启文件上传支持,默认为true
spring.servlet.multipart.enabled=true
#修改文件上传临时保存路径
spring.servlet.multipart.location=C:/temp
#单个上传文件的最大限制 默认是1M
spring.servlet.multipart.max-file-size=2MB
#多个上传文件的最大限制 默认是10M
spring.servlet.multipart.max-request-size=10MB
#文件写入磁盘的阈值
spring.servlet.multipart.file-size-threshold=0B
@RestController
public class UploadController {
@Value("${web.upload-path}")
String uploadPath;
@PostMapping("/upload")
public ResultVo upload(MultipartFile file){
if (!file.isEmpty()) {
String originalFilename = file.getOriginalFilename();
String format = originalFilename.substring(originalFilename.lastIndexOf("."));
if (file.getSize()>500*1024) {
return ResultVo.error("文件超过了500k");
}else if(
format.equalsIgnoreCase(".jpg")||
format.equalsIgnoreCase(".png")||
format.equalsIgnoreCase(".jpeg")||
format.equalsIgnoreCase(".gif")
){
//正常上传
String fileName= UUID.randomUUID().toString().replace("-","");
File saveFile=new File(uploadPath+fileName+format);
try {
file.transferTo(saveFile);
return ResultVo.success("文件上传成功",fileName+format);
} catch (IOException e) {
return ResultVo.error("文件上传出现异常");
}
}else{
return ResultVo.error("文件格式不对");
}
}else{
return ResultVo.error("文件没选");
}
}
}
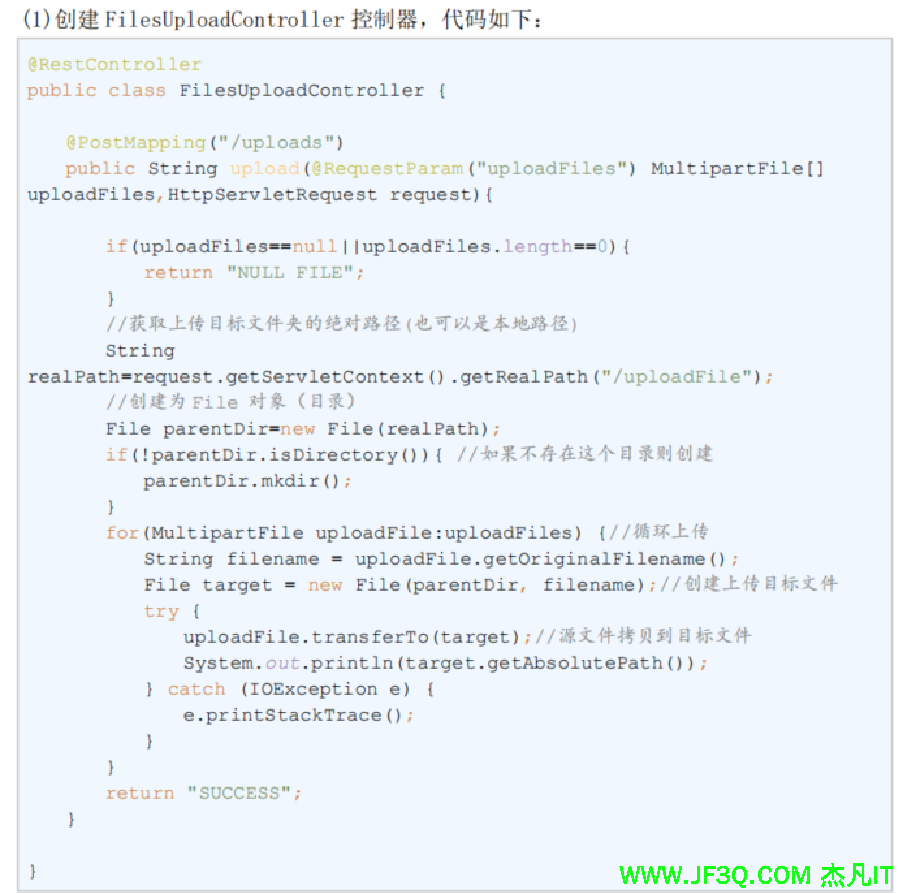
多文件上传
Thymeleaf 视图层技术
使用过程
1.加依赖
<dependency>
    <groupId>org.springframework.boot</groupId>
    <artifactId>spring-boot-starter-thymeleaf</artifactId>
</dependency>
2.配置thymeleaf模板视图解析器
在application. properties中可以添加关于Thymeleaf模板视图解释器的配置项,也可以不添加,使用默认值。参考代码如下:
#关闭Thymeleaf缓存,这样开发时方便测试,无须重启
spring.thymeleaf.cache=false
#设置Thymeleaf页面编码
spring.thymeleaf.encoding=utf-8
#Thymeleaf模式
spring.thymeleaf.mode=HTML5
#Thymeleaf页面的后缀
spring.thymeleaf.suffix=.html
#Thymeleaf页面的存储路径(前缀)
spring.thymeleaf.prefix=classpath:/templates/
3.页面引入命名空间
<!DOCTYPE html>
<html lang="en" xmlns:th="http://www.thymeleaf.org">
<head>
    <meta charset="UTF-8">
    <title>hello</title>
</head>
<body>
欢迎用户<span th:text="${username}">hello</span>登录
</body>
</html>
4.创建控制器
@Controller
@RequestMapping("/thymeleaf")
public class ThymeleafController {

    @GetMapping("/index")
    public String index(Model model){
        model.addAttribute("username","jf3q");
        return "hello";
    }
}
基础语法
1.th:text:文本的赋值与替换
<div th:text="${text1}">将被替换掉的原始值</div>如果替换的文本中有html代码的话,浏览器不能识别
<div th:text="${text2}">不能识别文本中的HTML标签</div>控制器中加的代码
model.addAttribute("text2","<h1>hello world</h1>");2.th:utext
跟th:text用法一样,不同的是如果文本中包含 HTML 标签,浏览器可以识别。
<div th:utext="${text2}">能识别文本中的HTML标签</div>3.th:value
给有 value 属性的 HTML 标签赋值
用户名:<input type="text" th:value="${username}" /><br/>4.th:checked
用于决定单选或复选框是否选中
性别:<input type="radio" th:checked="${gender}=='男'" />男
<input type="radio" th:checked="${gender}=='女'" />女<br/>
5.th:selected
决定下拉选择框中的选项是否被选中
城市<select>
    <option th:selected="${city}=='北京'">北京</option>
    <option th:selected="${city}=='上海'">上海</option>
    <option th:selected="${city}=='广州'">广州</option>
    <option th:selected="${city}=='深圳'">深圳</option>
</select>
控制器中加city值
model.addAttribute("city","广州");6.th:each
用来遍历集合
User user1=new User(1,"李白","123");
User user2=new User(2,"杜甫","123");
List<User> users=new ArrayList<>();
users.add(user1);
users.add(user2);
model.addAttribute("users",users);
用户列表如下:
<table border="1">
    <tr>
        <th>编号</th>
        <th>用户名</th>
        <th>密码</th>
    </tr>
    <tr th:each="user:${users}">
        <td th:text="${user.id}"></td>
        <td th:text="${user.username}"></td>
        <td th:text="${user.password}"></td>
    </tr>
</table>
除了遍历元素,还可于获取遍历的状态,thymeleaf 提供如下状态:
- index:当前的遍历索引,从 0 开始
- count:当前的遍历索引,从 1 开始
- size:被遍历变量里的元素数量。
- current:每次遍历的遍历变量。
- even:当前的遍历是否为偶数次。
- odd:当前的遍历是否为奇数次
- first:当前是否为首次遍历。
- last: 当前是否为最后一次遍历。
用户列表(含状态)如下:
<table border="1">
    <tr>
        <th>编号</th>
        <th>用户名</th>
        <th>密码</th>
        <th>索引号</th>
        <th>是否第一个</th>
        <th>是否最后一个</th>
        <th>是否偶数次</th>
    </tr>
    <tr th:each="user,state:${users}">
        <td th:text="${user.id}"></td>
        <td th:text="${user.username}"></td>
        <td th:text="${user.password}"></td>
        <td th:text="${state.index}"></td>
        <td th:text="${state.first}"></td>
        <td th:text="${state.last}"></td>
        <td th:text="${state.even}"></td>
    </tr>
</table>
7.th:if
选择结构,控制数据是否在页面上显示,当条件为 true 时将填充数据到闭合标签内部
<div th:if="${username}==jf3q" th:text="该用户是管理员"></div>8.th:unless
选择结构,当条件为 false 时将填充数据到闭合标签内部
<div th:unless="${username}==jf3q" th:text="该用户是普通用户"></div>9.th:swith 与 th:case
多重选择分支结构,
<div th:switch="${city}">
    <div th:case="北京">北京</div>
    <div th:case="上海">上海</div>
    <div th:case="广州">广州</div>
    <div th:case="深圳">深圳</div>
    <div th:case="">不确定</div>
</div>
10.th:attr
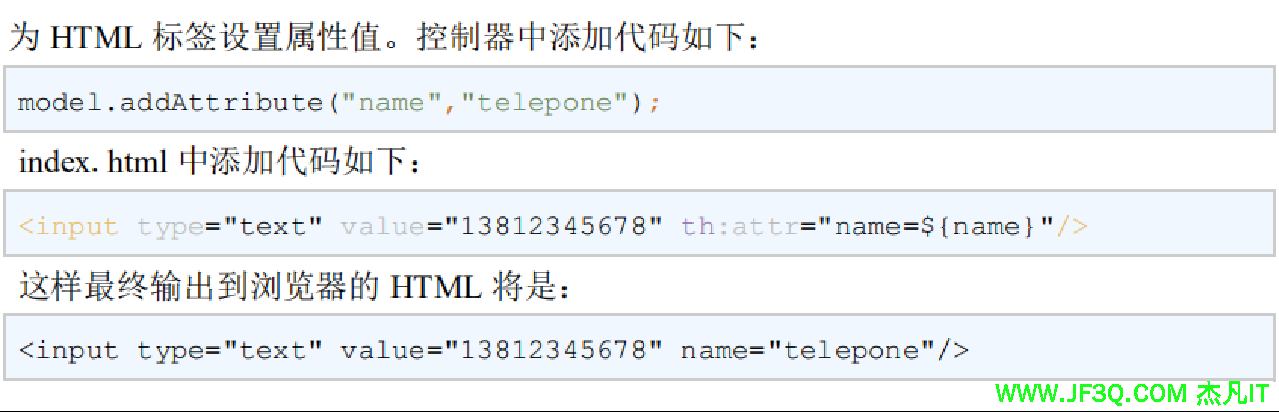
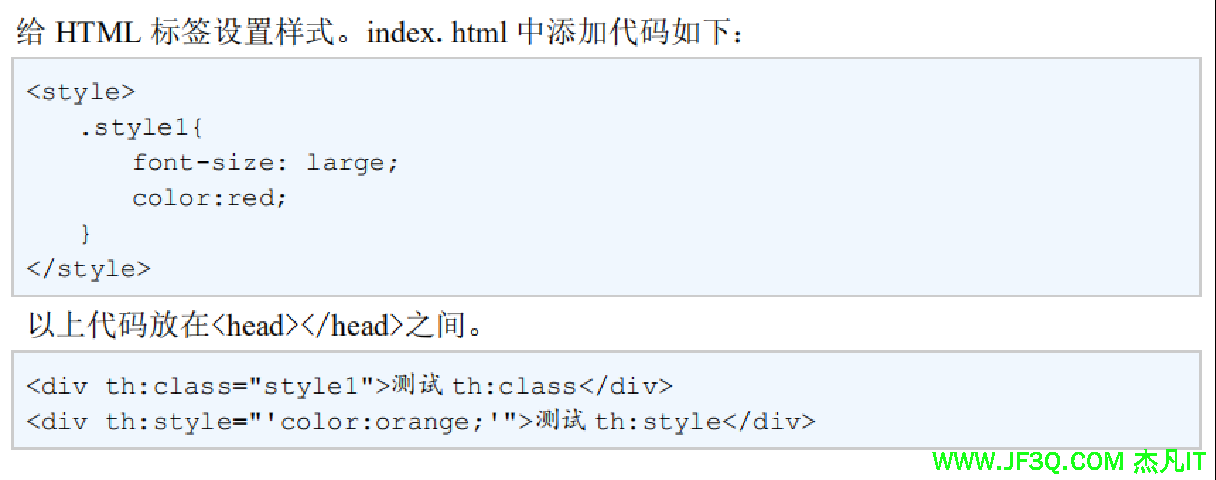
11.th:class 与 th:style
spel表达式
Thymeleaf 提供了 ${}、*{}、#{}、@{}四种占位符,在{}里面应用的表达式属于 SpEL 表达式。
1.${}
用于获取 Model 中的字符串或对象,如果是对象还可以用点运算符进一步获取对象的 属性值或方法。可以获取 Servlet 的各种内置对象,也可以获取 Thymeleaf 的内置对象,如 dates,numbers,strings,arrays,lists 等等。
2.*{}
其中的*号代表一个对象,大括号里面的内容代表对象的属性,通常要结合 th:object 属性一起使用,th:object 用来获取一个对象,然后再用*{}去获取对象的各个属性值。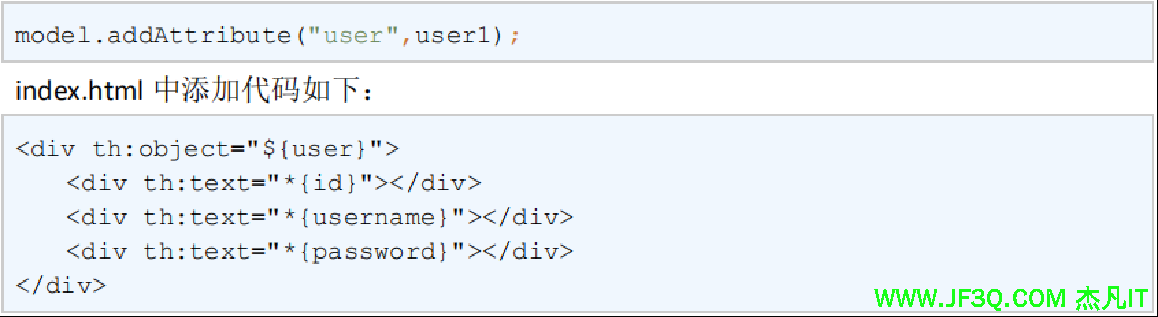
3.#{}
用于读取取国际化 properties 文件的属性。
4.@{} 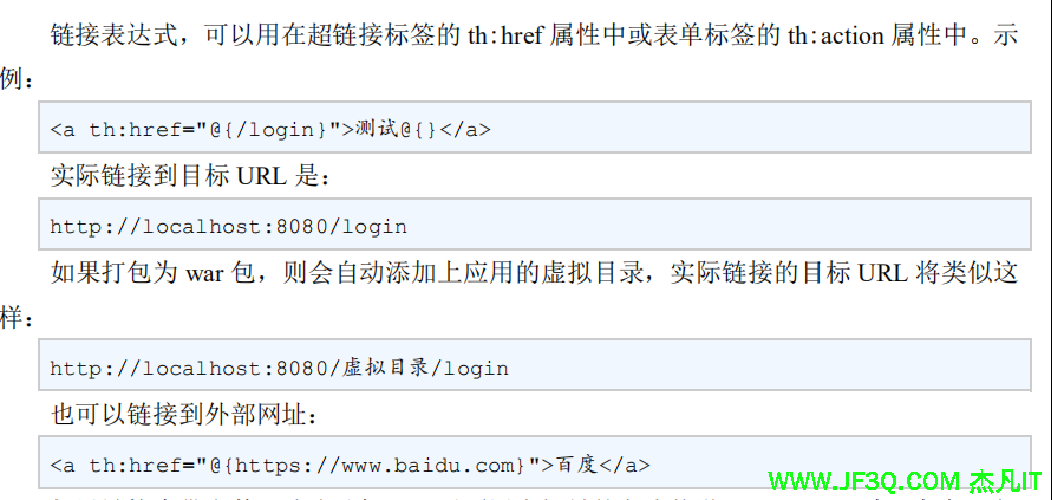
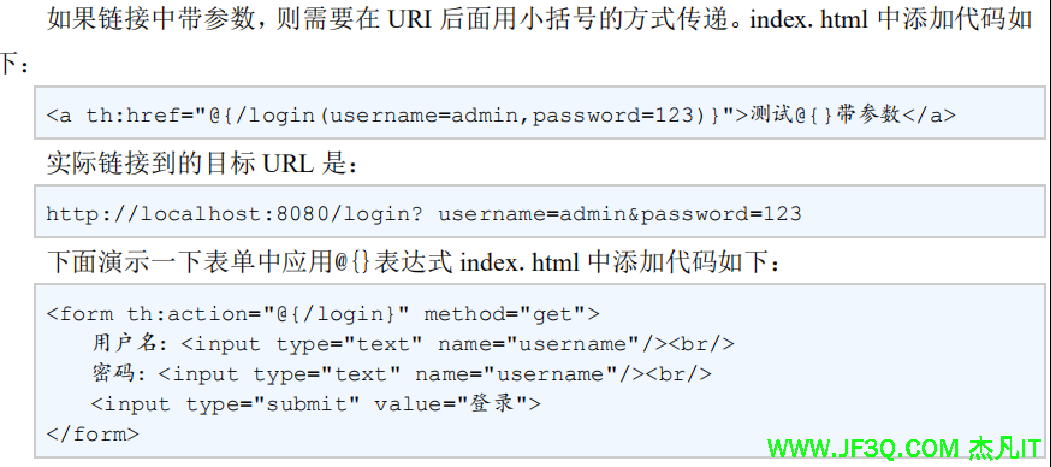
Thymeleaf 表达式
Thymeaf 除了使用 SpEL 表达式外,还有自己的表达式,在${}的大括号中使用的表达式属于 SpEL 表达式,而在 th:属性=""的双引号中应用的是 Thymeleaf 自身的表达式。
1.比较运算
可以使用的运算符包括>、>=、 ==、 != 、< 、<= ,其中的>和<本身是 HTML 标签的关键字,为了避免歧义,可使用别名,gt 对应>,lt 对应<,ge 对应>=,le 对应<=,not 对应!,eq 对应==,neq 或 nq 对应!=。


2.三目运算

3.逻辑运算
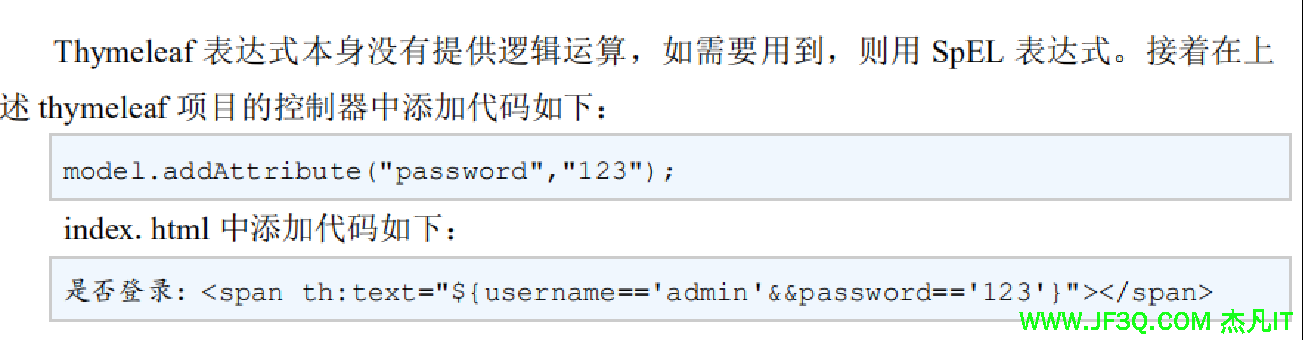

是否登录:<span th:text="${username=='admin'&&password=='123'}"></span>
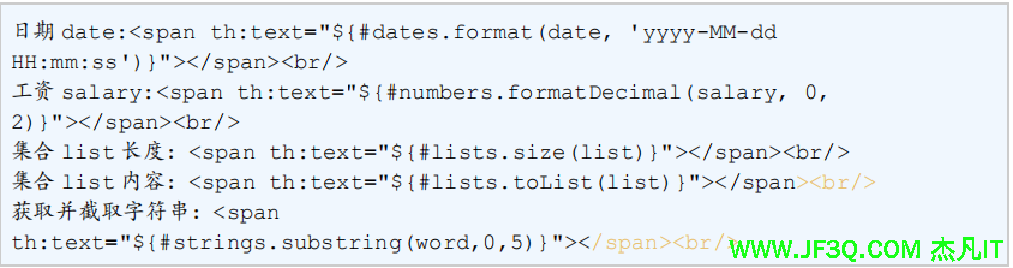
内置对象
在 Thymeleaf 中的内置对象有:
- #ctx:上下文对象。
- #request:获取 HttpServletRequest 对象。
- #response:获取 HttpServletResponse 对象。
- #session:获取 HttpSession 对象
- #servletContext:获取 HttpServletContext 对象
- #dates:日期格式化内置对象,具体方法可以参照 java.util.Date
- #calendars:类似于#dates,但是 java.util.Calendar 类的方法;
- #numbers:数字格式化;
- #strings:字符串格式化,具体方法可以参照 java.lang.String,如 startsWith、contains 等;
- #objects:参照 java.lang.Object
- #bools:判断 boolean 类型的工具
- #arrays:数组操作的工具
- #lists:列表操作的工具,参照 java.util.List
- #sets:Set 集合操作工具,参照 java.util.Set
- #maps:Map 集合操作工具,参照 java.util.Map
- #aggregates:操作数组或集合创建聚合的工具
- #messages
测试

模板片段
系统中的很多页面有很多公共内容,例如标题栏、主菜单、侧边栏、页脚等,这些公共内容可以提取放在一个称为“模板片段”的公共页面里面,其它页面可以引用这个“模板片段”内容。
1.模板片段的定义
普通 html 标签或 <block>标签,添加 th:fragment 属性,这样这个标签及其内部的所有内容就定义为一个模板片段。语法是 th:fragment="模板片段名称"。
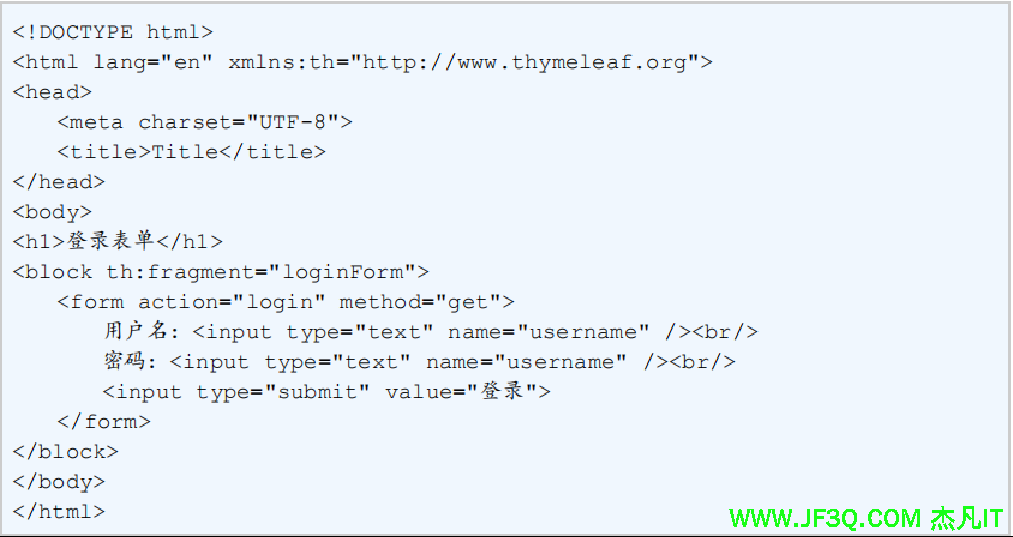
这里,<block th:fragment="loginForm">表示将 block 标签定义为一个模板片段,模板片段的名称叫 loginForm,定义了模板片段的当前 HTML 文件就称为模板,模板名称就是 HTML 文档的名字(不含后缀),此处模板名称为 login。
2.引用片段
1)插入整个模板
使用 th:insert 属性插入整个模板。 语法:th:insert="~{模板名称}" 除此之外,还可以使用 th:replace 和 th:include 插入。

2)插入模板片段
语法:th:insert="~{模板名称::模板片断名称}" 插入模板中的其中一个指定名称的片断,模板片断名可以对应 th:fragment 定义的名称,也可以用类似 JQuery 选择器的语法选择部分片段。

3)th:insert、th:replace、th:include 的区别
- th:insert:将公共片段整个插入到声明引入的元素中
- th:replace:将声明引入的元素替换为公共片段
- th:include:将被引入的片段的内容包含进这个标签中
3.模板片段传入参数
带参数的模板片段定义语法:th:fragment="模板片段名称(参数列表)"。参数列表指可以是一个或多个参数。并且在模板片段内部需要内容不同的位置使用参数,使用方式:${参数名称},例如:<span th:text="${参数}" ></span>。
引用语法:~{模板名称::模板片断名称(参数列表)}。这个参数列表是有实际值的。


综合实例
@Data
@AllArgsConstructor
@NoArgsConstructor
public class Student {
    private Integer id;
    private String name;
    private String gender;
    private Integer age;
    private String classname;

}
 List<Student> students= new ArrayList<>();
        students.add(new Student(1, "张三","女",20, "计科1班"));
        students.add(new Student(2, "李四","男",21, "计科2班"));
        students.add(new Student(3, "李白","男",18, "计科3班"));
        model.addAttribute("students",students);
        return "students";
<html lang="en" xmlns:th="http://www.thymeleaf.org">
<head>
<meta charset="UTF-8">
<title>学生列表</title>
</head>
<body>
<table>
<tr>
<td>id</td>
<td>姓名</td>
<td>性别</td>
<td>年龄</td>
<td>班级</td>
</tr>
<tr th:each="s:${students}">
<td th:text="${s.id}"></td>
<td th:text="${s.name}"></td>
<td>
<input type="radio" th:checked="${s.gender}=='男'" />男
<input type="radio" th:checked="${s.gender}=='女'" />女
</td>
<td th:text="${s.age}"></td>
<td>
<select >
<option th:selected="${s.classname}=='计科1班'">计科1班</option>
<option th:selected="${s.classname}=='计科2班'">计科2班</option>
<option th:selected="${s.classname}=='计科3班'">计科3班</option>
</select>
</td>
</tr>
</table>
</body>
</html>接口文档 Swagger3.0
Swagger 是一个用于生成、描述、调用和可视化 RESTful 风格的 Web 服务框架,最主 要的组件是 Swagger UI,该组件提供了一个可视化的 UI 页面展示描述文件,可以在该页面 中对相关接口进行查阅或做一些简单的接口请求。Swagger3.0 和之前版本的依赖不太一样
 <dependency>
            <groupId>io.springfox</groupId>
            <artifactId>springfox-boot-starter</artifactId>
            <version>3.0.0</version>
        </dependency>
常用注解
- @API:用于类上,表示标识这个类是 swagger 的资源(tags,value,hidden)
- @ApiOperation:用于方法上,表示一个 http 请求的动作(value,notes,httpMethod, hidden)
- @ApiParam:用于方法,参数或字段说明,表示对参数的添加元数据,说明或是否 必填等(name,value,required)
- @ApiModel:用于类上,表示对类进行说明,用于参数用实体类接收(value, description)
- @ApiModelProperty:用于方法或字段,表示对 model 属性的说明或者数据操作更改 (value,name,dataType,required,example,hidden)
- @ApiIgnore:用于类,方法或方法参数上,表示这个类,或者方法或者参数被忽略 (value)
- @ApiResponses:用于方法上,方法返回对象的说明(多个 @ApiResponse)
- @ApiResponse:用于方法上,每个参数的说明(code,message,response)
- @ApiImplicitParams:用于方法上,包含一组参数说明(多个 @ApiImplicitParam)
- @ApiImplicitParam :用于方法上,表示单独的请求参数(name,value,required,paramType,dataType,readOnly,allowEmptyValue,defaultValue
springboot整合swagger流程
由于spring Boot 3.0 在写稿时仍然处于快速迭代中,对 swagger3.0 的支持不太好,故这里暂时退到最近一个稳定版本 spring boot2.7.1 来讲解 Spring Boot 整合 Swagger3。
1.加依赖
<dependency>
<groupId>io.springfox</groupId>
<artifactId>springfox-boot-starter</artifactId>
<version>3.0.0</version>
</dependency>
<dependency>
<groupId>org.springframework.boot</groupId>
<artifactId>spring-boot-starter-web</artifactId>
</dependency>
<dependency>
<groupId>org.projectlombok</groupId>
<artifactId>lombok</artifactId>
<optional>true</optional>
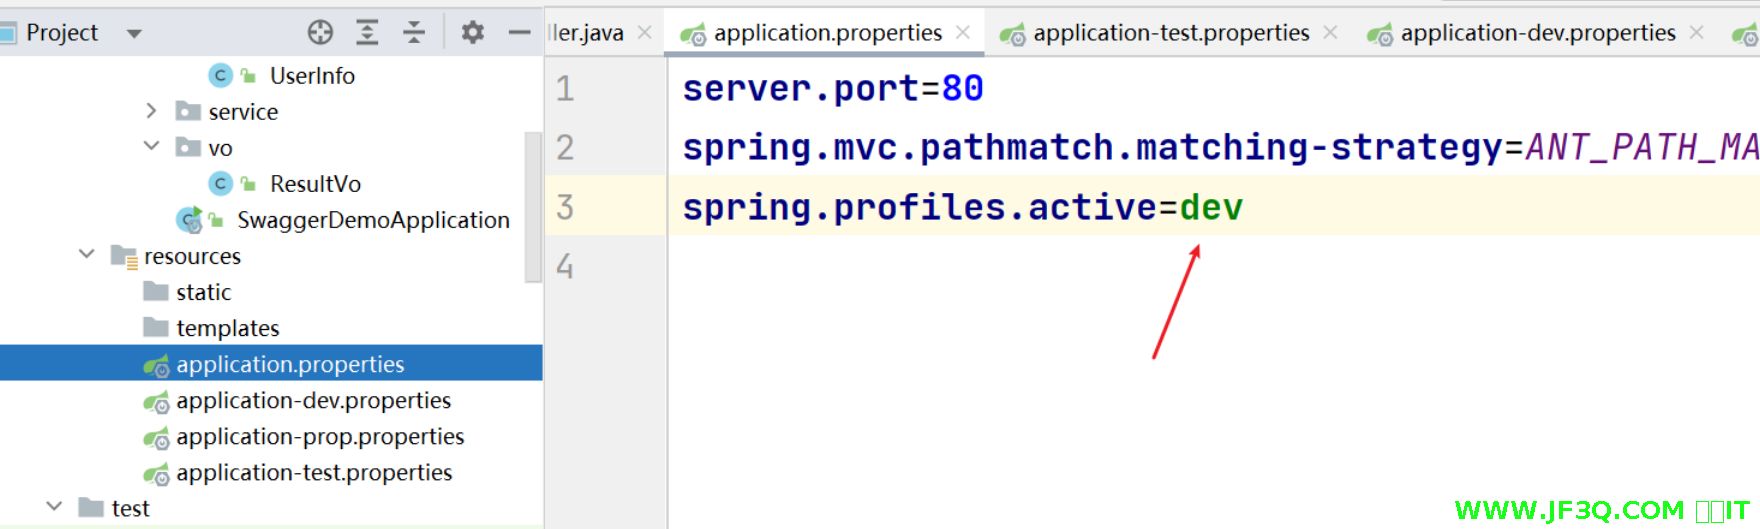
</dependency>2.Application.properties 中添加如下配置:
spring.mvc.pathmatch.matching-strategy=ANT_PATH_MATCHER这个配置的作用是将 SpringBoot 路径匹配模式修改为 AntPathMatcher。Spring Boot 2.6.0 开始使用基于 PathPatternParser 的路径匹配,而 Springfox 版本一直没有更新还是使用 的 AntPathMatcher,如果不这样配置,将会抛出以下异常:
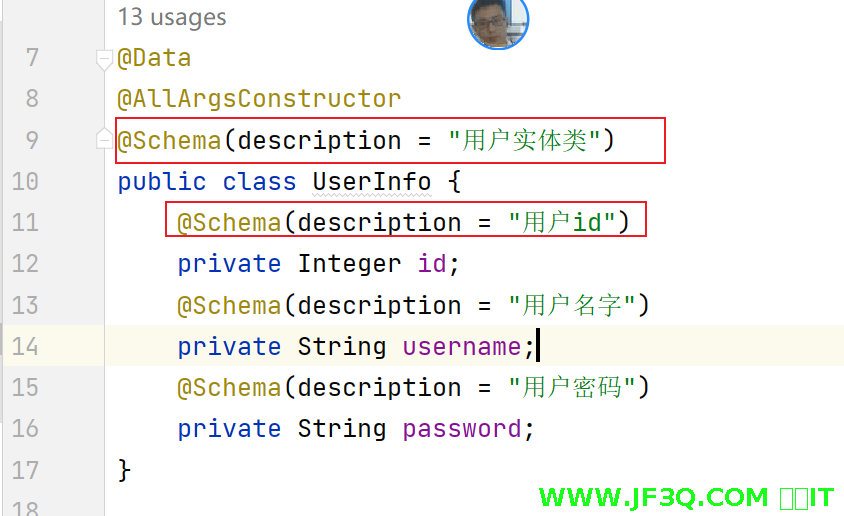
3.创建实体类 User
@Data
@AllArgsConstructor
@ApiModel(value = "用户User类",description = "描述用户User信息")
public class UserInfo {
    @ApiModelProperty(value = "用户id")
    private Integer id;
    @ApiModelProperty(value = "用户名")
    private String username;
    @ApiModelProperty(value = "密码")
    private String password;
}
4.创建配置类 SwaggerConfig 启用 Swagger
@Configuration
@EnableOpenApi
public class SwaggerConfig {
@Bean
public Docket desertsApi(){
return new Docket(DocumentationType.OAS_30)
.apiInfo(apiInfo())
.select()
.apis(RequestHandlerSelectors.basePackage("com.example.swagger_demo.controller"))//按包扫描,
.paths(PathSelectors.any())
.build()
.groupName("jf3q")
.enable(true);
}
private ApiInfo apiInfo(){
return new ApiInfoBuilder()
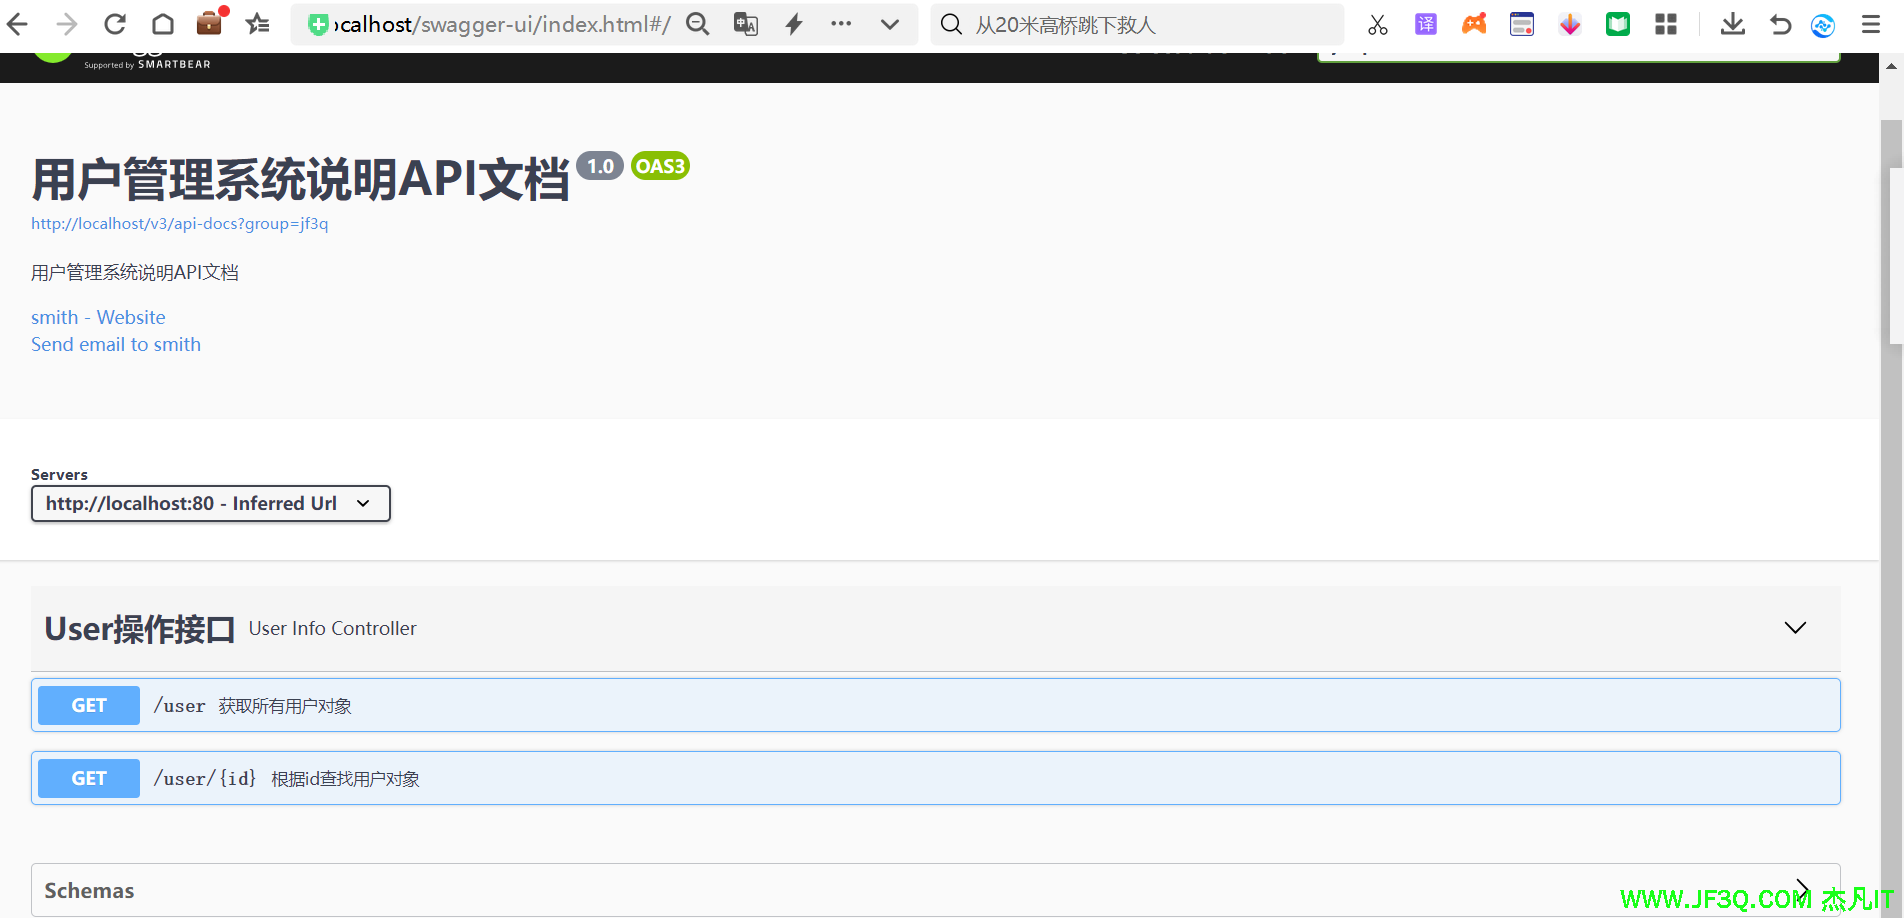
.title("用户管理系统说明API文档")//标题
.description("用户管理系统说明API文档")//描述
.contact(new Contact("jfit", "https://www.jf3q.com", "12345@qq.com"))//作者信息
// .termsOfServiceUrl("https://www.sike.com")
.version("1.0")//版本号
.build();
}
}5.controller
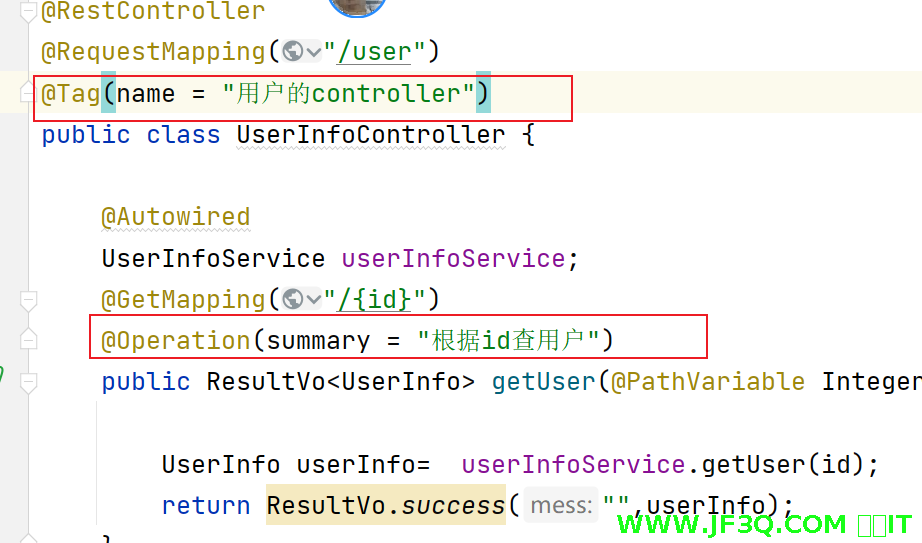
@RestController
@RequestMapping("/user")
@Api(tags = "User操作接口")
public class UserInfoController {
@Autowired
UserInfoService userInfoService;
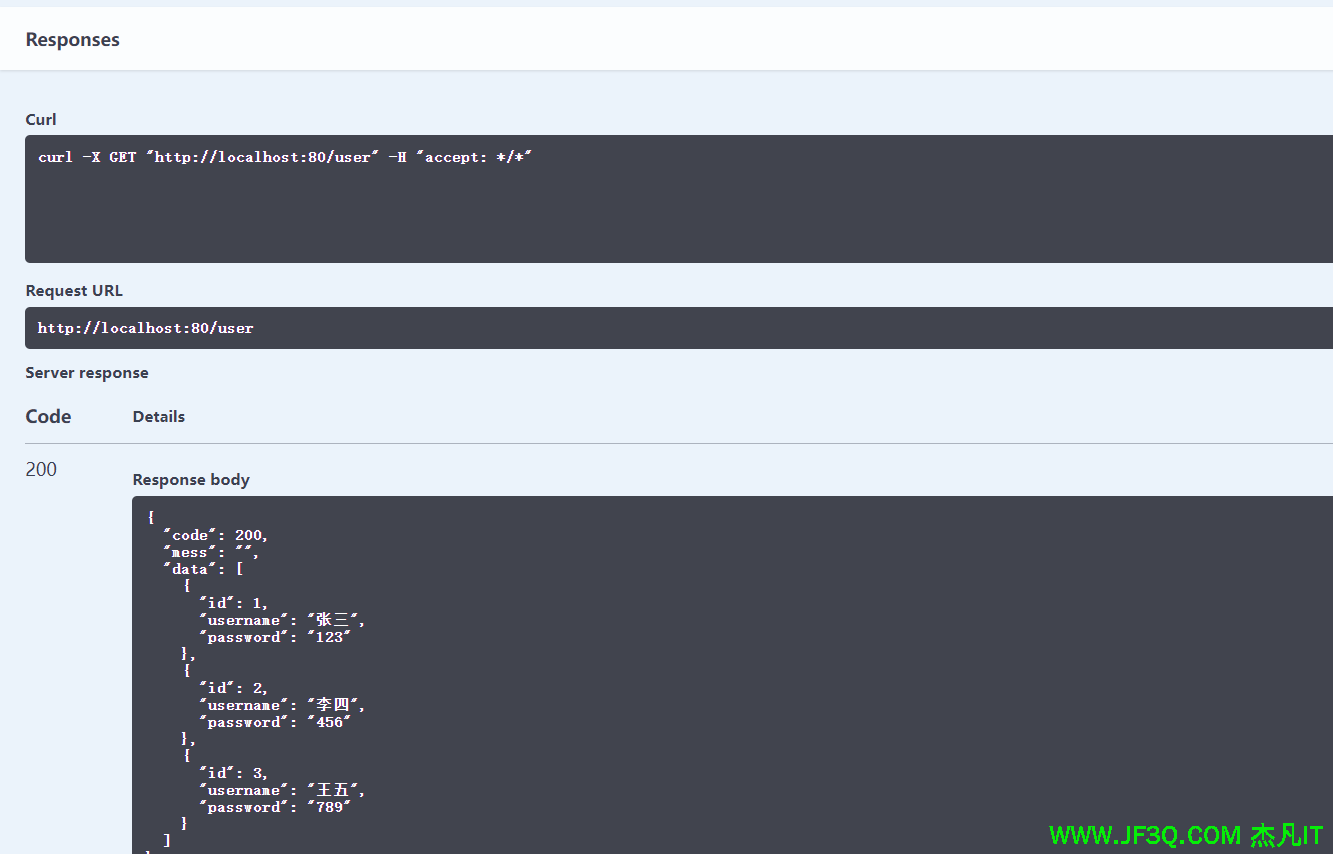
@GetMapping("/{id}")
@ApiOperation(value = "根据id查找用户对象", notes = "根据id查找用户对象")
public ResultVo<UserInfo> getUser(@ApiParam(value = "用户ID", example = "1", required = true)@PathVariable Integer id){
UserInfo userInfo= userInfoService.getUser(id);
return ResultVo.success("",userInfo);
}
@GetMapping
@ApiOperation(value = "获取所有用户对象", notes = "获取所有用户,无需参数")
public ResultVo<List<UserInfo>> getList(){
List<UserInfo> list=userInfoService.getList();
return ResultVo.success("",list);
}
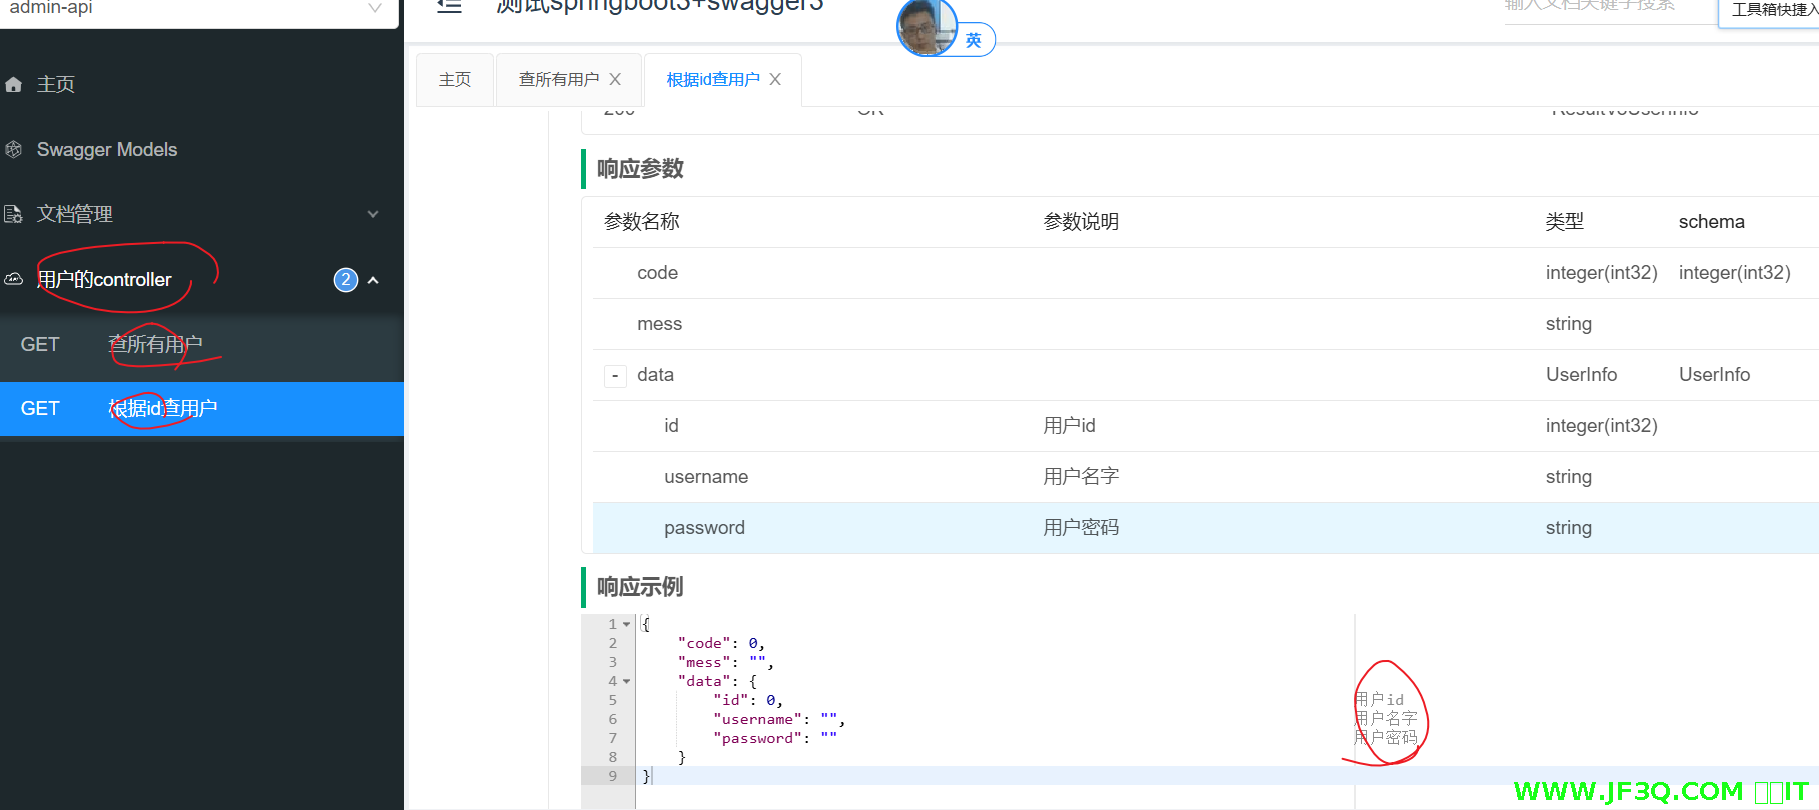
}6.访问接口文档页面
http://localhost:端口/swagger-ui/index.html


美化ui界面
Swagger 自带的 UI 界面不是很好看,可以使用流行的第三方 swagger-bootstrap-ui 进行 美化,添加如下依赖,重新启动,访问地址:http://localhost:端口/doc.html
<dependency>
    <groupId>com.github.xiaoymin</groupId>
    <artifactId>swagger-bootstrap-ui</artifactId>
    <version>1.9.6</version>
</dependency>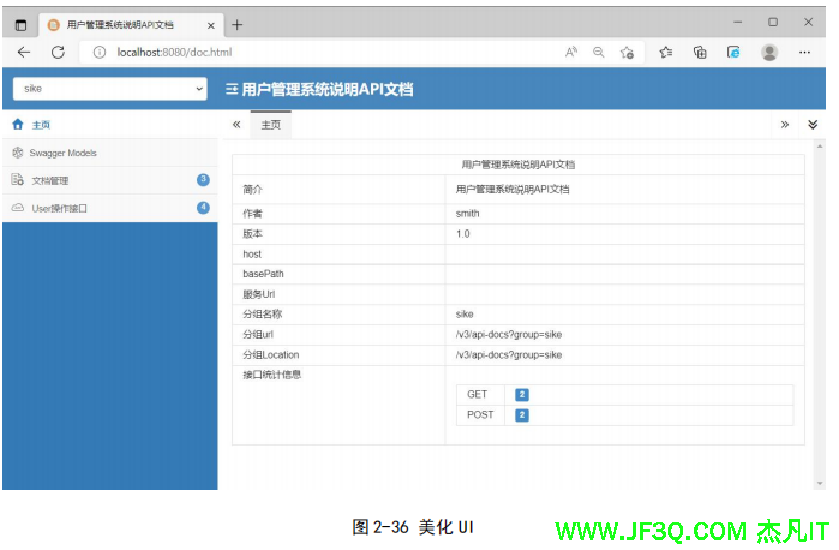
生产环境关闭swagger
一般 Swagger 只在开发和测试环境中使用,不带到生产环境中去。可以通过修改配置类 SwaggerConfig 里面的代码 enable(true)为 enable(false)来快速关闭 Swagger。更好的办法是自动识别是生成环境还是开发或测试环境,自动关闭或开启
@Bean
public Docket desertsApi(Environment environment){

//开发环境和测试环境
Profiles profiles=Profiles.of("dev","test");
//判断是否处在自己设定的环境当中
boolean swaggerEnabled = environment.acceptsProfiles(profiles);
return new Docket(DocumentationType.OAS_30)
.apiInfo(apiInfo())
.select()
.apis(RequestHandlerSelectors.basePackage("com.example.swagger_demo.controller"))//按包扫描,
.paths(PathSelectors.any())
.build()
.groupName("jf3q")
.enable(swaggerEnabled);
}
swagger3.0和boot3.0.0整合
参考文章:
https://blog.csdn.net/shgg2917/article/details/143649652
- 引入依赖
    <!-- Swagger3-knife4j依赖 -->
        <dependency>
            <groupId>com.github.xiaoymin</groupId>
            <artifactId>knife4j-openapi3-jakarta-spring-boot-starter</artifactId>
            <version>4.5.0</version>
        </dependency>
其实这个时候已经能用了,直接访问 localhost:端口/doc.html 即可,但没有一些人性化的温馨提示注释
- 修改 application.yml
swagger3:
  name: 杰凡it
  email: 1913284695@qq.com
  title: 测试springboot3+swagger3
  description: xxxx
  version: 1.0
termsOfServiceUrl: http://jf3q.com- 加载上面自定义的配置
@Data
@Component
@ConfigurationProperties(prefix = "swagger3")
public class SwaggerProperties {

    /**
     * 联系人的名称
     */
    private String name;


    /**
     * 联系人的邮箱
     */
    private String email;

    /**
     * API的标题
     */
    private String title;

    /**
     * API的描述
     */
    private String description;

    /**
     * API的版本号
     */
    private String version;

    /**
     * API的服务团队
     */
    private String termsOfServiceUrl;
}
- 写两个配置类
@Configuration
public class WebMvcConfig implements WebMvcConfigurer {

    /**
     * 设置静态资源映射
     * @param registry
     */
    @Override
    public void addResourceHandlers(ResourceHandlerRegistry registry) {
        // 添加静态资源映射规则
        registry.addResourceHandler("/static/**").addResourceLocations("classpath:/static/");
        //配置 knife4j 的静态资源请求映射地址
        registry.addResourceHandler("/doc.html")
                .addResourceLocations("classpath:/META-INF/resources/");
        registry.addResourceHandler("/webjars/**")
                .addResourceLocations("classpath:/META-INF/resources/webjars/");
    }
}
如果不放行会出现访问不了/doc.html,或者样式丢失,导致页面丑化。
/**
 * Knife4j整合Swagger3 Api接口文档
 */
@Configuration
@EnableConfigurationProperties(SwaggerProperties.class)
public class Knife4jConfig {
    private SwaggerProperties swaggerProperties;

    public Knife4jConfig(SwaggerProperties swaggerProperties) {
        this.swaggerProperties = swaggerProperties;
    }

    @Bean
    public GroupedOpenApi adminApi() { // 创建了一个api接口的分组
        return GroupedOpenApi.builder()
                .group("admin-api") // 分组名称
                .pathsToMatch("/**") // 接口请求路径规则
                .build();
    }

    @Bean
    public OpenAPI openAPI(){
        return new OpenAPI()
                .info(new Info() // 基本信息配置
                        .title(swaggerProperties.getTitle()) // 标题
                        .description(swaggerProperties.getDescription()) // 描述Api接口文档的基本信息
                        .version(swaggerProperties.getVersion()) // 版本
                        .termsOfService(swaggerProperties.getTermsOfServiceUrl())
                        // 设置OpenAPI文档的联系信息,包括联系人姓名为"patrick",邮箱为"patrick@gmail.com"。
                        .contact(new Contact().name(swaggerProperties.getName()).email(swaggerProperties.getEmail()))
                        // 设置OpenAPI文档的许可证信息,包括许可证名称为"Apache 2.0",许可证URL为"http://springdoc.org"。
                        .license(new License().name("Apache 2.0").url("\"http://springdoc.org\""))
                );
    }
}- 常用的注解
- controller 部分
- 实体类
效果如下
作业
1.把掌上游戏app项目改成springboot项目(mybatis部分先不用动),并集成swagger生成在线接口文档(已经就包含了本章所有内容)
2.练习thymeleaf小案例
好博客就要一起分享哦!分享海报
此处可发布评论
评论(0)展开评论
展开评论
您可能感兴趣的博客
 新业务
新业务  springboot学习
  ssm框架课
  vue学习
vue学习  【带小白】java基础速成