34.图形验证码功能实现

分类: springboot vue 专栏: 【带小白做项目】SpringBoot+Vue后台管理系统 标签: 图形验证码功能实现
2025-09-16 23:08:58 391浏览
前言:为了 用到 redis,专门加的这个功能
用一下 redis 存储图形验证码的值
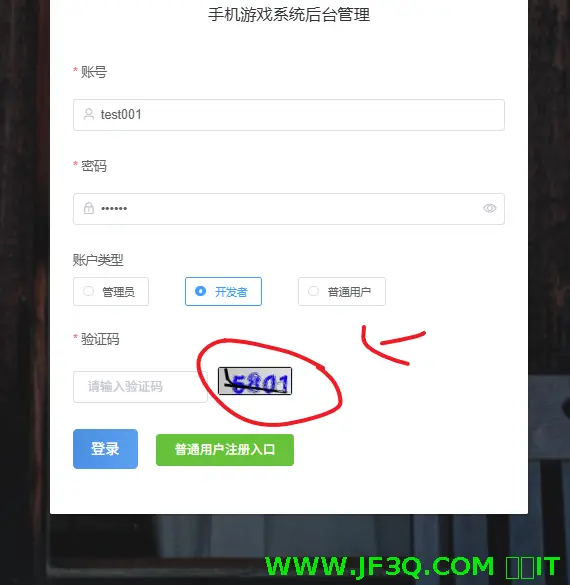
预期效果
这个有现成的图形验证码 jar——kaptcha
图形验证码功能有啥意义
为啥好多网站都有这个功能呢?目的是啥
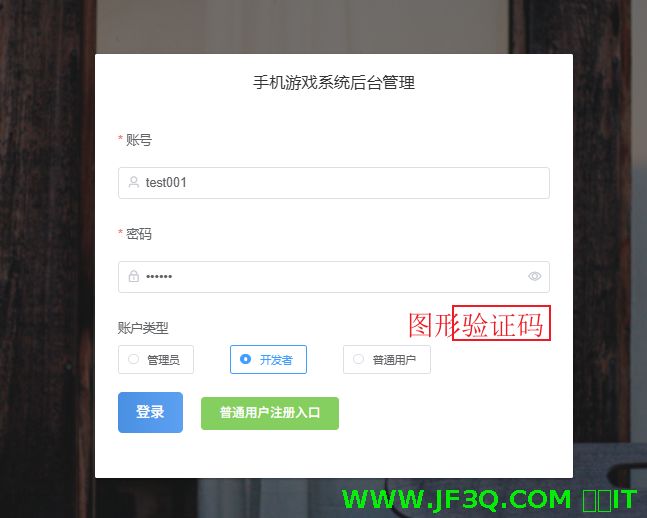
比如我的杰凡 it 网站,这个图形验证码还算比较简单
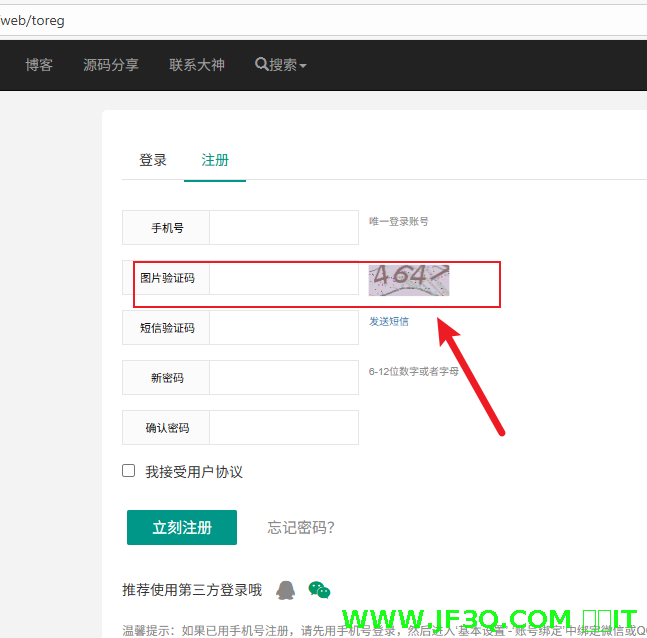
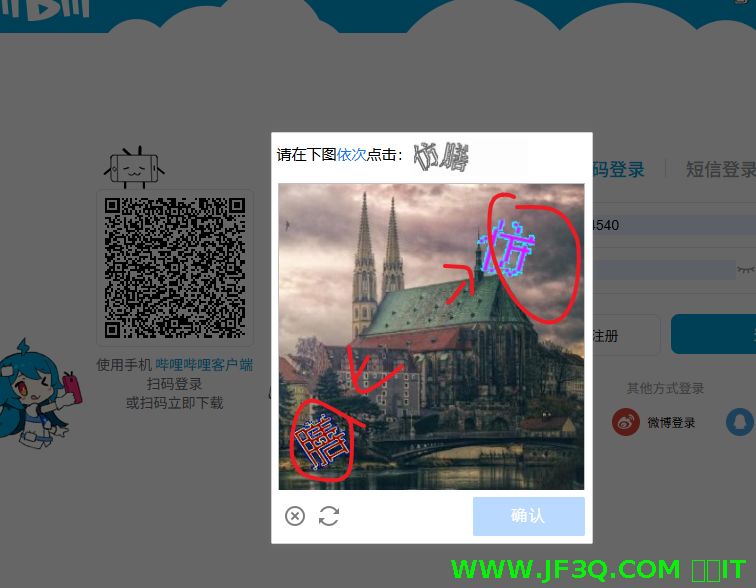
b 站的这个就比较复杂了
不是为了搞着好玩.主要原因是为了防止别人攻击,无限次调用接口,这样会造成什么后果?
- 浪费钱,比如我的那个注册功能,是要发短信验证码的,而这个接口我作为网站负责人是要交钱的。
- 网站访问会变慢,增加服务器的负担。
后端开发
kaptcha 的使用
redis 适合存储热数据,经常要读的
kaptcha 使用步骤
1. 依赖
<dependency>
<groupId>com.github.penggle</groupId>
<artifactId>kaptcha</artifactId>
<version>2.3.2</version>
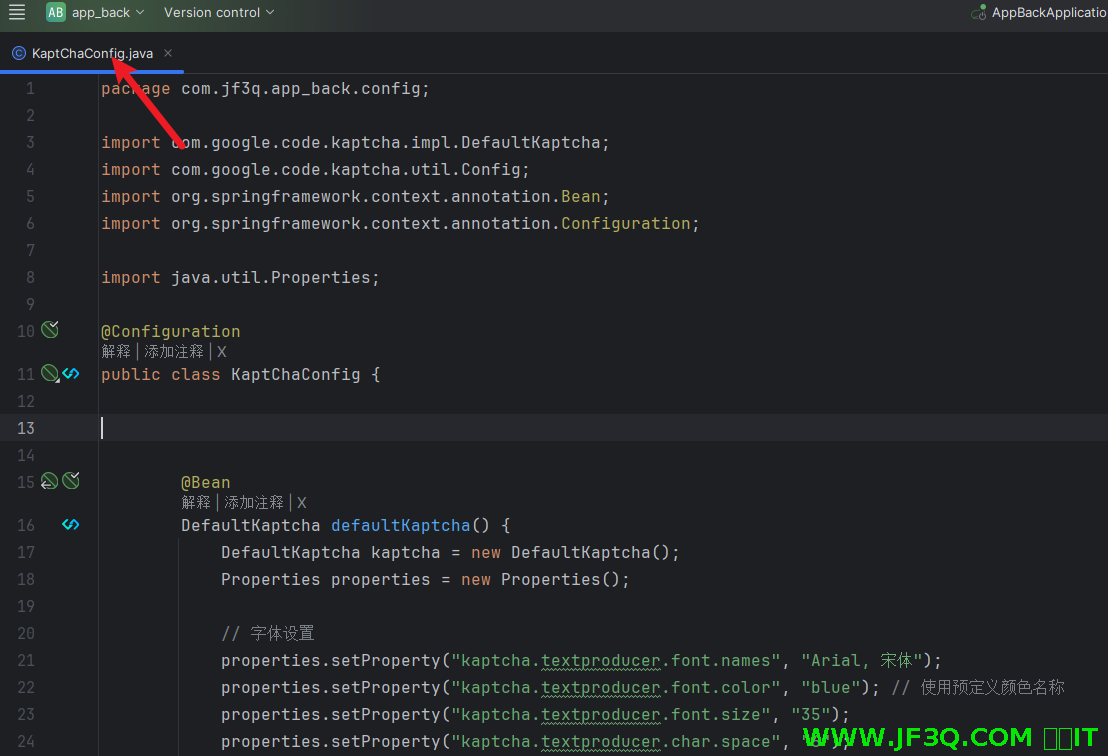
</dependency>2. 配置类
package com.jf3q.app_back.config;

import com.google.code.kaptcha.impl.DefaultKaptcha;
import com.google.code.kaptcha.util.Config;
import org.springframework.context.annotation.Bean;
import org.springframework.context.annotation.Configuration;

import java.util.Properties;

@Configuration
public class KaptChaConfig {


        @Bean
        DefaultKaptcha defaultKaptcha() {
            DefaultKaptcha kaptcha = new DefaultKaptcha();
            Properties properties = new Properties();

            // 字体设置
            properties.setProperty("kaptcha.textproducer.font.names", "Arial, 宋体");
            properties.setProperty("kaptcha.textproducer.font.color", "blue"); // 使用预定义颜色名称
            properties.setProperty("kaptcha.textproducer.font.size", "35");
            properties.setProperty("kaptcha.textproducer.char.space", "6");

            // 图片尺寸
            properties.setProperty("kaptcha.image.width", "120");
            properties.setProperty("kaptcha.image.height", "45");

            // 背景设置
            properties.setProperty("kaptcha.background.clear.from", "lightGray");
            properties.setProperty("kaptcha.background.clear.to", "white");

            // 干扰线设置
            properties.setProperty("kaptcha.noise.impl", "com.google.code.kaptcha.impl.DefaultNoise");
            properties.setProperty("kaptcha.noise.color", "gray");
            properties.setProperty("kaptcha.obscurificator.impl", "com.google.code.kaptcha.impl.WaterRipple");

            // 边框设置
            properties.setProperty("kaptcha.border", "yes");
            properties.setProperty("kaptcha.border.color", "darkGray");

            // 文本设置
            properties.setProperty("kaptcha.textproducer.char.string", "0123456789");
            properties.setProperty("kaptcha.textproducer.char.length", "4");

            // 曲线干扰
            properties.setProperty("kaptcha.curves.noise", "yes");
            properties.setProperty("kaptcha.curves.noise.color", "gray");

            Config config = new Config(properties);
            kaptcha.setConfig(config);

            return kaptcha;
        }
}
3. controller 接口
package com.jf3q.app_back.controller;

import com.google.code.kaptcha.impl.DefaultKaptcha;
import com.jf3q.app_back.service.RedisService;
import com.jf3q.app_back.vo.ResultVo;
import io.swagger.annotations.Api;
import io.swagger.annotations.ApiOperation;
import org.springframework.beans.factory.annotation.Autowired;
import org.springframework.stereotype.Controller;
import org.springframework.web.bind.annotation.GetMapping;
import org.springframework.web.bind.annotation.PostMapping;
import org.springframework.web.bind.annotation.RequestParam;
import org.springframework.web.bind.annotation.ResponseBody;
import javax.imageio.ImageIO;
import javax.servlet.http.HttpServletRequest;
import javax.servlet.http.HttpServletResponse;
import javax.servlet.http.HttpSession;
import java.awt.image.BufferedImage;
import java.io.IOException;

@Controller
@Api(tags = "图形验证码功能")
public class KaptchaController {

    @Autowired
    private DefaultKaptcha defaultKaptcha;

    @Autowired
    private RedisService redisService;

    // 生成验证码
    @ApiOperation(value = "生成图形验证码")
    @GetMapping("/kaptcha")
    public void getKaptcha(String uuid, HttpServletResponse response) throws IOException {
        // 定义response输出类型为image/jpeg类型
        response.setDateHeader("Expires", 0);
        response.setHeader("Cache-Control", "no-store, no-cache, must-revalidate");
        response.addHeader("Cache-Control", "post-check=0, pre-check=0");
        response.setHeader("Pragma", "no-cache");
        response.setContentType("image/jpeg");

        // 生成验证码文本
        String capText = defaultKaptcha.createText();

        // 将验证码存入session
//        request.getSession().setAttribute("kaptchaCode", capText);

        //由于是前后分离的项目,我们直接不用session,
        //将验证码存入redis中,并设置过期时间(基于内存的,读写速度非常快)  5分钟内有效
        redisService.set("kaptchaCode"+uuid, capText, 60*5);

        // 向客户端写出
        BufferedImage bi = defaultKaptcha.createImage(capText);
        ImageIO.write(bi, "jpg", response.getOutputStream());
    }

    // 验证码验证
    @PostMapping("/verify")
    @ApiOperation(value = "验证图形验证码")
    @ResponseBody
    public ResultVo verify(String uuid,@RequestParam("code") String code) {
        // 从session中获取验证码
//        String kaptchaCode = (String) session.getAttribute("kaptchaCode");
        String kaptchaCode = (String) redisService.get("kaptchaCode"+uuid);

        if (kaptchaCode == null || !kaptchaCode.equals(code)) {
            return ResultVo.error("验证码错误");
        }

        return ResultVo.success("验证码正确");
    }
}
4. 放行不需要校验 token
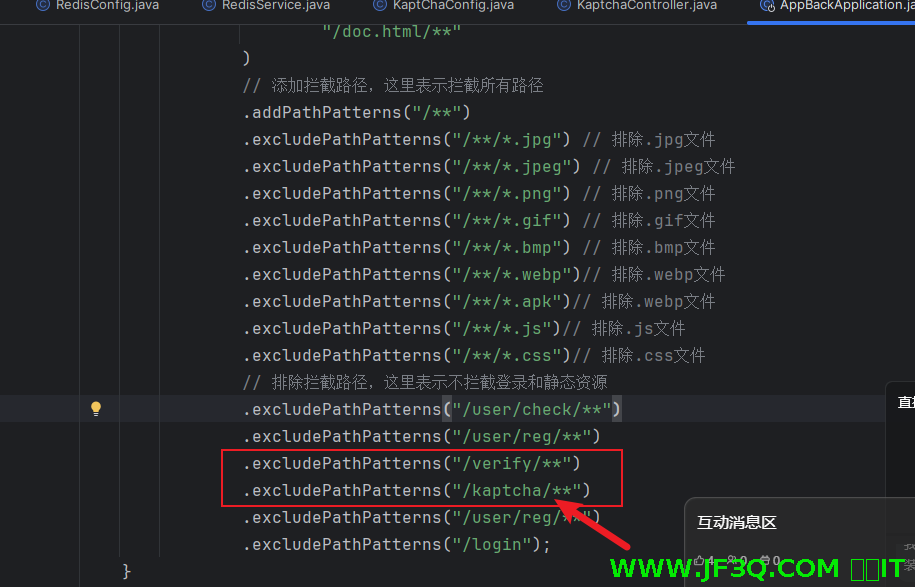
将这两个接口从拦截器放行掉,因为这两个接口不需要登录也可以访问才对
redis 的使用步骤
在 springboot 中使用
1. 依赖
 <dependency>
            <groupId>org.springframework.boot</groupId>
            <artifactId>spring-boot-starter-data-redis</artifactId>
        </dependency>

        <!-- 使用Lettuce作为连接池 -->
        <dependency>
            <groupId>org.apache.commons</groupId>
            <artifactId>commons-pool2</artifactId>
        </dependency>
2. 配置类RedisConfig
默认的序列化方式是 jdk 序列化。不方便读,随意这里改成 json 序列化
import com.fasterxml.jackson.annotation.JsonAutoDetect;
import com.fasterxml.jackson.annotation.PropertyAccessor;
import com.fasterxml.jackson.databind.ObjectMapper;
import com.fasterxml.jackson.databind.jsontype.impl.LaissezFaireSubTypeValidator;
import org.springframework.context.annotation.Bean;
import org.springframework.context.annotation.Configuration;
import org.springframework.data.redis.connection.RedisConnectionFactory;
import org.springframework.data.redis.core.RedisTemplate;
import org.springframework.data.redis.serializer.Jackson2JsonRedisSerializer;
import org.springframework.data.redis.serializer.StringRedisSerializer;

@Configuration
public class RedisConfig {

    @Bean
    @SuppressWarnings("all")
    public RedisTemplate<String, Object> redisTemplate(RedisConnectionFactory factory) {
        // 创建RedisTemplate对象
        RedisTemplate<String, Object> template = new RedisTemplate<>();
        // 连接工厂
        template.setConnectionFactory(factory);

        // 创建JSON序列化器
        Jackson2JsonRedisSerializer<Object> jackson2JsonRedisSerializer = new Jackson2JsonRedisSerializer<>(Object.class);
        ObjectMapper om = new ObjectMapper();
        om.setVisibility(PropertyAccessor.ALL, JsonAutoDetect.Visibility.ANY);
        om.activateDefaultTyping(LaissezFaireSubTypeValidator.instance, ObjectMapper.DefaultTyping.NON_FINAL);
        jackson2JsonRedisSerializer.setObjectMapper(om);

        // 创建String序列化器
        StringRedisSerializer stringRedisSerializer = new StringRedisSerializer();

        // key采用String的序列化方式
        template.setKeySerializer(stringRedisSerializer);
        // hash的key也采用String的序列化方式
        template.setHashKeySerializer(stringRedisSerializer);
        // value序列化方式采用jackson
        template.setValueSerializer(jackson2JsonRedisSerializer);
        // hash的value序列化方式采用jackson
        template.setHashValueSerializer(jackson2JsonRedisSerializer);

        template.afterPropertiesSet();
        return template;
    }
}
3. application.yml 加上 redis 的连接信息等
spring:
  redis:
    host: 127.0.0.1
    port: 6379
    password:
    lettuce:
      pool:
        max-active: 8
        max-wait: -1ms
        max-idle: 8
        min-idle: 0
    timeout: 3000ms
4. 常用的方法封装成一个 redisService
package com.jf3q.app_back.service;

import org.springframework.beans.factory.annotation.Autowired;
import org.springframework.data.redis.core.RedisTemplate;
import org.springframework.stereotype.Service;

import java.util.Arrays;
import java.util.concurrent.TimeUnit;

@Service
public class RedisService {

    @Autowired
    private RedisTemplate<String, Object> redisTemplate;

    /**
     * 设置缓存
     * @param key 键
     * @param value 值
     * @param time 时间(秒) time要大于0 如果time小于等于0 将设置无限期
     * @return true成功 false失败
     */
    public boolean set(String key, Object value, long time) {
        try {
            if (time > 0) {
                redisTemplate.opsForValue().set(key, value, time, TimeUnit.SECONDS);
            } else {
                redisTemplate.opsForValue().set(key, value);
            }
            return true;
        } catch (Exception e) {
            e.printStackTrace();
            return false;
        }
    }

    /**
     * 获取缓存
     * @param key 键
     * @return 值
     */
    public Object get(String key) {
        return key == null ? null : redisTemplate.opsForValue().get(key);
    }

    /**
     * 删除缓存
     * @param key 可以传一个值 或多个
     */
    public void del(String... key) {
        if (key != null && key.length > 0) {
            if (key.length == 1) {
                redisTemplate.delete(key[0]);
            } else {
                redisTemplate.delete(Arrays.asList(key));
            }
        }
    }

    /**
     * 指定缓存失效时间
     * @param key 键
     * @param time 时间(秒)
     * @return true成功 false 失败
     */
    public boolean expire(String key, long time) {
        try {
            if (time > 0) {
                return redisTemplate.expire(key, time, TimeUnit.SECONDS);
            }
            return false;
        } catch (Exception e) {
            e.printStackTrace();
            return false;
        }
    }

    /**
     * 根据key获取过期时间
     * @param key 键 不能为null
     * @return 时间(秒) 返回0代表为永久有效
     */
    public long getExpire(String key) {
        return redisTemplate.getExpire(key, TimeUnit.SECONDS);
    }

    // 其他常用操作...
}
前端开发
/******************* 💫 Codegeex Inline Diff *******************/
<template>
<div class="login">
<el-dialog
title="手机游戏系统后台管理"
:show-close="false"
:close-on-click-modal="false"
:close-on-press-escape="false"
:visible.sync="dialogVisible"
width="30%"
center
custom-class="login-dialog"
>
<el-form
ref="form"
:model="form"
:rules="LoginRules"
label-position="top"
label-width="80px"
size="medium"
>
<el-form-item label="账号" prop="username">
<el-input
v-model="form.username"
prefix-icon="el-icon-user"
placeholder="请输入账号"
></el-input>
</el-form-item>
<el-form-item label="密码" prop="password">
<el-input
type="password"
v-model="form.password"
prefix-icon="el-icon-lock"
placeholder="请输入密码"
show-password
></el-input>
</el-form-item>
<el-form-item prop="userType" class="form-item-inline" >
<div class="label-block">账户类型</div>
<el-radio-group v-model="form.userType" size="small">
<el-radio label="admin" border>管理员</el-radio>
<el-radio label="dev" border>开发者</el-radio>
<el-radio label="user" border>普通用户</el-radio>
</el-radio-group>
</el-form-item>
<!-- 加一个图形验证码的功能 -->
<el-form-item label="验证码" prop="captcha">
<div class="captcha-wrapper">
<el-input
v-model="form.captcha"
placeholder="请输入验证码"
class="captcha-input"
></el-input>
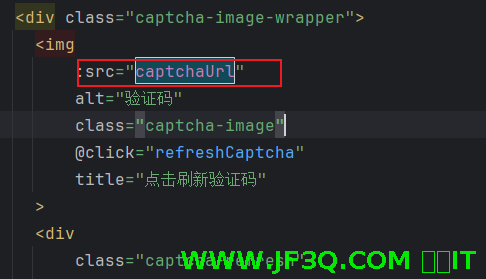
<div class="captcha-image-wrapper">
<img
:src="captchaUrl"
alt="验证码"
class="captcha-image"
@click="refreshCaptcha"
title="点击刷新验证码"
>
<div
class="captcha-refresh"
@click="refreshCaptcha"
>
<i class="el-icon-refresh"></i>
</div>
</div>
</div>
</el-form-item>
<el-form-item class="form-item-inline">
<el-button
type="primary"
@click="onSubmit"
class="login-button"
>登录
</el-button>
<el-button
type="success"
@click="toReg"
class="register-button"
>普通用户注册入口
</el-button>
</el-form-item>
</el-form>
</el-dialog>
<el-dialog
title="注册"
:visible.sync="regDialogVisible"
width="50%">
<el-form :model="ruleForm" :rules="rules" ref="ruleForm" label-width="100px" class="demo-ruleForm">
<el-form-item label="账号" prop="username">
<el-input v-model="ruleForm.username"></el-input>
</el-form-item>
<el-form-item label="密码" prop="password">
<el-input type="password" v-model="ruleForm.password"></el-input>
</el-form-item>
<el-form-item label="确认密码" prop="rawPassword">
<el-input type="password" v-model="ruleForm.rawPassword"></el-input>
</el-form-item>
<el-form-item>
<el-button type="primary" @click="submitForm('ruleForm')">立即注册</el-button>
<el-button @click="resetForm('ruleForm')">重置</el-button>
</el-form-item>
</el-form>
</el-dialog>
</div>
</template>
<script>
//生成一个随机字符串
let uuid = Math.random().toString(36).substr(2);
import {loginApi, checkUsername, regUser, getkaptcha, validateCode} from "@/api/app";
export default {
name: 'LoginView',
data() {
// 自定义验证码验证规则
const validateCaptcha = (rule, value, callback) => {
if (!value) {
return callback(new Error('请输入验证码'));
}
if (!this.captchaValid) {
return callback(new Error('验证码错误'));
}
callback();
};
var validateUserName = (rule, value, callback) => {
if (value === '') {
callback(new Error('请输入账号'));
} else {
checkUsername(value).then(res =>{
console.log("==========")
console.log(res)
callback();
})
}
};
var validatePass = (rule, value, callback) => {
if (value === '') {
callback(new Error('请输入密码'));
} else {
if (this.ruleForm.rawPassword !== '') {
this.$refs.ruleForm.validateField('再次输入密码');
}
callback();
}
};
var validatePass2 = (rule, value, callback) => {
if (value === '') {
callback(new Error('请再次输入密码'));
} else if (value !== this.ruleForm.password) {
callback(new Error('两次输入密码不一致!'));
} else {
callback();
}
};
return {
captchaValid: false,
captchaUrl: '',
regDialogVisible: false,
dialogVisible: true,
form: {
username: 'test001',
password: '123456',
userType: 'dev',
captcha: '', // 验证码
},
LoginRules: {
captcha: [
{ required: true, message: '请输入验证码', trigger: 'blur' },
{ validator: validateCaptcha, trigger: 'blur' }
],
username: [
{required: true, message: '请输入账号', trigger: 'blur'},
],
password: [
{required: true, message: '密码必填', trigger: 'blur'},
],
userType: [
{required: true, message: '账号类型必填', trigger: 'blur'},
],
},
ruleForm:{
username: '',
password: '',
rawPassword: ''
},
rules: {
username: [
{required: true, message: '请输入账号', trigger: 'blur'},
{min: 5, max: 10, message: '长度在 5 到 10 个字符', trigger: 'blur'},
{ validator: validateUserName, trigger: 'blur' }
],
password: [
{required: true, message: '请输入密码', trigger: 'blur'},
{min: 6, max: 10, message: '长度在 6 到 10 个字符', trigger: 'blur'},
{ validator: validatePass, trigger: 'blur' }
],
rawPassword: [
{required: true, message: '再次请输入密码', trigger: 'blur'},
{min: 6, max: 10, message: '长度在 6 到 10 个字符', trigger: 'blur'},
{ validator: validatePass2, trigger: 'blur' }
],
}
}
},
methods: {
// 刷新验证码
refreshCaptcha() {
console.log("==============")
// 释放之前的 URL 对象
if (this.captchaUrl) {
URL.revokeObjectURL(this.captchaUrl);
}
this.getCaptcha();
this.form.captcha = '';
// 清除验证错误信息
this.$refs.form.clearValidate('captcha');
},
//要传一个uuid
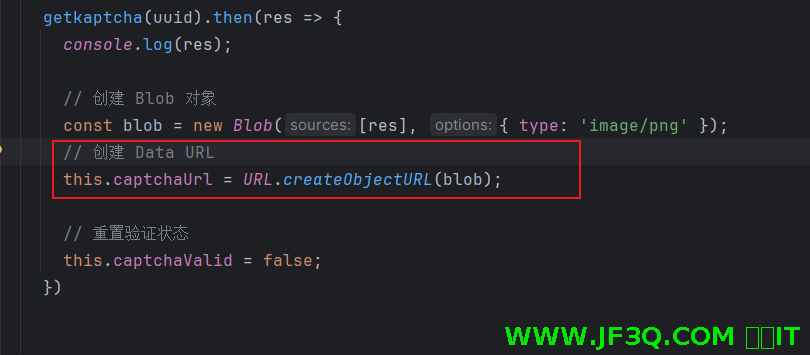
getCaptcha(){
getkaptcha(uuid).then(res => {
console.log(res);
// 创建 Blob 对象
const blob = new Blob([res], { type: 'image/png' });
// 创建 Data URL
this.captchaUrl = URL.createObjectURL(blob);
// 重置验证状态
this.captchaValid = false;
})
},
// 验证验证码
verifyCaptcha(callback) {
console.log("88888888888")
if (!this.form.captcha) {
this.$message.warning('请输入验证码');
return;
}
// 这里替换为实际的验证接口
validateCode(uuid,this.form.captcha).then( res =>{
console.log("99999999999")
console.log(res);
this.captchaValid = true;
callback && callback();
}).catch(err => {
console.error(err);
this.$message.error('验证失败,请重试');
this.refreshCaptcha();
});
},
//注册
submitForm(formName) {
this.$refs[formName].validate((valid) => {
if (valid) {
regUser(this.ruleForm).then(res => {
console.log(res);
this.$message.success(res.mess);
this.regDialogVisible=false
})
} else {
console.log('error submit!!');
return false;
}
});
},
resetForm(formName) {
this.$refs[formName].resetFields();
},
toReg(){
this.regDialogVisible=true
},
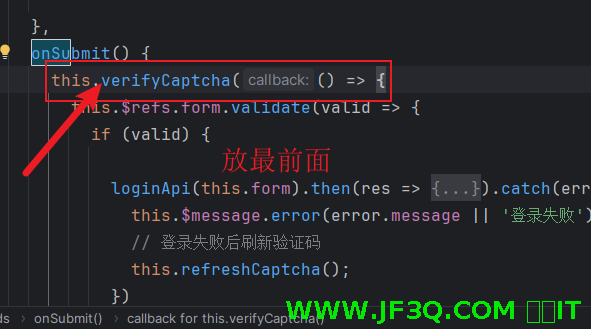
onSubmit() {
this.verifyCaptcha(() => {
this.$refs.form.validate(valid => {
if (valid) {
loginApi(this.form).then(res => {
console.log(res);
this.$message.success(res.mess);
sessionStorage.setItem("token", res.data);
sessionStorage.setItem("username", this.form.username);
sessionStorage.setItem("role", this.form.userType);
this.$router.push("/appInfo");
}).catch(error => {
this.$message.error(error.message || '登录失败');
// 登录失败后刷新验证码
this.refreshCaptcha();
})
}
});
})
}
},
created() {
this.getCaptcha();
},
// 组件销毁前释放 URL 对象
beforeDestroy() {
if (this.captchaUrl) {
URL.revokeObjectURL(this.captchaUrl);
}
}
}
</script>
<style scoped>
.form-item-inline {
display: flex;
align-items: center;
flex-wrap: nowrap;
margin-bottom: 20px;
}
.el-radio-group {
display: flex;
flex-wrap: nowrap;
}
.login-button {
margin-right: 10px;
}
.register-button {
margin-left: 10px;
}
.login {
width: 100%;
height: 100vh;
background-image: url('../assets/login-background.jpg');
background-size: cover;
background-position: center;
background-repeat: no-repeat;
}
.login-dialog {
border-radius: 10px;
overflow: hidden;
}
.login-dialog .el-dialog__header {
background: linear-gradient(90deg, #4a90e2 0%, #5ca0f2 100%);
padding: 20px 30px;
margin: 0;
}
.login-dialog .el-dialog__title {
color: #fff;
font-size: 20px;
font-weight: 600;
}
.login-dialog .el-dialog__body {
padding: 30px;
}
.login-dialog .el-input__inner {
height: 45px;
}
.login-dialog .el-radio {
margin-right: 30px;
}
.login-dialog .el-button--primary {
height: 45px;
font-size: 16px;
background: linear-gradient(90deg, #4a90e2 0%, #5ca0f2 100%);
border: none;
border-radius: 5px;
}
.login-dialog .el-button--primary:hover {
background: linear-gradient(90deg, #3a80d2 0%, #4ca0e2 100%);
}
.captcha-wrapper {
display: flex;
align-items: center;
gap: 10px;
}
.captcha-input {
width: 150px;
}
.captcha-image-wrapper {
position: relative;
cursor: pointer;
}
.captcha-image {
height: 32px;
border: 1px solid #dcdfe6;
border-radius: 4px;
}
.captcha-refresh {
position: absolute;
right: 5px;
top: 50%;
transform: translateY(-50%);
color: #909399;
font-size: 16px;
cursor: pointer;
}
.captcha-refresh:hover {
color: #409eff;
}
</style>
/**************** b90b5b937f704a739345f5ce4f7e4f9a ****************/
注意:
- 登录页面一进来的瞬间就应该请求获取图形验证码的接口
- 由于我们获取图形验证码的接口返回的是文件,所以要如下写法
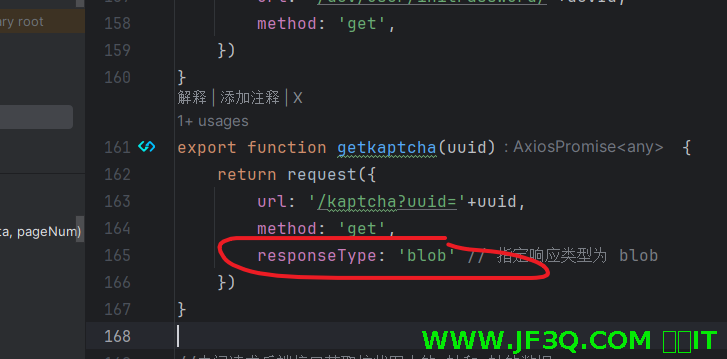
显示图片的时候,用的是 img 的 src 属性
- 登录表单校验前就应该先验证输入的图形验证码是否正确
美化一些图形验证码
默认的这个有点丑,这边美化后的
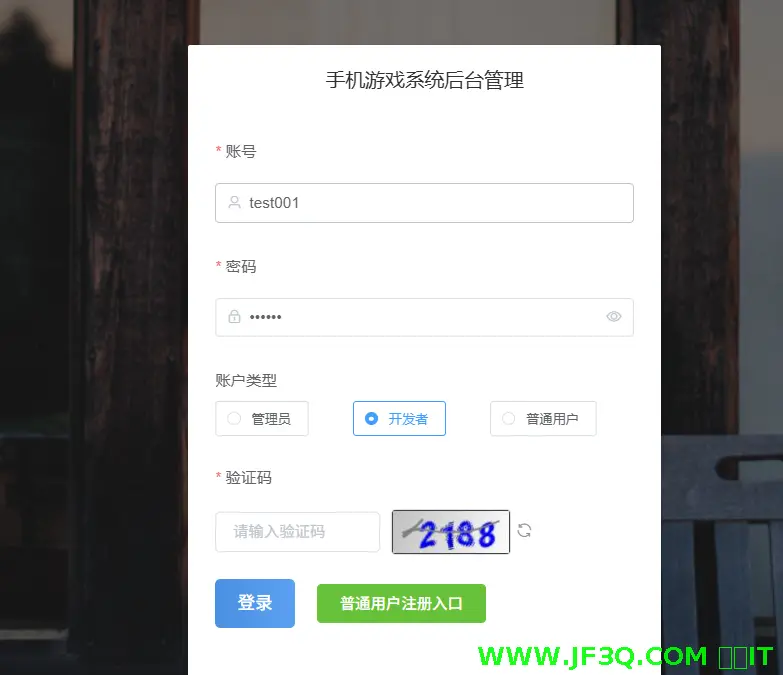
主要是修改了kaptcha 的配置类
下次课补充下下
- 刷新按钮靠右一点
- 优化一下那个输入验证码的框失去焦点的时候的校验功能
- 图形验证码不要大写字母,我搞成了简单的数字就行了
粉丝宝子可以加下杰哥微信号:jf3qcom
有实在解决不了的问题可以沟通

好博客就要一起分享哦!分享海报
此处可发布评论
评论(0)展开评论
展开评论


 新业务
新业务  springboot学习
  ssm框架课
  vue学习
vue学习  【带小白】java基础速成