no13-异常处理and表单验证and表单提交and前端浏览器debug调试

分类: ssm 专栏: ssm框架课 标签: 异常处理 表单验证 前端debug调试
2022-12-29 12:19:57 1601浏览
异常处理,表单验证,前端debug调试
1.异常处理
1.1局部异常处理
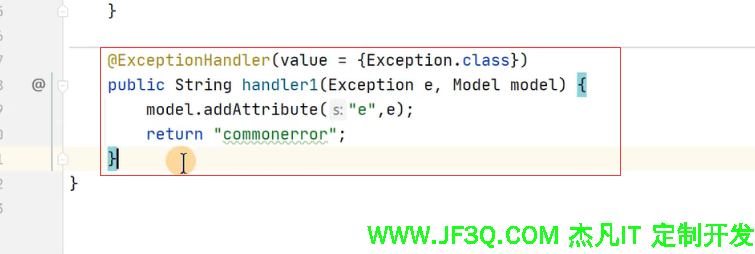
注意:map传递异常的值带不到页面哦
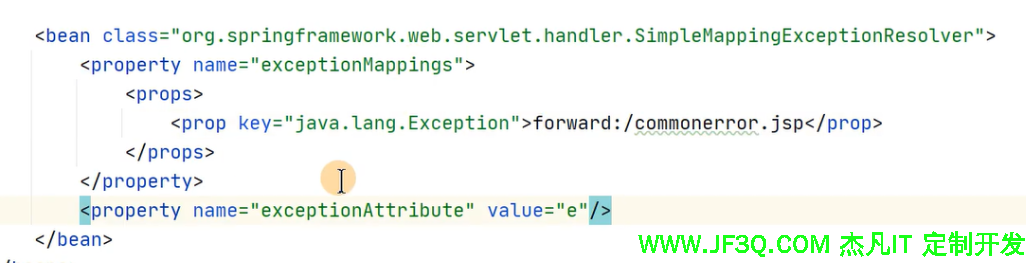
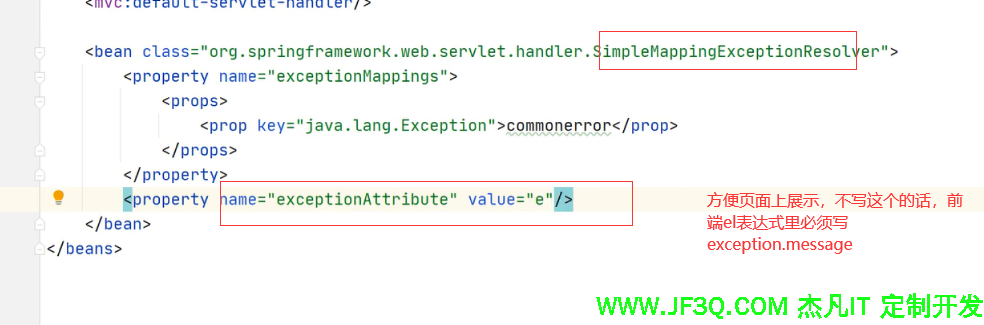
1.2全局异常处理
2.表单验证和表单提交
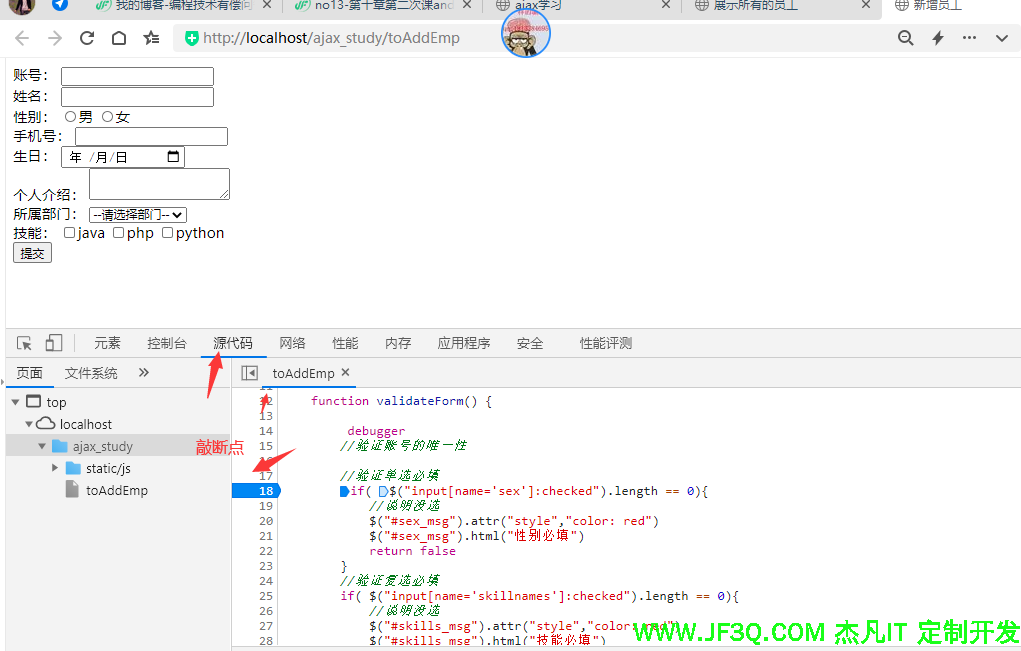
前端表单验证
<script>

    function validateForm() {

        //验证账号的唯一性

        //验证单选必填
        if( $("input[name='sex']:checked").length == 0){
            //说明没选
            $("#sex_msg").attr("style","color: red")
            $("#sex_msg").html("性别必填")
            return false
        }
        //验证复选必填
        if( $("input[name='skillnames']:checked").length == 0){
            //说明没选
            $("#skills_msg").attr("style","color: red")
            $("#skills_msg").html("技能必填")
            return false
        }


    }
    function validateAccount(account) {

        //前端debug调试 (前提:一定要打开f12)


        if(account.trim() == ''){
            $("#account_msg").attr("style","color: red")
            $("#account_msg").html("账号必填不能是空格")
            return false
        }

        //拿着用户输入的内容去发送ajax请求验证账号的唯一性
        $.ajax({
            url:"${pageContext.request.contextPath}/validateAccount",
            data:{"account":account},
            success:function (result) {
                console.log(result)
                if(result.code == 200){
                    $("#account_msg").attr("style","color: green")
                    $("#account_msg").html(result.message)
                }else {
                    $("#account_msg").attr("style","color: red")
                    $("#account_msg").html(result.message)
                }


            }
        })
    }
</script>
<body>

    <form action="${pageContext.request.contextPath}/saveEmp" method="post" onsubmit="return validateForm() ">


        账号:
        <input type="text" name="account" onblur="validateAccount($(this).val())" >
        <span id="account_msg" style="color: green"></span>
        <br>
        姓名:
        <input type="text" name="realname" required="required" ><br>
        性别:
        <input type="radio" name="sex" value="1" >男
        <input type="radio" name="sex" value="0" >女

        <span id="sex_msg" ></span>
        <br>
        手机号:
        <input type="text" name="phone" required="required" pattern="^1[35789]\d{9}$" >
        <br>

        生日:
        <input type="date" name="birthday" pattern="yyyy-MM-dd" required="required"/>
        <br>
        个人介绍:
        <textarea name="description" required="required"></textarea><br>
        所属部门:
        <select name="did" required="required">

            <option>--请选择部门--</option>

            <c:forEach items="${departments}" var="d">
                <option value="${d.id}">${d.dname}</option>
            </c:forEach>
        </select>
        <br>
        技能:

        <input type="checkbox" value="java" name="skillnames" >java
        <input type="checkbox" value="php" name="skillnames" >php
        <input type="checkbox" value="python" name="skillnames" >python

        <span id="skills_msg"></span>
        <br>
        <input type="submit" value="提交" onsubmit="return validateForm()">
</form>
后端部分java代码
@Controller
public class EmployeeController {

    @Autowired
    EmployeeService employeeService;
    @Autowired
    DepartmentService departmentService;

    @RequestMapping("/saveEmp")
    public String saveEmp(Employee employee,@RequestParam("skillnames") String[] skillnames){

        System.out.println(employee);
        System.out.println(skillnames);

        //保存employee

        //更新技能表skill


        return "redirect:/getEmps";


    }

    @RequestMapping("/validateAccount")
    @ResponseBody
    public ResultVo validateAccount(String account){

       Boolean flag= employeeService.validateAccount(account);
       if(flag){
           return new ResultVo().setCode(200).setMessage("账号可用");
       }else{
           return new ResultVo().setCode(300).setMessage("账号已存在");
       }


    }

    @RequestMapping("/toAddEmp")
    public String toAddEmp(Model model){
        List<Department> departments = departmentService.getDepartments();

        model.addAttribute("departments",departments);
        return "add_emp";
    }

    //查询所有的员工展示到页面上---带条件
    @RequestMapping("/getEmps")
    public String getEmps(Model model,Employee employee){
        List<Employee> emps = employeeService.getEmps(employee);
        model.addAttribute("emps",emps);
        model.addAttribute("employee",employee);
        return "emps";
    }

    //编辑修改(数据回显)
    @RequestMapping("/toUpdateEmp")
    public String toUpdateEmp(@RequestParam(required = true) Integer eid, Model model){
      Employee employee= employeeService.getByEmpId(eid);
        model.addAttribute("employee",employee);
       model.addAttribute("deps",departmentService.getDepartments());


       //把该员工的技能  java,php,python
        StringBuffer stringBuffer = new StringBuffer();

        List<Skill> skills = employee.getSkills();

        for(Skill s:skills){
            stringBuffer.append(s.getSname()+",");

        }


        System.out.println(stringBuffer);
        model.addAttribute("emp_skills",stringBuffer);


        return "update_emp";


    }


}
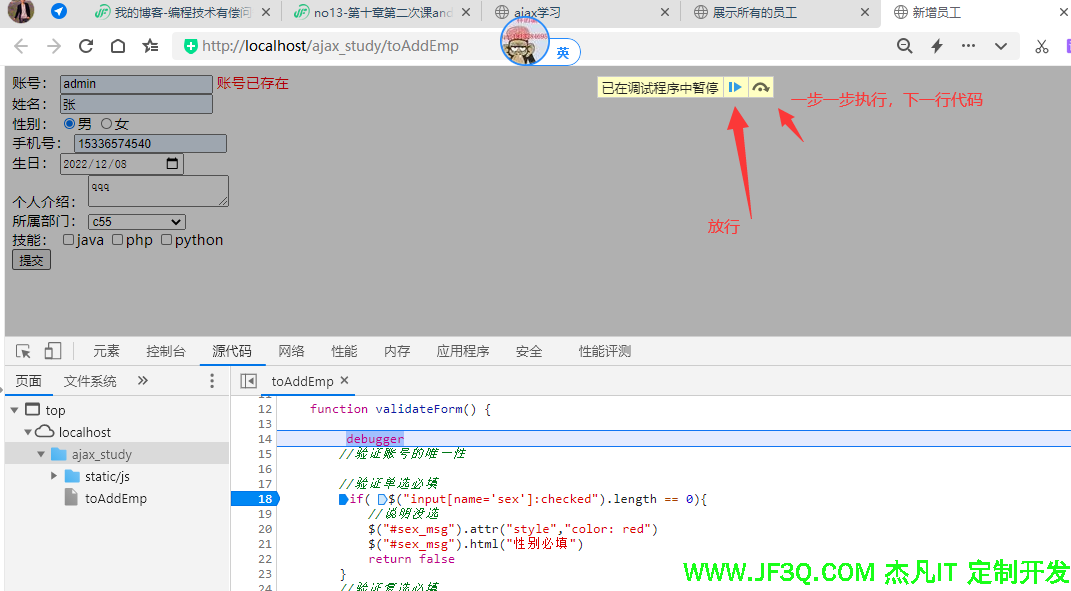
3.前端浏览器debug
前提是需要打开浏览器的调试面板(f12)
- 在需要调试的js代码处写debugger

- 直接在浏览器调试面板的源代码选项卡里敲断点
好博客就要一起分享哦!分享海报
此处可发布评论
评论(0)展开评论
暂无评论,快来写一下吧
展开评论
您可能感兴趣的博客
他的专栏
 新业务
新业务  springboot学习
  ssm框架课
  vue学习
vue学习  【带小白】java基础速成
 他感兴趣的技术
