no7-web开发-前后分离项目vue和elementUI和springboot框架

分类: Java springboot vue 专栏: springboot学习 标签: 前后分离项目
2023-03-21 16:58:26 1721浏览
准备工作
nvm安装node
nvm是node的包管理工具,常用的命令:
nvm ls
nvm install 12.18.3
nvm uninstall 12.18.3
nvm use 12.18.3
node -v
npm -v
配置淘宝镜像
npm config set registry https://registry.npm.taobao.org
查看是否配置成功
npm config get registry
安装vue-cli
安装最新版本: npm install -g @vue/cli
安装指定版本: npm install -g @vue/cli@4.4.1
测试是否安装成功:vue --version或者vue -V
创建vue项目
先确定安装了vue init
npm install -g @vue/cli-init@4.4.1
创建项目
vue init webpack testVue
项目结构介绍
├── build/               # Webpack 配置目录
├── dist/                # build 生成的生产环境下的项目
├── config/               # Vue基本配置文件,可以设置监听端口,打包输出等
├── node_modules/                # 依赖包,通常执行npm i会生成
├── src/                 # 源码目录(开发的项目文件都在此文件中写)
│   ├── assets/            # 放置需要经由 Webpack 处理的静态文件,通常为样式类文件,如css,sass以及一些外部的js
│   ├── components/        # 公共组件
│   ├── filters/           # 过滤器
│   ├── store/         # 状态管理
│   ├── routes/            # 路由,此处配置项目路由
│   ├── services/          # 服务(统一管理 XHR 请求)
│   ├── utils/             # 工具类
│   ├── views/             # 路由页面组件
│   ├── App.vue             # 根组件
│   ├── main.js             # 入口文件
├── index.html         # 主页,打开网页后最先访问的页面
├── static/              # 放置无需经由 Webpack 处理的静态文件,通常放置图片类资源
├── .babelrc             # Babel 转码配置
├── .editorconfig             # 代码格式
├── .eslintignore        # (配置)ESLint 检查中需忽略的文件(夹)
├── .eslintrc            # ESLint 配置
├── .gitignore           # (配置)在上传中需被 Git 忽略的文件(夹)
├── package.json         # 本项目的配置信息,启动方式
├── package-lock.json         # 记录当前状态下实际安装的各个npm package的具体来源和版本号
├── README.md         # 项目说明(很重要,便于其他人看懂)
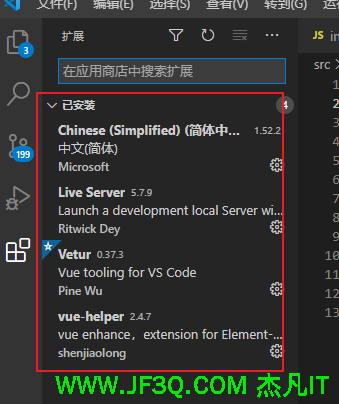
vscode开发vue项目
必备的插件
安装elementUI
npm i element-ui -S
安装axios
npm install axios
使用axios
import axios from 'axios'
mounted () {
  axios({
    method: 'get',
    url: 'list'
  }).then(resp => {
配置后台请求地址
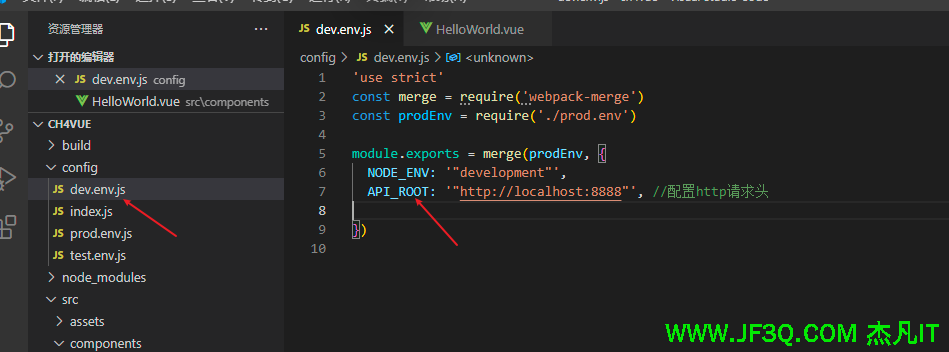
module.exports = merge(prodEnv, {
  NODE_ENV: '"development"',
  API_ROOT: '"http://localhost:8888"', //配置http请求头

})
process.env.API_ROOT
解决跨域问题
- 后端解决
//@CrossOrigin//解决跨域问题
public class BrandController {- 前端解决
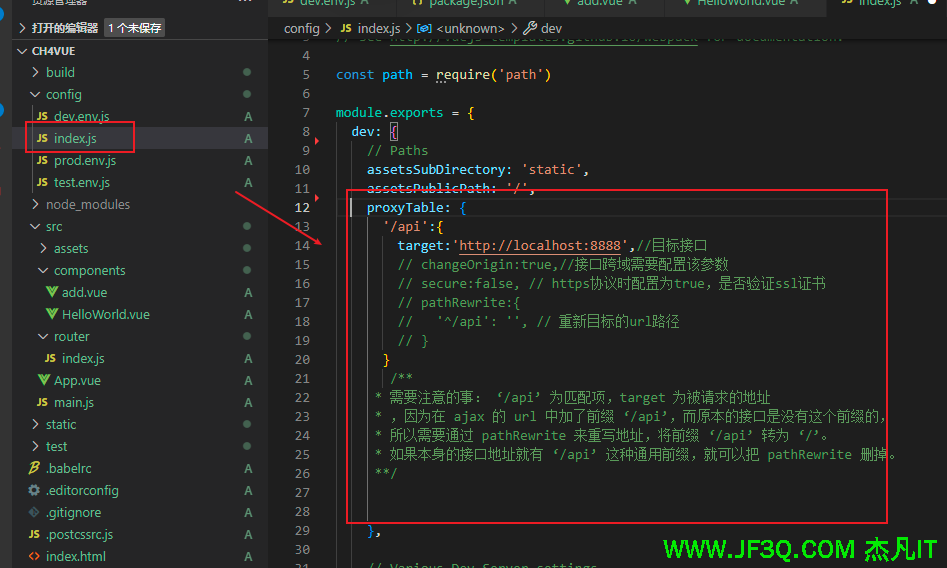
  proxyTable: {
      '/api':{
        target:'http://localhost:8888',//目标接口
        // changeOrigin:true,//接口跨域需要配置该参数
        // secure:false, // https协议时配置为true,是否验证ssl证书
        // pathRewrite:{
        //   '^/api': '', // 重新目标的url路径
        // }
      }
       /**
     * 需要注意的事: ‘/api’ 为匹配项,target 为被请求的地址
     * ,因为在 ajax 的 url 中加了前缀 ‘/api’,而原本的接口是没有这个前缀的,
     * 所以需要通过 pathRewrite 来重写地址,将前缀 ‘/api’ 转为 ‘/’。
     * 如果本身的接口地址就有 ‘/api’ 这种通用前缀,就可以把 pathRewrite 删掉。
     **/


    },
发请求的时候要注意前缀api
 axios({
      method: 'get',
      url: "/api/getAllBrands"
    }).then(resp => {
        console.log(resp)
    })
vue之间路由跳转
1.router-link跳转(不带参数)
<router-link to="/index/index">
    <button class="button">跳转到首页</button>
</router-link>


//转换成a标签
<a href="/index/index">
    <button class="button">跳转到首页</button>
</a>

//转换成JavaScript实现
<button class="button" @click="go_index">跳转到首页</button>
<script>
export default{
  methods:{
    go_index(){
      window.location.href="/index/index"
    }
  }
}
</script>
2.router-link跳转(带参数)
<router-link :to="{path:'/index', query: {id:1,name:2}}">
    <button class="button">跳转到首页</button>
</router-link>


//转换成a标签
<a href="/index?id=1&name=2">
    <button class="button">跳转到首页</button>
</a>

//转换成JavaScript实现
<button class="button" @click="go_index">跳转到首页</button>
<script>
export default{
  methods:{
    go_index(){
      window.location.href="/index?id=1&name=2"
    }
  }
}
</script>

//JavaScript的另一种实现
<button class="button" @click="go_index">跳转到首页</button>
<script>
export default{
  methods:{
    go_index(){
      this.$router.push({path:'/index', query: {id:1,name:2}})
    }
  }
}
</script>
好博客就要一起分享哦!分享海报
此处可发布评论
评论(2)展开评论

您可能感兴趣的博客

 新业务
新业务  springboot学习
  ssm框架课
  vue学习
vue学习  【带小白】java基础速成