no8-springboot原理第一次课-自动配置原理-启动流程-自定义启动器

分类: springboot 专栏: springboot学习 标签: 自定义启动器 启动流程原理
2023-03-23 21:06:49 1438浏览
自动配置原理
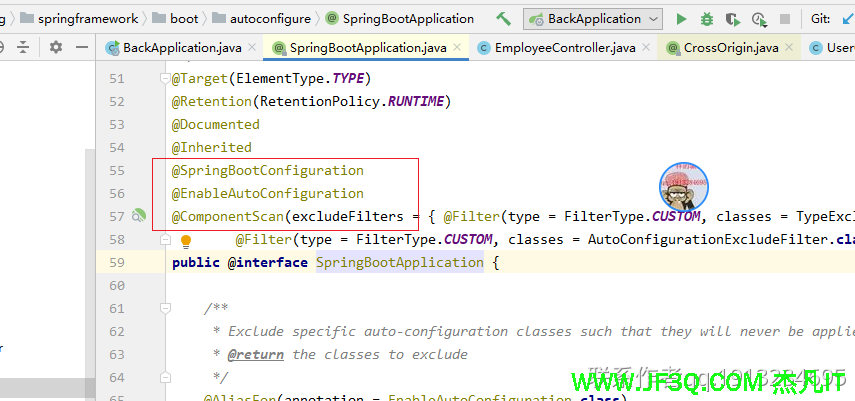
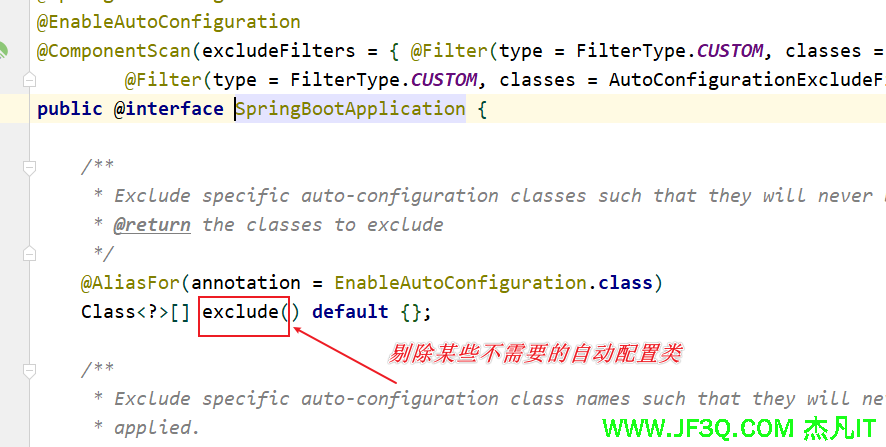
@SpringBootApplication
作用:启动类上加的注解,这个类的同级别或者子包下面的组件才会被扫描到
是一个复合注解,等价于@Configuration,@EnableAutoConfiguration,@ComponentScan三个注解
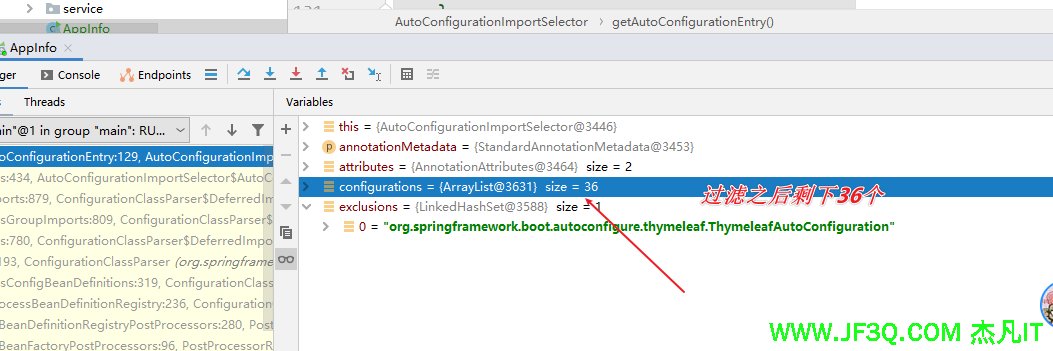
假设我把thymeleaf的自动配置类给剔除就会导致需要视图解析器的接口访问不到。

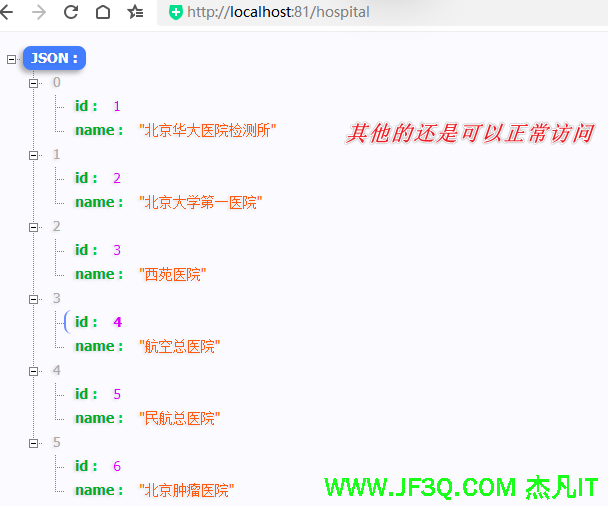
如果不剔除的话项目启动就会有这个自动配置类加载进去
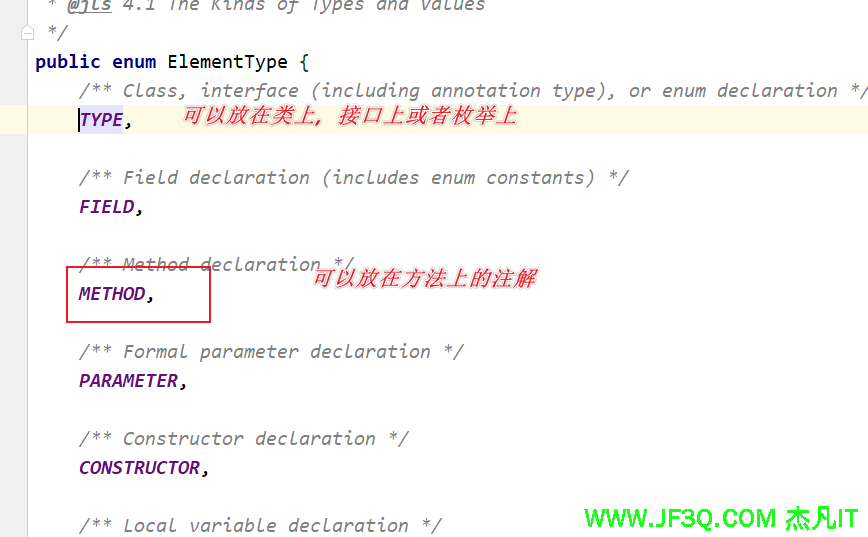
描述注解
@Target:这是一个描述注解
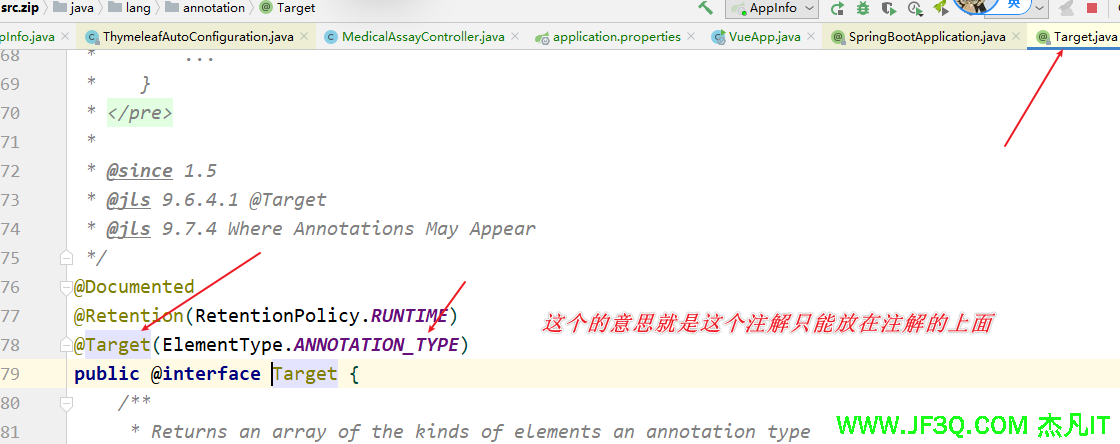
@Retention:说明注解的生命周期以及作用域。有些注解是可以改变你代码运行结果的,有些注解不能(比如重写。@Override)
RetentionPolicy.SOURCE:只是在代码中有,编译后的class文件里没有,所以不会造成任何影响
RetentionPolicy.RUNTIME:对代码有影响
@Documented:注解标准文档
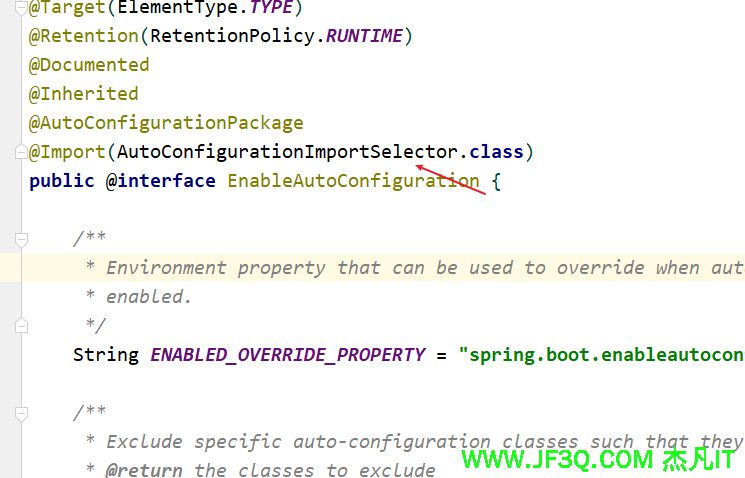
@SpringBootConfiguration:表示springboot启动类是一个配置类
@EnableAutoConfiguration:开关自动配置
@ComponentScan:扫包,默认是扫描当前其同类同级别的包以及子包
最核心的就是@EnableAutoConfiguration
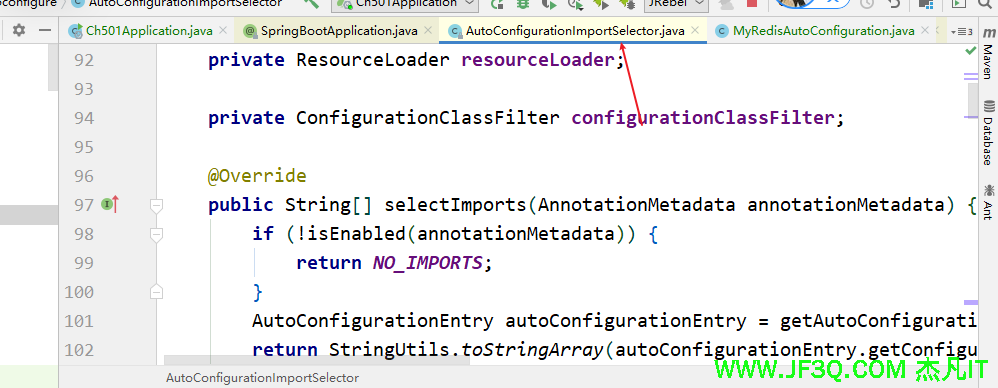
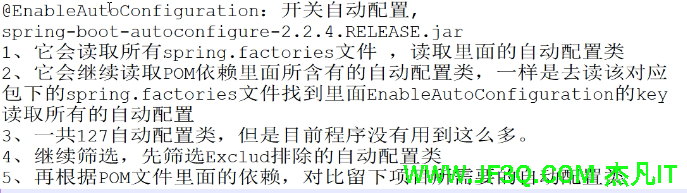
其中selectImports方法返回所有的配置类
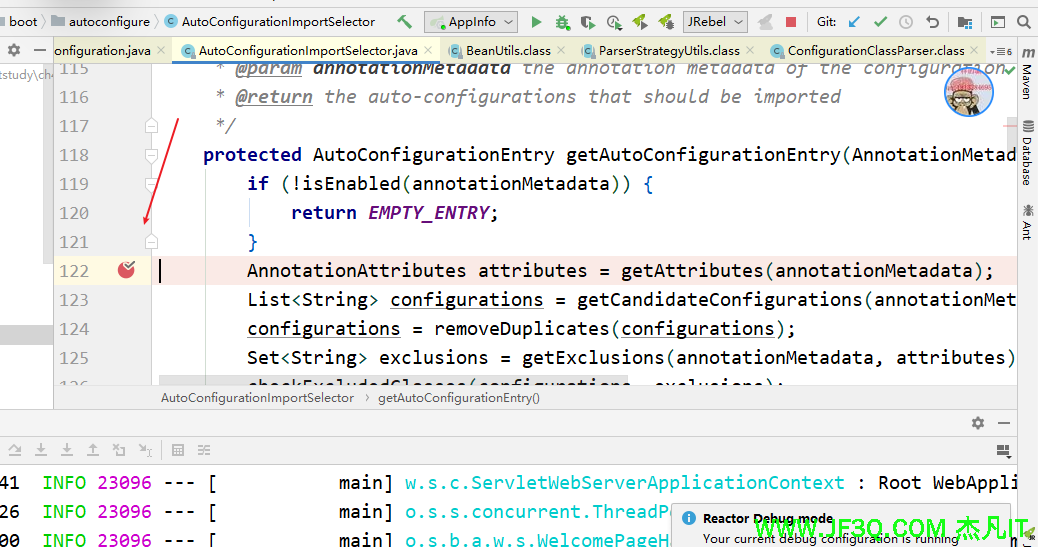
在getAutoConfigurationEntry方法中调用getCandidateConfigurations来读取候选配置类,
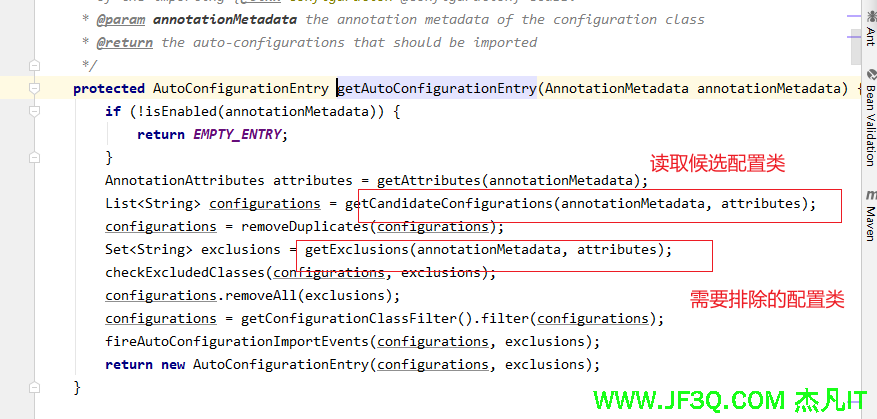
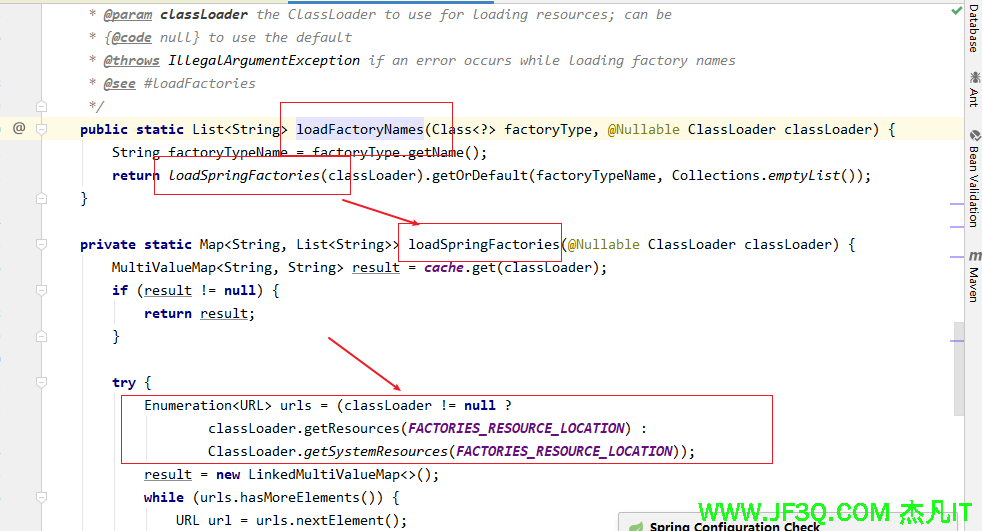
在getCandidateConfigurations方法中调用SpringFactoriesLoader的静态方法loadFactoryNames。

SpringFactoriesLoader.loadFactoryNames读取META-INF/spring.factories
把自定义的配置类,监听器等配置到META-INF/spring.factories中。
打断点分析一下
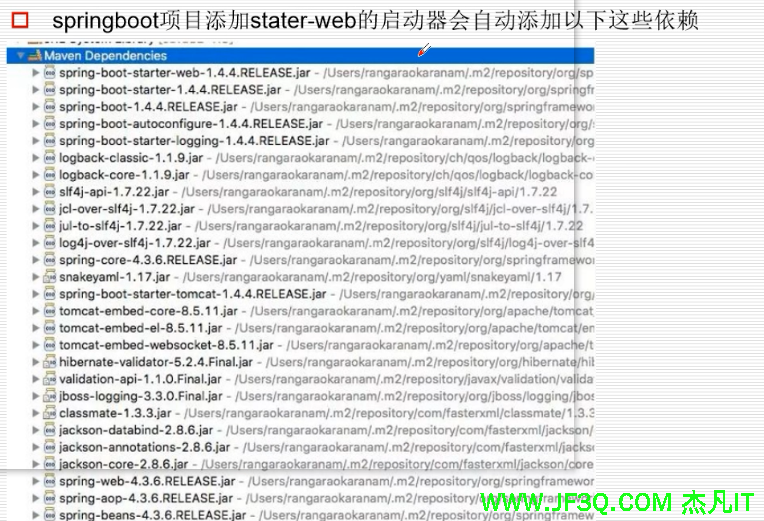
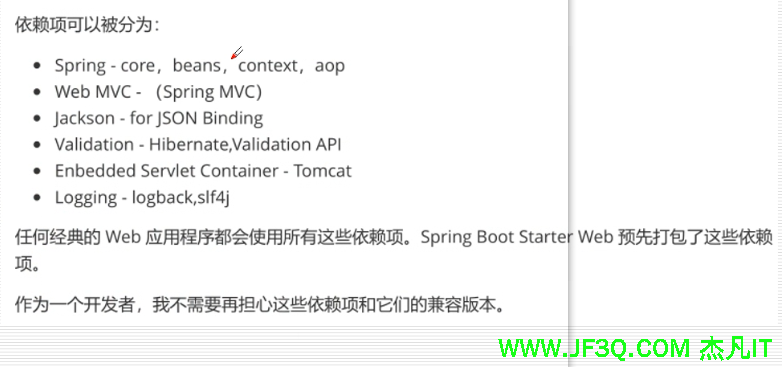
查看用到的自动配置类:
127:默认提供了127个自动配置类作为候选
27:会根据我们自己加的依赖,来判断目前项目中需要用到哪些自动配置类
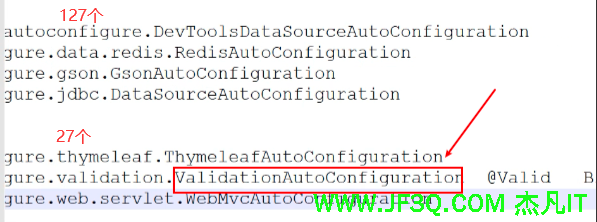
这个是后端数据检验的自动配置类
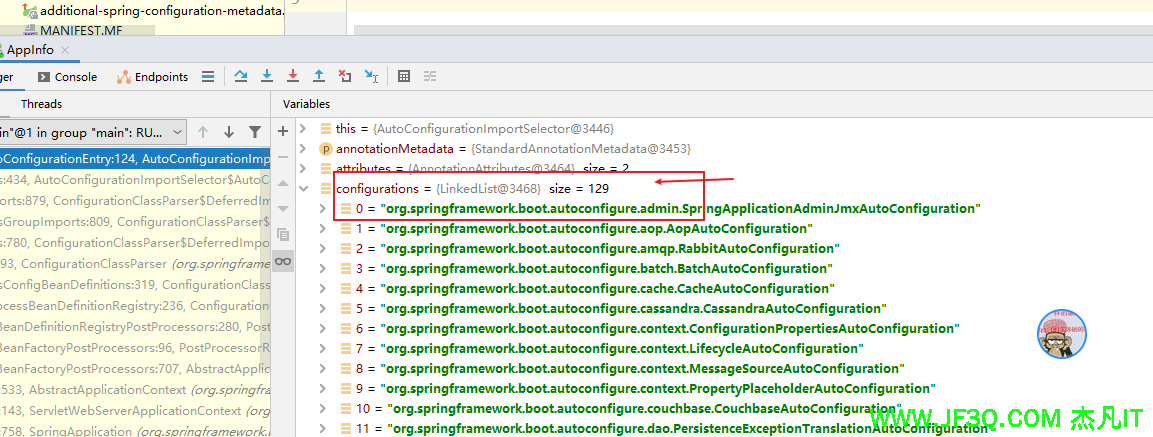
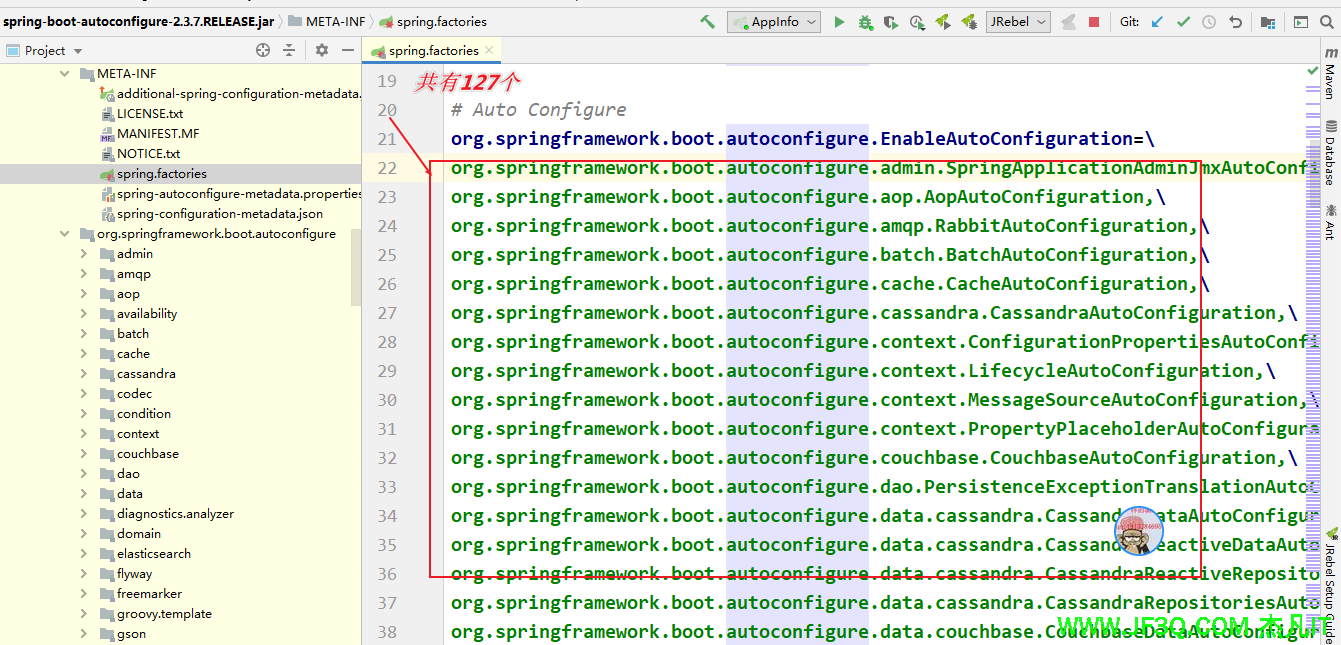
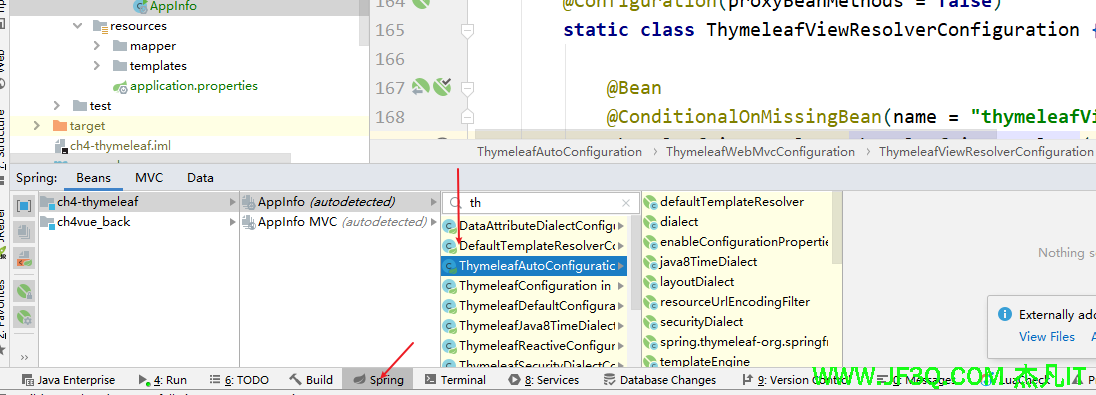
主要就是找spring.factories这个文件
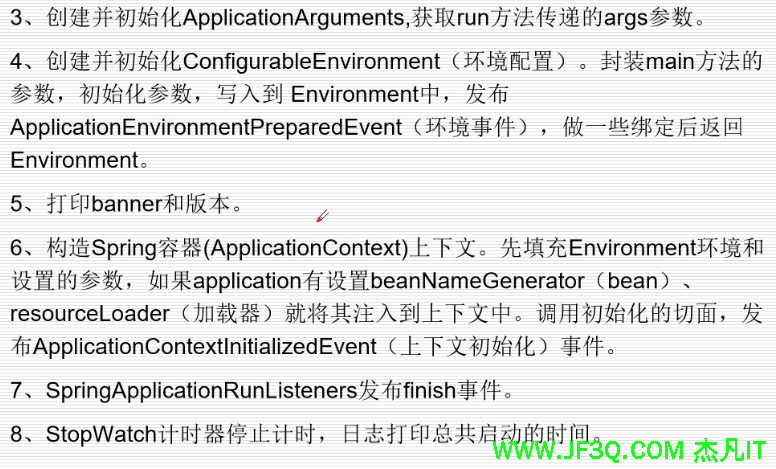
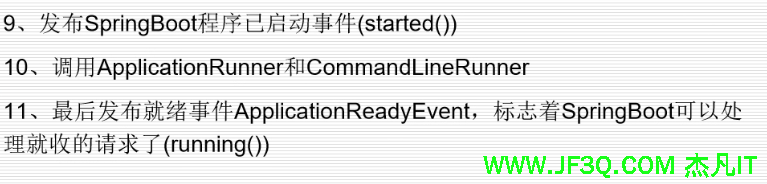
启动流程
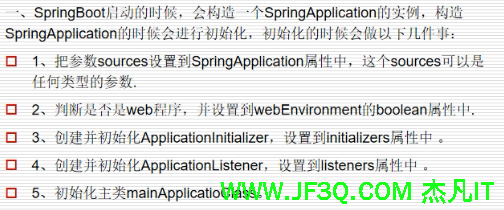
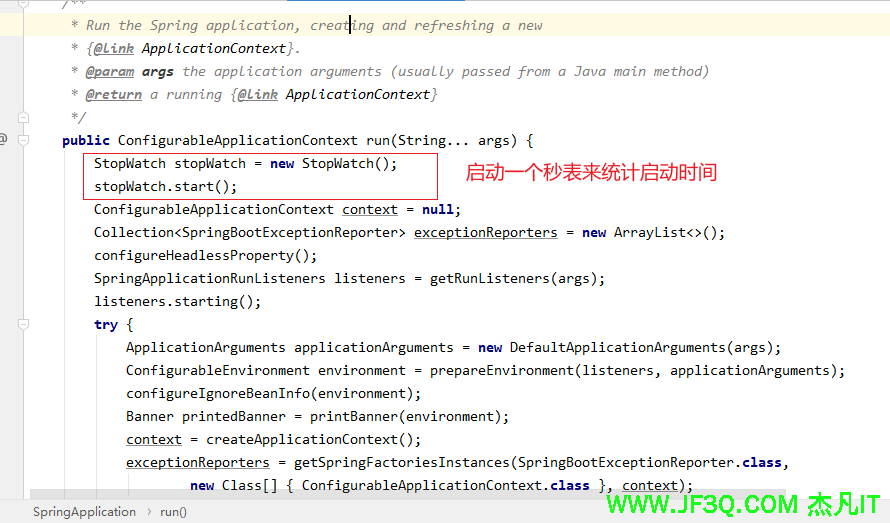
SpringApplication初始化方法
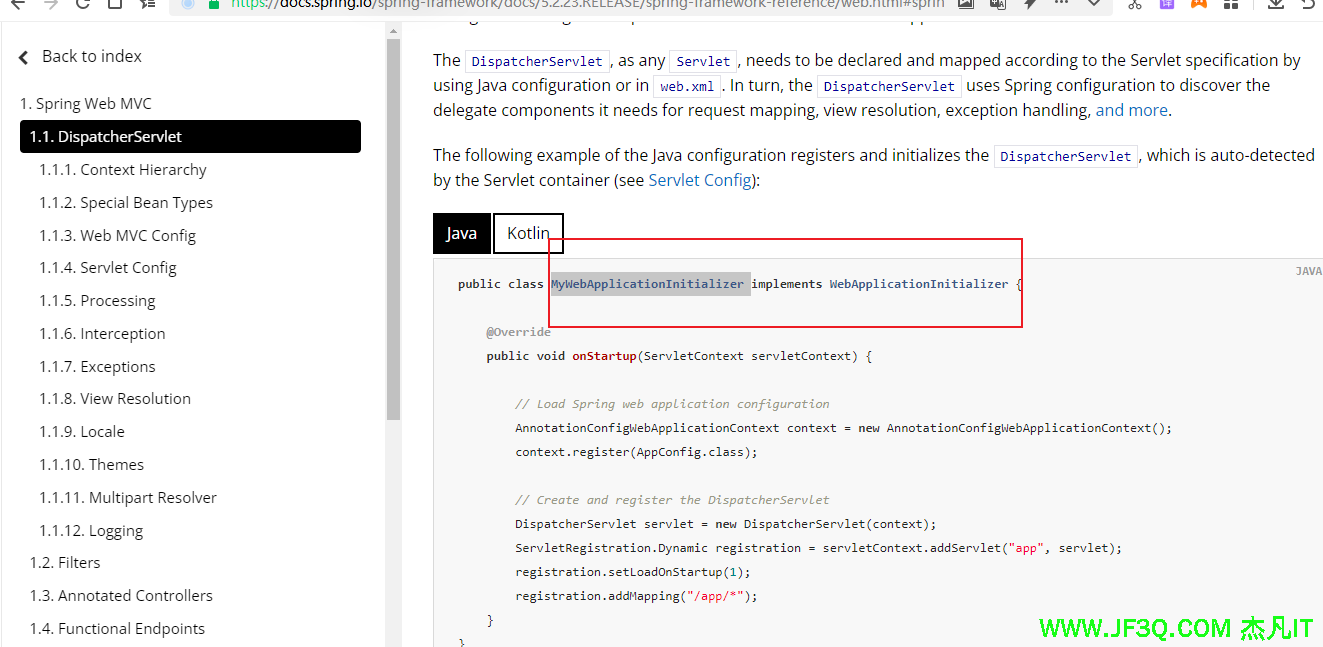
类比替代web.xml文件的那个类
springboot启动流程
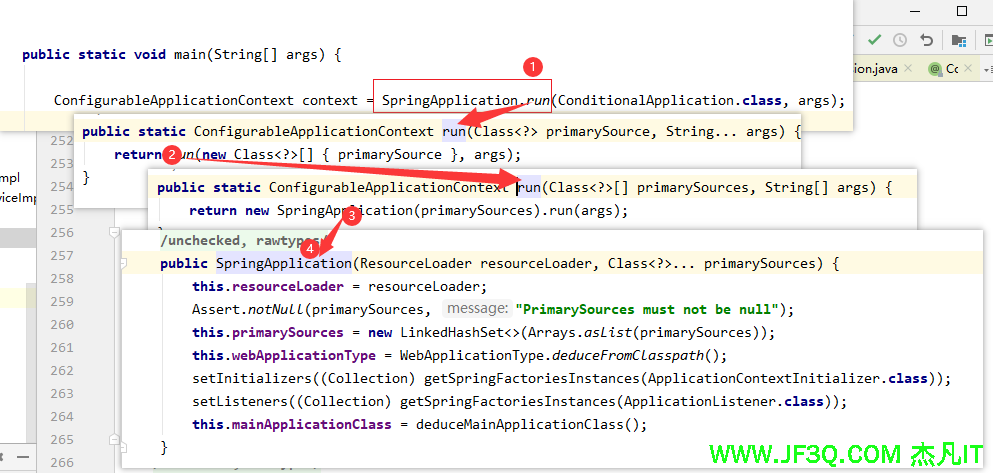
当SpringApplication创建完毕后,就开始执行run方法

我们可以在resources目录下新建一个banner.txt来修改默认的banner
自定义banner.txt
//							_ooOoo_								  //
//						   o8888888o							  //
//						   88" . "88							  //
//						   (| ^_^ |)							  //
//						   O\  =  /O							  //
//						____/`---'\____							  //
//					  .'  \\|     |//  `.						  //
//					 /  \\|||  :  |||//  \						  //
//				    /  _||||| -:- |||||-  \						  //
//				    |   | \\\  -  /// |   |						  //
//					| \_|  ''\---/''  |   |						  //
//					\  .-\__  `-`  ___/-. /						  //
//				  ___`. .'  /--.--\  `. . ___					  //
//				."" '<  `.___\_<|>_/___.'  >'"".				  //
//			  | | :  `- \`.;`\ _ /`;.`/ - ` : | |				  //
//			  \  \ `-.   \_ __\ /__ _/   .-` /  /                 //
//		========`-.____`-.___\_____/___.-`____.-'========		  //
//				             `=---='                              //
//		^^^^^^^^^^^^^^^^^^^^^^^^^^^^^^^^^^^^^^^^^^^^^^^^^^        //
//         佛祖保佑       永无BUG		永不修改				  //
提个问题:是先进run方法还是先进自动配置?
答:先进run
启动器starter
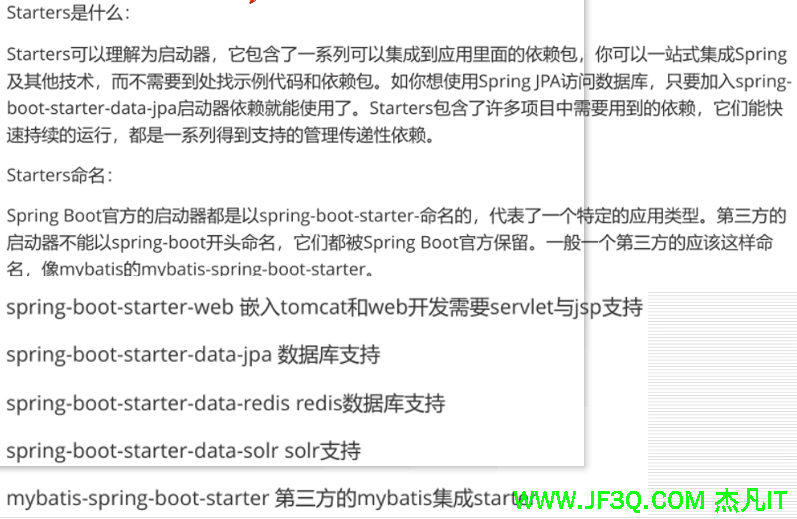
自定义starter
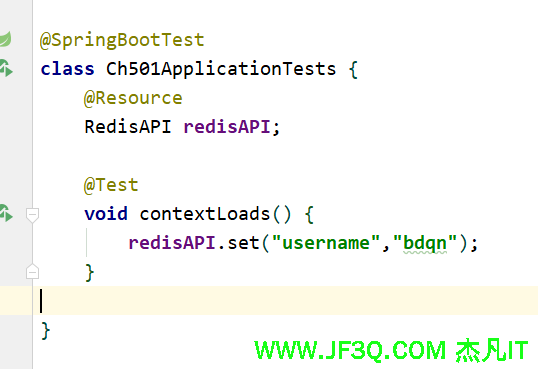
把之前爱旅行项目中jedis的方式往redis里存值改造成一个启动器
1.创建autoconfigure模块
- 修改pom文件
  <parent>
        <groupId>org.springframework.boot</groupId>
        <artifactId>spring-boot-starter-parent</artifactId>
        <version>2.3.7.RELEASE</version>
    </parent>

<dependencies>
        <!--导入自动配置的相关依赖-->
        <dependency>
            <groupId>org.springframework.boot</groupId>
            <artifactId>spring-boot-autoconfigure</artifactId>
        </dependency>

        <!--方便idea能检测到该依赖中用到的配置属性,能够自动补全,其实就是在编译的时候在
        META-INF下生成一个spring-configuration-metadata.json文件-->
        <dependency>
            <groupId>org.springframework.boot</groupId>
            <artifactId>spring-boot-configuration-processor</artifactId>
            <optional>true</optional>
        </dependency>

        <!--jedis依赖-->
        <dependency>
            <groupId>redis.clients</groupId>
            <artifactId>jedis</artifactId>
        </dependency>

        <dependency>
            <groupId>org.projectlombok</groupId>
            <artifactId>lombok</artifactId>
            <optional>true</optional>
        </dependency>

</dependencies>- 新建一个属性类
@Data
@ConfigurationProperties(prefix = "jfit.redis")
public class MyRedisProperties {
    private int database = 0;
    private String host="localhost";
    private int timeout=2000;//单位是秒,默认值为0,表示无限制
    private String password;
    private int port=6379;
}
- 新建一个自动配置类
@Configuration
@EnableConfigurationProperties(MyRedisProperties.class)
@ConditionalOnClass(JedisPool.class)
public class MyRedisAutoConfiguration {
    @Autowired
    MyRedisProperties redisProperties;

    @Bean
    public JedisPoolConfig setPoolConfig(){
        return new JedisPoolConfig();
    }

    @Bean
    public JedisPool setPool(){
        JedisPool jedisPool = new JedisPool(setPoolConfig(),
                redisProperties.getHost(),
                redisProperties.getPort(),
                redisProperties.getTimeout(),
                redisProperties.getPassword(),
                redisProperties.getDatabase());

        return  jedisPool;

    }

    //RedisAPI这是我专门定义的一个工具类
    @Bean
    public RedisAPI setProperties(){

        RedisAPI redisAPI = new RedisAPI();
        redisAPI.setJedisPool(setPool());

        return redisAPI;

    }
}
- resources下META-INF下新建一个spring.factories
# Auto Configure
org.springframework.boot.autoconfigure.EnableAutoConfiguration=\
org.redis.spring.boot.redisspringbootautoconfigure.MyRedisAutoConfiguration
2.创建starter模块
在pom文件中引用一下上面步骤安装好的依赖即可
 <dependencies>
        <dependency>
            <groupId>com.jf3q</groupId>
            <artifactId>redis-spring-boot-autoconfigure</artifactId>
            <version>0.0.1-SNAPSHOT</version>
        </dependency>
    </dependencies>
3.测试模块
在pom文件中把第二步安装好的依赖导入就可以使用了
注意:
- 在创建自动配置模块的时候,一直无法生成那个json文件。导致application.properties里不能自动提示
解决方案:我建自动配置模块的时候把springboot-test引入了导致无法生成json文件
- 加jedis依赖的时候不要写版本号,不然有可能出现版本不一致导致的错误,因为这个jedis其实在boot的版本里已经设置版本了(人家设置的这个版本是跟其他jar是兼容的)
好博客就要一起分享哦!分享海报
此处可发布评论
评论(2)展开评论


 新业务
新业务  springboot学习
  ssm框架课
  vue学习
vue学习  【带小白】java基础速成